Showing posts with label how to. Show all posts

Sunday, 3 November 2019

CSV Import Using AJAX Progress Bar in PHP

Part 1 - Upload CSV File using Ajax with PHP


Part 2 - Start Import CSV file data using Ajax


Part 3 - Start Import CSV file data using Ajax


This is another post on display PHP script process on progress bar using Ajax with jQuery. Here In this post we will show CSV file data import process on progress bar by using Ajax jquery with PHP script. Or in short Display CSV import process using Ajax progress bar.

Now you have one question arise in your mind why we want to display import process of CSV file data on progress bar. This is one very useful feature for impove your UI, because if there is large data in your CSV file for import into Mysql data, then at that time your PHP script will display time out error on web page. And it will very difficult import large amount of CSV file data into Mysql database.

For solve this problem, here we have make one php script, which will solve the problem of PHP timeout error at the time of import of large CSV file. Because here we will import CSV file data into Mysql table in step by step and display how many data are process for import we will display on progress bar using Ajax with jQuery. So, if User has import CSV file, then he can view CSV file data importing process on web page in the form of progress bar. This all process will be done without refresh of web page, because here we have use Ajax technology with jQuery. Here we have use Bootstrap library for make progress bar.

There are many tutorials are available online for display file upload procress on progress bar in php script using Ajax, but there is no any post find on How to show CSV file data import process on progress bar using Ajax jQuery in PHP script. So, we have publish this tutorial, in which we have covered how to display real time mysql data import process on progress bar using Ajax with PHP. For make real time progress bar in PHP using Ajax, we have divided this tutorial into following part.

  • Upload CSV File using Ajax with PHP
  • Start Import CSV file data using Ajax
  • Display Import CSV File Data on progress bar using Ajax


Upload CSV File using Ajax with PHP


Here we will first upload CSV file on server by using PHP with Ajax. We can also directly fetch data from CSV file without uploading also, but here we want to display real time import process on progress bar, so we will first upload CSV file on server by using Ajax. Source code of uploading of CSV file using Ajax with PHP script you can find below.

index.php


<!DOCTYPE html>
<html>
 <head>
  <title>Import CSV File Data with Progress Bar in PHP using Ajax</title>  
  <script src="https://ajax.googleapis.com/ajax/libs/jquery/3.1.0/jquery.min.js"></script>
  <link rel="stylesheet" href="https://maxcdn.bootstrapcdn.com/bootstrap/3.3.6/css/bootstrap.min.css" />
  <script src="https://maxcdn.bootstrapcdn.com/bootstrap/3.3.7/js/bootstrap.min.js"></script>
 </head>
 <body>
  
  <br />
  <br />
  <div class="container">
   <h1 align="center">Import CSV File Data with Progress Bar in PHP using Ajax - 3</h1>
   <br />
   <div class="panel panel-default">
    <div class="panel-heading">
     <h3 class="panel-title">Import CSV File Data</h3>
    </div>
      <div class="panel-body">
       <span id="message"></span>
       <form id="sample_form" method="POST" enctype="multipart/form-data" class="form-horizontal">
        <div class="form-group">
         <label class="col-md-4 control-label">Select CSV File</label>
         <input type="file" name="file" id="file" />
        </div>
        <div class="form-group" align="center">
         <input type="hidden" name="hidden_field" value="1" />
         <input type="submit" name="import" id="import" class="btn btn-info" value="Import" />
        </div>
       </form>
       <div class="form-group" id="process" style="display:none;">
        <div class="progress">
         <div class="progress-bar progress-bar-striped active" role="progressbar" aria-valuemin="0" aria-valuemax="100">
          <span id="process_data">0</span> - <span id="total_data">0</span>
         </div>
        </div>
       </div>
      </div>
     </div>
  </div>
 </body>
</html>

<script>
 
 $(document).ready(function(){

  var clear_timer;

  $('#sample_form').on('submit', function(event){
   $('#message').html('');
   event.preventDefault();
   $.ajax({
    url:"upload.php",
    method:"POST",
    data: new FormData(this),
    dataType:"json",
    contentType:false,
    cache:false,
    processData:false,
    beforeSend:function(){
     $('#import').attr('disabled','disabled');
     $('#import').val('Importing');
    },
    success:function(data)
    {
     if(data.success)
     {
      $('#total_data').text(data.total_line);

      $('#message').html('<div class="alert alert-success">CSV File Uploaded</div>');
     }
     if(data.error)
     {
      $('#message').html('<div class="alert alert-danger">'+data.error+'</div>');
      $('#import').attr('disabled',false);
      $('#import').val('Import');
     }
    }
   })
  });

 });
</script>


upload.php


<?php

//upload.php

if(isset($_POST['hidden_field']))
{
 $error = '';
 $total_line = '';
 session_start();
 if($_FILES['file']['name'] != '')
 {
  $allowed_extension = array('csv');
  $file_array = explode(".", $_FILES["file"]["name"]);
  $extension = end($file_array);
  if(in_array($extension, $allowed_extension))
  {
   $new_file_name = rand() . '.' . $extension;
   $_SESSION['csv_file_name'] = $new_file_name;
   move_uploaded_file($_FILES['file']['tmp_name'], 'file/'.$new_file_name);
   $file_content = file('file/'. $new_file_name, FILE_SKIP_EMPTY_LINES);
   $total_line = count($file_content);
  }
  else
  {
   $error = 'Only CSV file format is allowed';
  }
 }
 else
 {
  $error = 'Please Select File';
 }

 if($error != '')
 {
  $output = array(
   'error'  => $error
  );
 } 
 else
 {
  $output = array(
   'success'  => true,
   'total_line' => ($total_line - 1)
  );
 }

 echo json_encode($output);
}

?>


Start Import CSV file data using Ajax


Once CSV file has been store into folder, then after we want to start import CSV data into Mysql database. For start import csv file data, here we have use Ajax request, which will be triggered after successfully upload CSV file, and it will send Ajax request to PHP script for read data from CSV file and start importing into Mysql table.

index.php


<!DOCTYPE html>
<html>
 <head>
  <title>Import CSV File Data with Progress Bar in PHP using Ajax</title>  
  <script src="https://ajax.googleapis.com/ajax/libs/jquery/3.1.0/jquery.min.js"></script>
  <link rel="stylesheet" href="https://maxcdn.bootstrapcdn.com/bootstrap/3.3.6/css/bootstrap.min.css" />
  <script src="https://maxcdn.bootstrapcdn.com/bootstrap/3.3.7/js/bootstrap.min.js"></script>
 </head>
 <body>
  
  <br />
  <br />
  <div class="container">
   <h1 align="center">Import CSV File Data with Progress Bar in PHP using Ajax - 3</h1>
   <br />
   <div class="panel panel-default">
    <div class="panel-heading">
     <h3 class="panel-title">Import CSV File Data</h3>
    </div>
      <div class="panel-body">
       <span id="message"></span>
       <form id="sample_form" method="POST" enctype="multipart/form-data" class="form-horizontal">
        <div class="form-group">
         <label class="col-md-4 control-label">Select CSV File</label>
         <input type="file" name="file" id="file" />
        </div>
        <div class="form-group" align="center">
         <input type="hidden" name="hidden_field" value="1" />
         <input type="submit" name="import" id="import" class="btn btn-info" value="Import" />
        </div>
       </form>
       <div class="form-group" id="process" style="display:none;">
        <div class="progress">
         <div class="progress-bar progress-bar-striped active" role="progressbar" aria-valuemin="0" aria-valuemax="100">
          <span id="process_data">0</span> - <span id="total_data">0</span>
         </div>
        </div>
       </div>
      </div>
     </div>
  </div>
 </body>
</html>

<script>
 
 $(document).ready(function(){

  var clear_timer;

  $('#sample_form').on('submit', function(event){
   $('#message').html('');
   event.preventDefault();
   $.ajax({
    url:"upload.php",
    method:"POST",
    data: new FormData(this),
    dataType:"json",
    contentType:false,
    cache:false,
    processData:false,
    beforeSend:function(){
     $('#import').attr('disabled','disabled');
     $('#import').val('Importing');
    },
    success:function(data)
    {
     if(data.success)
     {
      $('#total_data').text(data.total_line);

      start_import();

      //$('#message').html('<div class="alert alert-success">CSV File Uploaded</div>');
     }
     if(data.error)
     {
      $('#message').html('<div class="alert alert-danger">'+data.error+'</div>');
      $('#import').attr('disabled',false);
      $('#import').val('Import');
     }
    }
   })
  });

  function start_import()
  {
   $('#process').css('display', 'block');
   $.ajax({
    url:"import.php",
    success:function()
    {

    }
   })
  }

 });
</script>


import.php


<?php

//import.php

header('Content-type: text/html; charset=utf-8');
header("Cache-Control: no-cache, must-revalidate");
header ("Pragma: no-cache");

set_time_limit(0);

ob_implicit_flush(1);

session_start();

if(isset($_SESSION['csv_file_name']))
{
 $connect = new PDO("mysql:host=localhost; dbname=testing", "root", "");

 $file_data = fopen('file/' . $_SESSION['csv_file_name'], 'r');

 fgetcsv($file_data);

 while($row = fgetcsv($file_data))
 {
  $data = array(
   ':first_name' => $row[0],
   ':last_name' => $row[1]
  );

  $query = "
  INSERT INTO tbl_sample (first_name, last_name) 
     VALUES (:first_name, :last_name)
  ";

  $statement = $connect->prepare($query);

  $statement->execute($data);

  sleep(1);

  if(ob_get_level() > 0)
  {
   ob_end_flush();
  }
 }

 unset($_SESSION['csv_file_name']);
}

?>


Display Import CSV File Data on progress bar using Ajax


Once CSV file is uploaded and start importing data from CSV file to Mysql Database, now in your mind question will arise how to display CSV data importing process on progress bar. For this also, we will send continously send Ajax request for fetech how many number of data are processed based on that number progress bar will display data import process. It will continously send request for fetch number of data are process until all data are imported into mysql table. For this here we have use jQuery setInterval() and clearInterval() callback function has been used.

index.php


<!DOCTYPE html>
<html>
 <head>
  <title>Import CSV File Data with Progress Bar in PHP using Ajax</title>  
  <script src="https://ajax.googleapis.com/ajax/libs/jquery/3.1.0/jquery.min.js"></script>
  <link rel="stylesheet" href="https://maxcdn.bootstrapcdn.com/bootstrap/3.3.6/css/bootstrap.min.css" />
  <script src="https://maxcdn.bootstrapcdn.com/bootstrap/3.3.7/js/bootstrap.min.js"></script>
 </head>
 <body>
  
  <br />
  <br />
  <div class="container">
   <h1 align="center">Import CSV File Data with Progress Bar in PHP using Ajax - 3</h1>
   <br />
   <div class="panel panel-default">
    <div class="panel-heading">
     <h3 class="panel-title">Import CSV File Data</h3>
    </div>
      <div class="panel-body">
       <span id="message"></span>
       <form id="sample_form" method="POST" enctype="multipart/form-data" class="form-horizontal">
        <div class="form-group">
         <label class="col-md-4 control-label">Select CSV File</label>
         <input type="file" name="file" id="file" />
        </div>
        <div class="form-group" align="center">
         <input type="hidden" name="hidden_field" value="1" />
         <input type="submit" name="import" id="import" class="btn btn-info" value="Import" />
        </div>
       </form>
       <div class="form-group" id="process" style="display:none;">
        <div class="progress">
         <div class="progress-bar progress-bar-striped active" role="progressbar" aria-valuemin="0" aria-valuemax="100">
          <span id="process_data">0</span> - <span id="total_data">0</span>
         </div>
        </div>
       </div>
      </div>
     </div>
  </div>
 </body>
</html>

<script>
 
 $(document).ready(function(){

  var clear_timer;

  $('#sample_form').on('submit', function(event){
   $('#message').html('');
   event.preventDefault();
   $.ajax({
    url:"upload.php",
    method:"POST",
    data: new FormData(this),
    dataType:"json",
    contentType:false,
    cache:false,
    processData:false,
    beforeSend:function(){
     $('#import').attr('disabled','disabled');
     $('#import').val('Importing');
    },
    success:function(data)
    {
     if(data.success)
     {
      $('#total_data').text(data.total_line);

      start_import();

      clear_timer = setInterval(get_import_data, 2000);

      //$('#message').html('<div class="alert alert-success">CSV File Uploaded</div>');
     }
     if(data.error)
     {
      $('#message').html('<div class="alert alert-danger">'+data.error+'</div>');
      $('#import').attr('disabled',false);
      $('#import').val('Import');
     }
    }
   })
  });

  function start_import()
  {
   $('#process').css('display', 'block');
   $.ajax({
    url:"import.php",
    success:function()
    {

    }
   })
  }

  function get_import_data()
  {
   $.ajax({
    url:"process.php",
    success:function(data)
    {
     var total_data = $('#total_data').text();
     var width = Math.round((data/total_data)*100);
     $('#process_data').text(data);
     $('.progress-bar').css('width', width + '%');
     if(width >= 100)
     {
      clearInterval(clear_timer);
      $('#process').css('display', 'none');
      $('#file').val('');
      $('#message').html('<div class="alert alert-success">Data Successfully Imported</div>');
      $('#import').attr('disabled',false);
      $('#import').val('Import');
     }
    }
   })
  }

 });
</script>


process.php


<?php

//process.php

$connect = new PDO("mysql:host=localhost; dbname=testing", "root", "");

$query = "SELECT * FROM tbl_sample";

$statement = $connect->prepare($query);

$statement->execute();

echo $statement->rowCount();

?>


This tutorial is make for learning purpose, you have make required changes as per your requirement. Above you have complete step by step process for CSV file data importing process on progress bar using PHP script with Ajax jQuery Bootstrap and Mysql database. If you want to get complete source code of this PHP Ajax jQuery tutorial, you can download source code in zip file by click on below link.


Thursday, 10 October 2019

How to Implement Login using Facebook Account in PHP


This is one more post on How to make Social Login in PHP. In this post, we will use Facebook account login allow to user for get access into our website. Here you can find process for login with Facebook PHP SDK library. In this tutorial, we have use latest Facebook API SDK library for login with PHP script.

In most of website, you can generally find registration form for sign up for get access into website, but most of the user is not interested in filling large website registration form. At this time if you have allow user to login or register with Facebook login, then user has not required to filling large registration form and they can easily get access into website by login using Facebook account. In this blog, we will learn you how to implement login with Facebook account in your PHP website.

Here we have use Facebook PHP SDK library that allows to access Facebook API from your PHP web application. By using this library you can simply integrate the PHP Login with Facebook Account using Facebook SDK library. Here you can find process for how to make User login and registration system with Facebook using PHP and display user profile data on web page.


Now we have get started with the latest version of Facebook SDK v5.x and your system must required following configuration.

  • PHP version must be greater than 5.4.
  • mbstring extension must be enable in your server.

Create Facebook APP


For get access Facebook API, first you need to create Facebook app and then get App ID and App Secret which you can use at the time of calling Facebook API. Below you can find step by step process for create Facebook app in Facebook developers dashboard.

1. First go to https://developers.facebook.com/ facebook developers page and login with your Facebook Account.

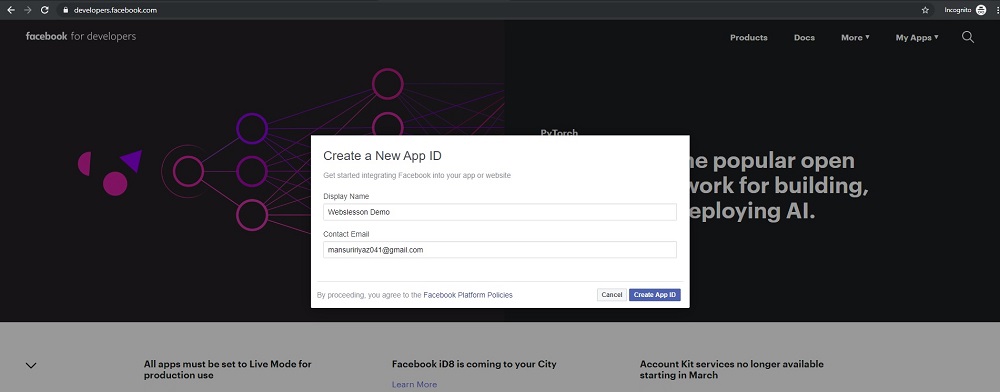
2. After login into Facebook account, now click on My apps menu and in this click on Create App link.


3. After click on Create App link, then modal has pop up on web page, here you have to define App Display Name details and click on Create App ID button.


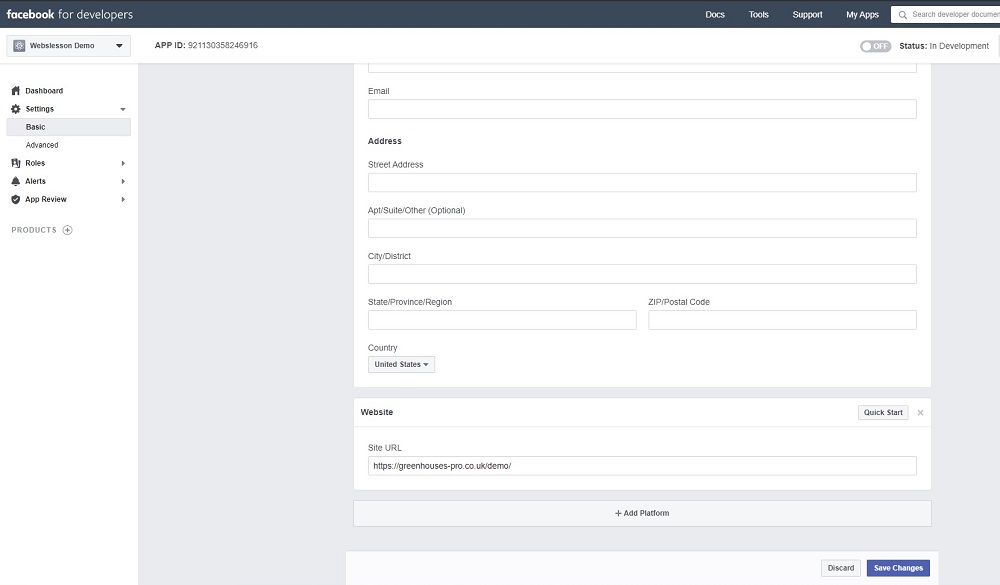
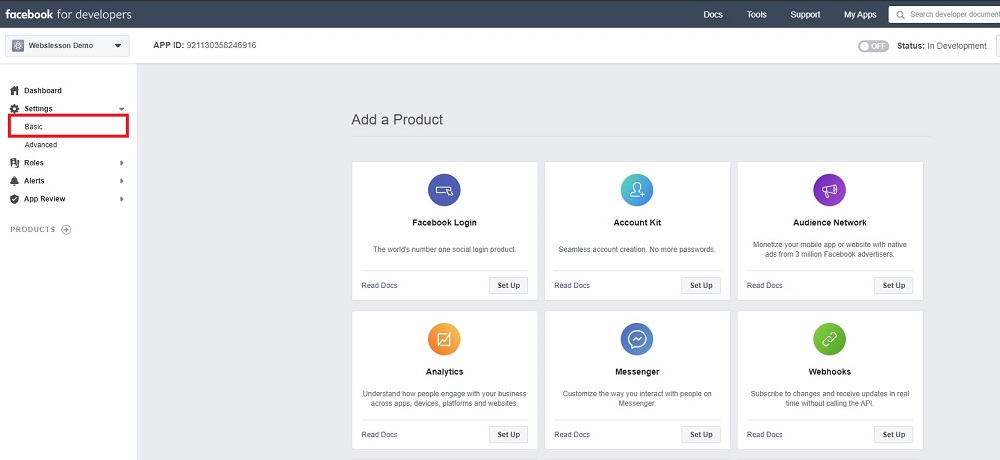
4. Now navigate to Setting » Basic link.


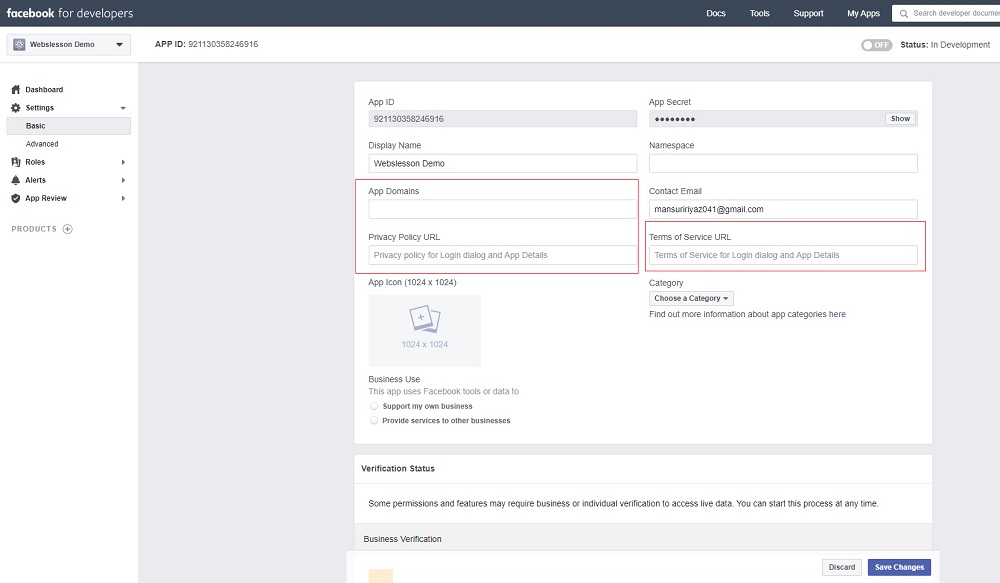
5. Here you have to specify App Domains, Privacy Policy URL, Terms of Service URL and select Category. Lastly, you have to click on Save Changes button.


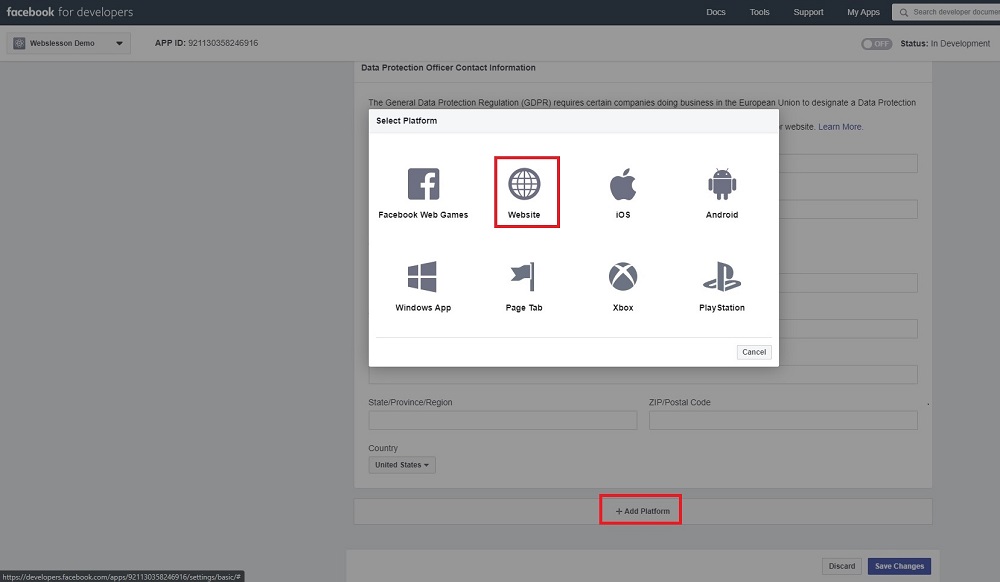
6. Now you have to navigate to Add a Product page by click on plus button. So, modal will pop up and here you have to select Website.


7. After select Website option, then Website field has been appear on web page, and here you have to define your app Site URL.


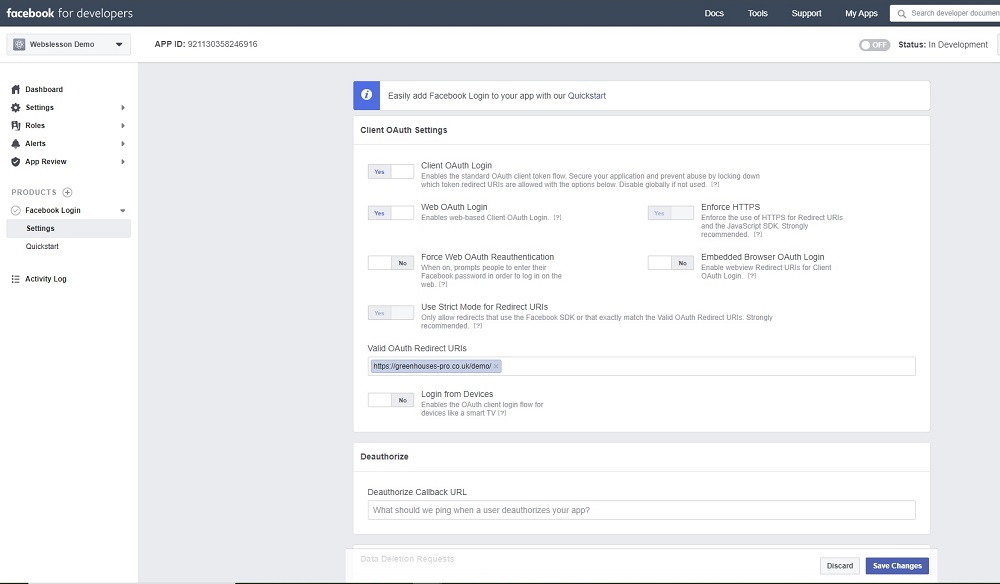
8. Now you have to add product, so go to Dashboard link and on you have to Set up Facebook Login product.

9. Once you have Set up Facebook Login product, then new web page has been load, here you have to define Valid OAuth Redirect URIs and click on Save Changes button.


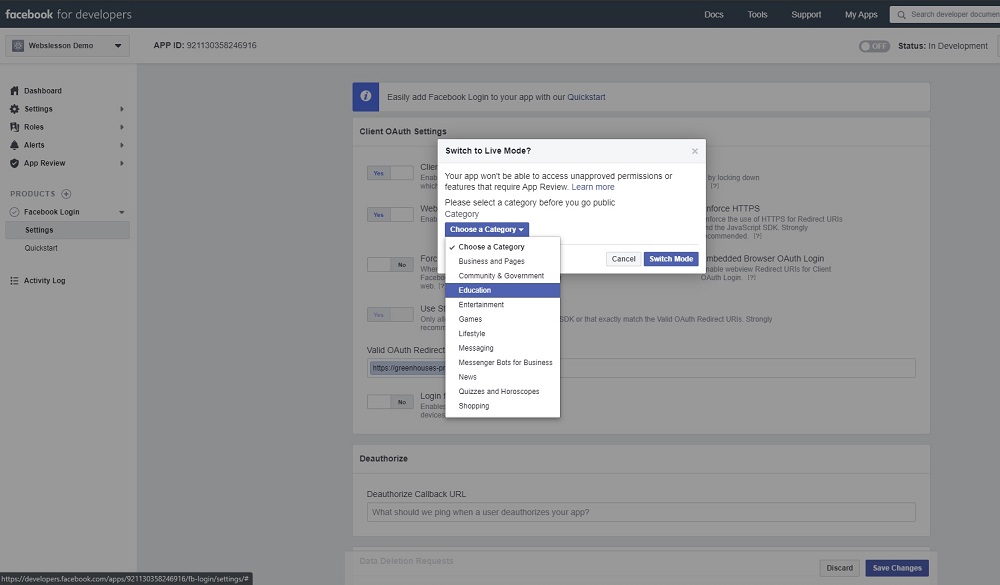
10. You have change your status from In Development mode to Live mode, for this you have to click on Off button, after click on Off button, then modal will pop up and here you have to select Category and click on Switch Mode button. After click on Switch Mode button, your App will be Live this is required for get profile data from Facebook API.


Download Facebook SDK for PHP


After this we want to download Facebook SDK for PHP library. For this we have to open Command Prompt editor. In this first you have to go to directory in which you want to download Facebook SDK for PHP. After this you have to run Composer command, this is because we have use Composer dependecy manager for download Facebook SDK for PHP. After this you have to run following command.


composer require facebook/graph-sdk


This command will download Facebook SDK library for PHP in define directory.

config.php


In this file first we need to add autoload.php file of Facebook SDK library for PHP using require_once statement.

After this, we have to check, session variable started or not by using PHP session_id() function.

Now we have to called Facebook API, here we have to define app_id and app_secret key which we have to get at the time of create Facebook App. Here we have to define default_graph_version also.


<?php

require_once 'vendor/autoload.php';

if (!session_id())
{
    session_start();
}

// Call Facebook API

$facebook = new \Facebook\Facebook([
  'app_id'      => '921130358246916',
  'app_secret'     => '8d382dc63a190925664594ef090b8a78',
  'default_graph_version'  => 'v2.10'
]);

?>


index.php


In this file first we need to add config.php file by using include statement.

After this we want to get redirect login helper, for this here we have use getRedirectLoginHelper() method.

Now we want to check any $_GET['code'] variable value has been received or not, if received that means user has login using Facebook account and display profile data on web page, otherwise display link for Login using Facebook account.

Suppose it has received $_GET['code'] variable value, then we want to check access token has been store in $_SESSION variable or not if it is already store in $_SESSION variable, then that value has been store in local variable.

But suppose access token is not get from $_SESSION variable, then we need to get by using getAccessToken() method and store in local variable and then after store in $_SESSION variable.

After getting access token now we want to set the default access token to use with request by using setDefaultAccessToken() method.

Now we have proceed for get profile data, for this here we have use get() method and under this method we have to define profile fields like name, email etc and in second argument we have to define access token value.

Lastly, for get user profile data, here we have use getGraphUser(), this method will creating a graph user collection.

This way we can get data from Facebook API and store in $_SESSION variable.

For create link for login using Facebook account, for this here we have use getLoginUrl() method, this method will send the user in order to login to Facebook. In this method you have to define redirect url and permission array.

So, below you can source code for get login with Facebook account using PHP and display profile data on web page.


<?php

//index.php

include('config.php');

$facebook_output = '';

$facebook_helper = $facebook->getRedirectLoginHelper();

if(isset($_GET['code']))
{
 if(isset($_SESSION['access_token']))
 {
  $access_token = $_SESSION['access_token'];
 }
 else
 {
  $access_token = $facebook_helper->getAccessToken();

  $_SESSION['access_token'] = $access_token;

  $facebook->setDefaultAccessToken($_SESSION['access_token']);
 }

 $_SESSION['user_id'] = '';
 $_SESSION['user_name'] = '';
 $_SESSION['user_email_address'] = '';
 $_SESSION['user_image'] = '';

 $graph_response = $facebook->get("/me?fields=name,email", $access_token);

 $facebook_user_info = $graph_response->getGraphUser();

 if(!empty($facebook_user_info['id']))
 {
  $_SESSION['user_image'] = 'http://graph.facebook.com/'.$facebook_user_info['id'].'/picture';
 }

 if(!empty($facebook_user_info['name']))
 {
  $_SESSION['user_name'] = $facebook_user_info['name'];
 }

 if(!empty($facebook_user_info['email']))
 {
  $_SESSION['user_email_address'] = $facebook_user_info['email'];
 }
 
}
else
{
 // Get login url
    $facebook_permissions = ['email']; // Optional permissions

    $facebook_login_url = $facebook_helper->getLoginUrl('https://greenhouses-pro.co.uk/demo/', $facebook_permissions);
    
    // Render Facebook login button
    $facebook_login_url = '<div align="center"><a href="'.$facebook_login_url.'"><img src="php-login-with-facebook.gif" /></a></div>';
}


?>
<html>
 <head>
  <meta http-equiv="Content-Type" content="text/html; charset=utf-8" />
  <title>PHP Login using Google Account</title>
  <meta content='width=device-width, initial-scale=1, maximum-scale=1' name='viewport'/>
  <script src="https://ajax.googleapis.com/ajax/libs/jquery/2.1.3/jquery.min.js"></script>
  <script src="https://maxcdn.bootstrapcdn.com/bootstrap/3.3.6/js/bootstrap.min.js"></script>
  <link href="https://maxcdn.bootstrapcdn.com/bootstrap/3.3.6/css/bootstrap.min.css" rel="stylesheet" />
  
 </head>
 <body>
  <div class="container">
   <br />
   <h2 align="center">PHP Login using Google Account</h2>
   <br />
   <div class="panel panel-default">
    <?php 
    if(isset($facebook_login_url))
    {
     echo $facebook_login_url;
    }
    else
    {
     echo '<div class="panel-heading">Welcome User</div><div class="panel-body">';
     echo '<img src="'.$_SESSION["user_image"].'" class="img-responsive img-circle img-thumbnail" />';
     echo '<h3><b>Name :</b> '.$_SESSION['user_name'].'</h3>';
     echo '<h3><b>Email :</b> '.$_SESSION['user_email_address'].'</h3>';
     echo '<h3><a href="logout.php">Logout</h3></div>';
    }
    ?>
   </div>
  </div>
 </body>
</html>


logout.php


<?php

//logout.php

session_destroy();

header('location:index.php');

?>


So, from this post you can learn how to allow user to login using Facebook account in PHP website, We hope you have learn login with Facebook in PHP web application from this post.

Friday, 15 February 2019

Make and Download Zip File using Codeigniter


In this post, We will discuss how can we generate zip file of multiple file, after this save in folder, lastly download generated zip file by using Codeigniter framework. Codeigniter is one of the best PHP framework, which will boost you web development process and there many web developer has been used this framework for their web application development, because it is widely popular PHP framework. It has provide many built in helper and library which will help you to develop your web application very fast. This framework will helps to do many task very easily. So, here also we have one task like how to make zip file in Codeigniter framework.

Codeigniter Zip Encoding Class


If you have use Codeigniter framework, then it is very easy for you to create Zip file. Because Codeigniter has it's own built in Zip library. This class will used for generate Zip archives, and that Zip archives we can download in our local computer also. Now how to initialze this zip class. For this we have to write following code.


$this->load->library('zip');


By using above code will can initialize Codeigniter Zip class, after this we can use different method of this class by calling $this->zip object. Now here we want to generate zip file of selected images from list of images. For this here we will use following method of this zip library.

read_file() - This method will read the content of a file and it will add into Zip.

add_data() - This method will add data to Zip file. In this define path of the file and data of this file.

archive() - This method will write file to the specified directory, in this method we have to define file name with complete path.

download() - This method will download created Zip file in our local computer, in this method we have to define zip file name.

Above all method of Codeigniter Zip class will help us to generate Zip file, save in folder and download in our local computer. Below you can find complete source code of this tutorial.


Make and Download Zip File using Codeigniter


Source Code


Zip_file.php(Controllers)


<?php
defined('BASEPATH') OR exit('No direct script access allowed');

class Zip_file extends CI_Controller {
 
 function index()
 {
  $directory = 'download';
  $data["images"] = glob($directory . "/*.jpg");
  $this->load->view('zip_file', $data);
 }

 function download()
 {
  if($this->input->post('images'))
  {
   $this->load->library('zip');
   $images = $this->input->post('images');
   foreach($images as $image)
   {
    $this->zip->read_file($image);
   }
   $this->zip->download(''.time().'.zip');
  }
 }

}

?>


zip_file.php


<html>
<head>
    <title>How to Create ZIP File in CodeIgniter</title>
    
 <script src="https://ajax.googleapis.com/ajax/libs/jquery/2.2.0/jquery.min.js"></script>
 <link rel="stylesheet" href="https://maxcdn.bootstrapcdn.com/bootstrap/3.3.6/css/bootstrap.min.css" />
 <script src="https://maxcdn.bootstrapcdn.com/bootstrap/3.3.6/js/bootstrap.min.js"></script>
    
</head>
<body>
 <div class="container box">
  <h3 align="center">How to Create ZIP File in CodeIgniter</h3>
  <br />
  <form method="post" action="<?php echo base_url(); ?>zip_file/download">
  <?php
  foreach($images as $image)
  {
   echo '
   <div class="col-md-2" align="center" style="margin-bottom:24px;">
    <img src="'.base_url().''.$image.'" class="img-thumbnail img-responsive" />
     <br />
    <input type="checkbox" name="images[]" class="select" value="'.$image.'" />
   </div>
   ';
  }
  ?>
  <br />
  <div align="center">
   <input type="submit" name="download" class="btn btn-primary" value="Download" />
  </div>
  </form>
 </div>
</body>
</html>

<script>
$(document).ready(function(){
 $('.select').click(function(){
  if(this.checked)
  {
   $(this).parent().css('border', '5px solid #ff0000');
  }
  else
  {
   $(this).parent().css('border', 'none');
  }
 });
});
</script>


Friday, 21 December 2018

How to Load Dynamic Data in jQuery UI Tooltip using Ajax with PHP


If you are using jQuery as front-end for you web development, then this post will helpful. Because in this post we have covered topic like How to Load Ajax content in jQuery UI Tooltip plugin by using PHP script. Do you know what is tooltip, in a web development tooltip is a simple message that will fade in on web page when mouse cursor is move over any element like icon, image, hyperlink or simple text on webpage. But here we will load dynamic data into jQuery Tooltip by using PHP script with Ajax. By using Ajax, it will called request for fetch data from Mysql database, and convert into HTML format and load into tooltip plugin. That means all details will be appear on web page in tooltip while cursor move on particular element on web page.

By using Tooltip plugin, it will increase the UI of your web application. For make dynamic tooltip here we have use jQuery UI library tooltip plugin. By using tooltip, we can display hint or information of graphical UI. It is mainly initialize when cursor move hover on any element on web page. There many different ways we can use tooltips in web development, e.g. we can use tooltip for display for validation message on web page. There are different other way we can use tooltip. Tooltip is also benifit for form elements to display additional information for any HTML element in form.

Here we have take simple example of display student additional details in tooltip. When mouse move on any student name, in tooltip we have load that student image and other details like name phone number etc. For do this things we have use Ajax with jquery UI Tooltip plugin. For initialize tooltip plugin, here we have use tooltip() method. This method has been used to initialize tooltip plugin on HTML element. When mouse move on HTML element then here we have trigger Ajax request under content option callback function. This Ajax request send request to PHP script and fetch particular student data, convert into HTML format and lastly load under jQuery Tooltip plugin. For get complete source code of How to Load Dynamic Data in jQuery UI Tooltip using Ajax with PHP, below you can find complete source code.


Source Code


database_connection.php


<?php

//database_connection.php

$connect = new PDO("mysql:host=localhost;dbname=testing", "root", "");


?>


index.php


<!--
//index.php
!-->

<?php

include('database_connection.php');

$query = "SELECT * FROM tbl_student ORDER BY student_name ASC";

$statement = $connect->prepare($query);

$statement->execute();

$result = $statement->fetchAll();

?>

<html>  
    <head>  
        <title>How to Load Ajax Data in jQuery UI Tooltip using PHP</title>  
  <link rel="stylesheet" href="//code.jquery.com/ui/1.12.1/themes/base/jquery-ui.css">
        <script src="https://code.jquery.com/jquery-1.12.4.js"></script>
  <script src="https://code.jquery.com/ui/1.12.1/jquery-ui.js"></script>
  <link rel="stylesheet" href="https://maxcdn.bootstrapcdn.com/bootstrap/3.3.6/css/bootstrap.min.css" />
    </head>  
    <body>  
        <div class="container">
   <br />
   
   <h3 align="center">How to Load Ajax Data in jQuery UI Tooltip using PHP</a></h3><br />
   <br />
   <div class="row">
    <div class="col-md-3">
    
    </div>
    <div class="col-md-6">
     <div class="panel panel-default">
      <div class="panel-heading">
       <h3 class="panel-title">Student Details</h3>
      </div>
      <div class="panel-body">
       <div class="table-responsive">
        <table class="table table-striped table-bordered">
         <tr>
          <th>Student Name</th>
         </tr>
         <?php
         foreach($result as $row)
         {
          echo '<tr><td><b><a href="#" id="'.$row["student_id"].'" title=" ">'.$row["student_name"].'</a></b></td></tr>';
         }
         ?>
        </table>
       </div>
      </div>
     </div>
    </div>
   </div>
  </div>
    </body>  
</html>  


<script>  
$(document).ready(function(){ 

 $('a').tooltip({
  classes:{
   "ui-tooltip":"highlight"
  },
  position:{ my:'left center', at:'right+50 center'},
  content:function(result){
   $.post('fetch.php', {
    id:$(this).attr('id')
   }, function(data){
    result(data);
   });
  }
 });
  
});  
</script>


fetch.php


<?php

//fetch.php

include('database_connection.php');

if(isset($_POST["id"]))
{
 $query = "SELECT * FROM tbl_student WHERE student_id = '".$_POST["id"]."'";

 $statement = $connect->prepare($query);

 $statement->execute();

 $result = $statement->fetchAll();

 $output = '';

 foreach($result as $row)
 {
  $output .= '
  <img src="images/'.$row["image"].'" class="img-thumbnail" />
  <h4>Name - '.$row["student_name"].'</h4>
  <h4>Phone No. - '.$row["student_phone"].'</h4>
  ';
 }
 echo $output;
}

?>