With time, the PHP framework has turned into the most preferred choice when talking about developing web applications for a company. Although there are numerous PHP frameworks which are available in the market, demand for Laravel and CodeIgniter is increasing rapidly.
Laravel
Laravel is an open-source framework that is based on PHP programming. The platform was intended for the development of web applications by using MVC architectural patterns. It is basically evolved to alleviate the development task for the developers since it can take care of the general tasks.
The general tasks in web projects include web page sessions, caching, routing, and authentication. Hiring dedicated Laravel developers can solve much of your problems. Laravel has refined, yet expressive syntax.
The following are some attractive features of Laravel:
Contains in-built modules and libraries
Define numerous routes
Availability of different test cases
Query Builder and ORM
Configuration management features
Lightweight template engine
Schema builder
CodeIgniter
CodeIgniter is a powerful Application Development Framework for developers to create websites with the help of the PHP framework. Its toolkit, such as a rich set of libraries, helps in developing full-featured online applications in less time because there is no need to write the code from scratch. You can create dynamic websites through CodeIgniter. Moreover, the users get full liberty since they are not required to use the MVC development pattern.
The following are some interesting features of CodeIgniter:
Security and XSS Filtering
Extremely compact
Model-View-Controller Based System
Query Builder Database Support
Session Management
Form and Data Validation
Supports the email attachments
Comparison between Laravel and Codeigniter
Being popular PHP framework options in the market, it is difficult to decide on one. So, the below-mentioned aspects can help in making the decision:
More compatible with upgraded PHP version: Currently, the advanced version PHP 7 is available in the market for developers. Indeed, both frameworks Laravel and CodeIgniter support PHP 7.X versions. However, there are some issues faced by coders and testers of CodeIgniter during the development as well as testing of a project. Thus, Laravel has the upper hand when it comes to compatibility.
Technical Documentation: The CodeIgniter framework cannot be beaten by any other framework in terms of the fully organized and simple to understand documentation. The notions used in building and designing a website through the CodeIgniter framework are pretty much easy to understand since they are certainly illustrated in the file in a comprehensive way. However, the Laravel framework includes difficult-to-understand documentation. So, CodeIgniter is more useful.
Usage of Libraries: Laravel incorporates object-oriented libraries, which play a vital role during the development of an effective website. Autocomplete features can support its libraries to carry out the development process easily. Whereas CodeIgniter libraries do not have such features, and they do not contribute to convenient development. Therefore, Laravel makes the development process easy.
Stability and Reliability: Both PHP frameworks, i.e., Laravel and CodeIgniter are stable and reliable. While the chances of bugs and other technical problems are not much in CodeIgniter, Laravel has higher chances of such issues.
Community Preference: Developers use Laravel and CodeIgniter framework to work on all types of website projects, be it small scale or large scale. However, the development community of the Laravel framework is larger as compared to CodeIgniter.
Modular packages: Laravel assists web programmers to split up the task into short module packages. However, the CodeIgniter framework demands developers use a modular extension to keep modules up. So, the latter framework does not provide modular code separation by default.
Simplified Database: The Laravel framework has a feature of skeptic relocations so that it can share the database without using complicated coding. But, the CodeIgniter framework does not come up with a highlight for the relocation of database patterns.
In-built Template Engine: There is an inbuilt template engine in the Laravel framework, namely blade to optimize the web performance. However, the CodeIgniter framework does not have a built-in template engine. The programmers are needed to integrate the CodeIgniter framework with a template engine tool such as Smarty to enhance the web performance. Thus, the former framework provides more convenience.
Compatibility with HTTPS: To transmit the information securely, HTTPS protocol plays an essential role. Laravel has considerable security since it supports HTTPS routes whereas, in the case of the CodeIgniter framework, it is not fully compatible with HTTPS.
REST Application Programming Interface: Laravel framework includes RESTful controllers to create various REST application programming interfaces without putting in extra time or effort. However, in the case of the CodeIgniter framework, there is a requirement for additional code to build the REST API.
Object-Relation Mapping: Laravel framework uses eloquent as object relation, whereas CodeIgniter framework uses an advanced version of a database design known as an active record to regulate database operations by writing small code.
Routing: Developers get the routing options in both Laravel and CodeIgniter frameworks. CodeIgniter provides implicit as well as explicit routing. Whereas, Laravel is more reliable and flexible when sending routing requests. Thus, developers can get more benefits from Laravel as compared to CodeIgniter.
Authentication Feature: In the Laravel framework, the authentication class assists developers in implementing authorization and authentication. However, the developers require to write custom CodeIgniter extensions for making use of authentication and authorize features.
Security: When it comes to any kind of web application, security is a prominent aspect. Laravel has features of better authorization and authentication checks. Laravel framework is a comparatively more secure framework than CodeIgniter.
Both frameworks are the prominent PHP frameworks to develop web applications. Although Laravel is comparatively slightly difficult for the developers to learn, its additional features make it suitable for a versatile website. On the contrary, CodeIgniter is convenient to use and a better option for small projects that do not require additional features.
Author Bio :
Harikrishna Kundariya, a marketer, developer, IoT, ChatBot & Blockchain savvy, designer, co-founder, Director of eSparkBiz Technologies. His 8+ experience enables him to provide digital solutions to new start-ups based on IoT and ChatBot.
This is Codeigniter 4 CRUD (Create, Read, Update, Delete) Operation tutorial with Mysql database. In this post, we will make Codeigniter 4 CRUD application with example of Insert, Update, Delete and Select data from Mysql database. So from this post, you can learn How to create CRUD application Codeigniter 4 framework.
Codeigniter 4 framework is completely different than older version of Codeigniter framework. So for learn new framework, first we need to learn How can we perform basic Select, Insert, Update and delete data from Mysql database under this Codeigniter 4 framework. So for learn basic Mysql database crud operation here we will make simple project in Codeigniter 4 framework and in that project we will fetch data from Mysql table and display on web page with pagination links using Codeigniter 4 framework. Then after we will insert or add data into Mysql table with form data validation by using Codeigniter 4 framework. Once we have add or insert data so after this, we will seen how to edit or update mysql table data in Codeigniter 4 framework and lastly, we will seen how to remove or delete data from Mysql database under this Codeigniter 4 application. So this Crud operation we will perform under this Codeigniter 4 CRUD project.
So, If you want to implement CRUD operation in Codeigniter 4 framework, then you have to follow below steps.
Download Codeigniter 4
Enable Codeigniter 4 Errors
Make Database Connection
Create Models Class
Fetch Data from Mysql Database
Insert or Add data in Mysql Database
Update or Edit Mysql table data
Delete or Remove data from Mysql
Download Codeigniter 4
For download Codeigniter 4 framework, first we need to install Composer in our computer. We can also download Codeigniter 4 framework from it's official site but it is better if we have use composer for download Codeigniter 4 framework. But before download we have some prerequisites for download Codeigniter 4 framework.
Install Composer
PHP 7.2+
Enable PHP Intl Extension
If above all requirement is available in your computer then you can download Codeigniter 4 framework. So for download Codeigniter 4 framework, we have open command prompt and move to directory in which we want to download Codeigniter 4 framework and then after run following command.
This command will make crud folder in define directory and then after in that folder it will download Codeigniter 4 framework. So this way we can download Codeigniter 4 framework.
Enable Codeigniter 4 Errors
Before we have start making CRUD application in Codeigniter 4 framework, first we want to enable Codeigniter 4 errors, this step is required, if we have not enable display of errors on web page then we cannot figure out where is error has been occure. So before proceed for create CRUD application, first we need to enable Codeigniter 4 errors so it will display errors on web page.
So we have to open app/Config/Boot/development.php this file and set display_errors to 1 in place of zero. And then after we have to open app/Config/Boot/production.php file and in that file also we have to set display_errors value 1 in place of 0. So by changing this it will display any PHP error on web page at the time of CRUD application development.
Make Database Connection
In this steps, we will seen How can we make Mysql database connection. But before making database connection. First we want to make table in our Mysql database. So for this run following .SQL script. This script will make user_table with some data in testing database. So you can use this data form CRUD operation.
After this, we have open app/Config/Database.php file and under this file we have to define following Mysql database configuration, which will make Mysql database connection in Codeigniter 4 framework.
Under this steps we will make Models class for perform database related operation. Under this Codeigniter 4 framework models class has been created under app/Models directory and under this directory we have create CrudModel.php which source code you can seen below.
app/Models/CrudModel.php
<?php

namespace App\Models;

use CodeIgniter\Model;

class CrudModel extends Model
{
	protected $table = 'user_table';

	protected $primaryKey = 'id';

	protected $allowedFields = ['name', 'email', 'gender'];

}

?>
Under this class, in $table variable we have define name of database table.
In $primaryKey variable, we have define table's primary key.
In $allowedFields variable, we have define fields name, which will used for database operation.
Fetch Data from Mysql Database
Now we have come on the first operation of CRUD and in this part we will discuss how to fetch data from Mysql table and display on web page in HTML table. For this first we have to create one Controllers class file under app/Controllers with name Crud.php. Below you can find the source code of this controller class file for fetch or read data from Mysql table.
app/Controllers/Crud.php
<?php

namespace App\Controllers;

use App\Models\CrudModel;

class Crud extends BaseController
{
	function index()
	{
		//echo 'Hello Codeigniter 4';

		$crudModel = new CrudModel();

		$data['user_data'] = $crudModel->orderBy('id', 'DESC')->paginate(10);

		$data['pagination_link'] = $crudModel->pager;

		return view('crud_view', $data);
	}
}

?>
Under this class file, first we have import CrudModel class for database operation. For fetch data from Mysql table we have make following method.
index() - This is root method of this Crud controller. Under this method we have create object of CrudModel class and by using this object we have fetch data from user_table by using orderBy() and paginate() method. And for create pagination link, here in Codeigniter 4 framework it has been use pager services. And lastly under this method, view() method has been load crud_view.php file on browser and it has display data from $data variable.
Above we can see crud_view.php source code. So in this source code we can see how it has fetch data from user_data variable and display on web page in table format. And for pagination links first it has set path pagination links by using $pagination_link->setPath('crud'); this code and for display pagination links it has use echo $pagination_link->links(); this method. For display success message here it has use session flashdata feature of Codeigniter framework.
Insert or Add data in Mysql Database
In previous steps we have seen How to Fetch or Select data from Mysql table in Codeigniter 4 framework. And now in this steps you can find how to insert or add data into Mysql table with Codeigniter 4 framework. For Insert data first you have to seen source of Crud controller.
So, here for Insert data we have make following method which has handle insert or add data request in Codeigniter 4 framework.
add() - This method has been load form for received data from User.
add_validation() - This method has been receive insert form data request from add() method. Under this method first we have load required helper class using helper() method. After this we want to validate form data, so here we have validate(), under this method we have define validation rules. If form data not passed under this validation rules, then it will add_data.php view file on browser with validation error. But suppose form data has been passed validation rules then form data will be insert into mysql table by using save() method. Under this method for display success message, it has been used Session library setFlashdata() and lastly form will be redirect to index() method of Crud controller by using redirect() method.
Below you can find source of view file which has been used for process insert data into Mysql table.
Under this views file we have make html form for received data from user. Under this view file for display form data validation, here we have use Codeigniter 4 validation services. This has been fetch validation error and display on web page by using getError() method. Under this method we have to define input field name, so that field validation error will be display on web page.
And in crud_view.php file, we have to add create link, which will redirect page to add() method of Crud controller. Source of this file, you can find below.
After inserting of data, now we want to update or edit existing mysql table data. So for update data, first we want create edit button in each row of table. So in below source code, you can find, how to add edit button in each row of table under this app/Views/crud_view.php file.
After this in views folder, we have create one another file edit_data.php. Under this file, we have to make form for display single user data for change that data. In that formk we have also write code for display validation error using Codeigniter 4 validation library.
In controller, we have make two method for handle edit or update existing user data. We have make following method for edit or update mysql table data in Crud.php controllers class.
fetch_single_data($id = null) - This method has received request for fetch single user data from Mysql user_table. So under this method it has use where('id', $id) and first() method for fetch single user data and then after it has load that data in edit_data.php views file for any change or modification of data.
edit_validation() - This method has received update data form request, so when we have submit edit form data, then it has received request for update data. Under this method first it has validate form data and then after by using update() method it has update mysql table data. Below you can find source code of Crud.php controller class.
In this Codeigniter 4 Crud application, now we want to learn how to delete or remove data from Mysql table. So first need to create one javascript function, this function will redirect url to delete method of Crud.php controller for delete data from Mysql table, then after we need to make delete button in each row of data. For this we have to go app/Views/crud_view.php file and below you can how to make delete button in each of data.
Next we have to Crud.php controller class and in that class we have make delete method. That method has received get request with id of row of data. Based on that id it will remove data from Mysql table under this Codeigniter 4 CRUD application.
CodeIgniter 4 Ajax Crud with datatables and Bootstrap Modals
If you want to add some more feature in above Codeigniter 4 CRUD application, then here we have add one more tutorial in Codeigniter 4 with Ajax and by using Ajax with Codeigniter 4 framework here we have also make single page CRUD application. In this Codeigniter 4 CRUD Application using Ajax, we can searching, sorting, paginate of dynamic data also. This is by using jQuery DataTables plugin with Codeigniter 4 framework. So here we have fetch data from Mysql table and load that data in jQuery DataTables plugin in tabular format in Codeigniter 4 framework. After this for insert update delete data in single page Codeigniter 4 CRUD application, here we have use Bootstrap 4 modals class. So by using Modals pop up feature, we can insert or update mysql table data on same page without going to another page. So this way we can build Single page CRUD application Codeigniter 4 framework by using Ajax with jQuery DataTables plugin and Bootstrap modals. Below you can find complete source code of Ajax CRUD application in Codeigniter 4 framework.
app/Models/Ajax_crudModel.php
<?php
//Ajax_crudModel.php
namespace App\Models;
use CodeIgniter\Model;
class Ajax_crudModel extends Model
{
protected $table = 'user_table';
protected $primaryKey = 'id';
protected $allowedFields = ['name', 'email', 'gender'];
public function noticeTable()
{
$builder = $this->db->table('user_table');
return $builder;
}
public function button()
{
$action_button = function($row){
return '
<button type="button" name="edit" class="btn btn-warning btn-sm edit" data-id="'.$row['id'].'">Edit</button>
<button type="button" class="btn btn-danger btn-sm delete" data-id="'.$row['id'].'">Delete</button>
';
};
return $action_button;
}
}
?>
At the last, Here we have step by step make CRUD application in Codeigniter 4 framework and we have perform CRUD Operation with Mysql Database in Codeigniter 4 and we have seen How to download Codeigniter 4 frameworkd using Composer, then after we have make database connection in Codeigniter 4 framework, next we have seen how can we enable display of errors at the time of Codeigniter 4 framework and then after we have seen how to fetch and display data on web page in Codeigniter 4. Next we have we seen how to insert update and delete data in Codeigniter 4 framework. So this tutorial will help you to start with Codegniter framework for web development.
This post will covered How to add Google re Captcha in Codeigniter application or in another word How to validate Codeigniter Form data by using Google reCaptcha validation. This is simple post on Integration of Google reCaptcha in PHP Codeigniter framework. In this tutorial, we will step by step describe you implementation of Google reCaptcha in Codeingniter application.
Now in your mind one question will arise why need to Add Google reCaptcha in our Form. So by using this Google reCaptcha, we can reduce form spam entry and it will stop storing spam data in our web application.
What is reCaptcha?
reCaptcha is one of the free services which has been provided by Google and it will protect our online web application from the spam data and abuse. It has been used some advanced risk analysis techniques which will be tells that particular user is humans or bots which has fill form data. So, it is mainly used for reduce spamming in our website.
What are benifits of using reCaptcha
There are several benifits of Google reCaptcha which you can find below.
It will protect our website registration form from spamming registration.
It will prevent from spam comments
It will secured our Online Shopping
It will protect our Email Account
So there are many other benifits of adding Google reCaptcha in our Codeigniter website. But now below you can find step by step process for integrate Google recaptcha in Codeigniter framework.
In first step we want to get the Google recaptcha Site key and Secret key. So first we have to login into our Google account and then after https://www.google.com/recaptcha/admin/create and register your domain name in which website you want to add. So in below you image you can find data like label, reCAPTCHA type and domain name field. After filling this details, you have to click on submit button.
Once you have click on submit button, then you can get Google reCaptcha site key and secret key which you can see in below image. So you have to copy both key and store in safe place. We will use both key in Codeigniter for integrate Google reCaptcha with Codeigniter framework.
2. Define Base Url in Codeigniter
Before starting coding in Codeigniter framework, we have to first define base url of Codeigniter application. For define base url, we have to open application/config/ config.php and under that file you have define base url at $config['base_url'] in this variable.
For making MySql Database connection in Codeigniter framework, we have to open application/config/database.php file and under this file we have to define Mysql Database configuration.
After making Mysql database connection in Codeigniter framework, next we want to create table in Mysql database. So for create table in Mysql database, we have to run following SQL script in phpMyAdmin and it will make sample_data table will create in Mysql database.
--
-- Table structure for table `sample_data`
--

CREATE TABLE `sample_data` (
  `id` int(10) NOT NULL,
  `first_name` varchar(250) NOT NULL,
  `last_name` varchar(250) NOT NULL,
  `age` varchar(30) NOT NULL,
  `gender` varchar(30) NOT NULL
) ENGINE=InnoDB DEFAULT CHARSET=latin1;

--
-- Indexes for table `sample_data`
--
ALTER TABLE `sample_data`
  ADD PRIMARY KEY (`id`);

--
-- AUTO_INCREMENT for dumped tables
--

--
-- AUTO_INCREMENT for table `sample_data`
--
ALTER TABLE `sample_data`
  MODIFY `id` int(10) NOT NULL AUTO_INCREMENT, AUTO_INCREMENT=1;
5. Create Controller in Codeigniter
Codeigniter is a MVC model based framework and under this framework Controllers class has been used for handle http request. So for handle Google reCaptcha validation here we have create application/controllers/Captcha.php file and under this class file we have make following method.
__construct() - This magic method will execute code when object of this class has been created and it will load session library and captcha model class under this class. So we can use both class mehtod under this class.
index() - This is root method of this class and it will display views/captcha.php file html content on web page.
validate() - This method has been received form data from client side and under this method firs it has been check g-recaptcha-response variable value has been set or not. If this variable value is set then only it will execute other code. This variable has been generated by Google reCaptcha site key. And then after for check at server side it has use Secret key and send request reCaptcha api for get response regarding user has give proper answer or not. If from reCaptcha api success variable value has been received that means user has pass google recaptcha validation and then after data will be inserted into Mysql database. So here without Google reCaptcha validation data will not be insert into our system.
In Codeigniter models class has been used for perform database related operation and models chass has been created in application/models directory. In this tutorial, we have create Captcha_models.php class file and under this file we have make insert() method which has been used for insert data into Mysql table.
application/models/Captcha_models.php
<?php

class Captcha_model extends CI_Model
{
	function insert($data)
	{
		$this->db->insert('sample_data', $data);
	}
}
7. Create Views file in Codeigniter
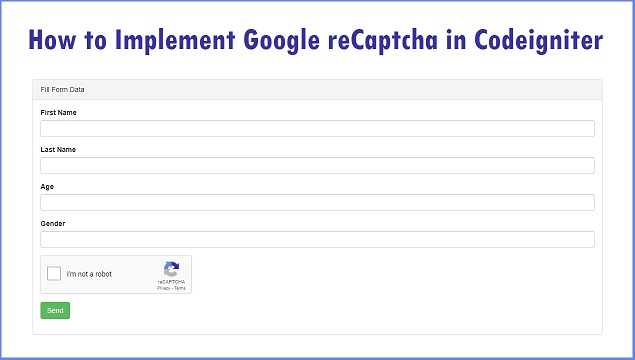
Views file has been used for display HTML output in brwoser under this Codeigniter framework and here we have create application/views/captcha.php file. Under this file we have make one html form for get data from user table and for create Google reCaptcha under this form we have create one division tag with class=g-recaptcha and at under this tag we have add data-sitekey and under this attirbute value we have to define Google reCaptcha site key. So by define this site key it will generate Google reCaptcha wiget under this form.
So, this is complete step by step process for integrate Google reCaptcha under this Codeigniter application and reduce spam entry in your website. This is because without pass Google reCaptcha validation, data will not be entered into our database. So it will reduce spam attack in our website. If you have any query then you can ask in comment box we will reply on your comment regarding your query.
Are you looking for tutorial on How to Create Real Time Chat Application in Codeigniter using Ajax jQuery. So, you have come on the right place because in this post you can find and learn How to implement a chat application in Codeigniter website using Ajax, jQuery, Mysql Database and json. By using this tutorial, every one can build their own chat app in Codeigniter framework, and this app will be real time because here we have use Ajax jQuery and json so all data will refresh without refresh of web page. So, here you can make your live chat application with Codeigniter framework. One more benefits of this tutorial is that you can make Facebook like chat application in Codeigniter.
If you are PHP developers, then every PHP developer is first prefer Codeigniter framework, this is because Codeigniter framework is fast application development framework, this framework has provide in build library, helper function using PHP which will helps to you to speed up build web based application. If you have use Codeigniter framework, then you can developed web application faster than you have start coding web application from scratch. So, you want to build your own chat application, you have to prefer any PHP framework like Codeigniter. This is because it is pur MVC framework, which will build light chat application.
In this post we will use Codeigniter framework for build Real time web based text messaging application, that means one person can send text message to another person on internet in real time. You chat build chat application like Facebook. One person can make live conversation with multiple person. Real time or live chat means online conversation in which sender or receiver will send and receiver text messages. In this chat application will make feature like one person can chat with one person or one person can chat with multiple person also. There are many Chat application available on internet, but if you want to build you own chat application, then you have to first select technology in which you want to build you chat application. Here we have use Codeigniter and Mysql database as server side technology, and at jQuery, Ajax, JSON has been used at client technology. Below you can find basic feature of this chat application.
If you want to make Chat application in Codeigniter framework, then first you have to make Mysql Database. Once you have make database, then For this you have to run following SQL script, it will make required tables in you database.
--
-- Database: `codeigniter_chat`
--

-- --------------------------------------------------------

--
-- Table structure for table `chat_messages`
--

CREATE TABLE `chat_messages` (
  `chat_messages_id` int(11) NOT NULL,
  `sender_id` int(11) NOT NULL,
  `receiver_id` int(11) NOT NULL,
  `chat_messages_text` text NOT NULL,
  `chat_messages_status` enum('no','yes') NOT NULL,
  `chat_messages_datetime` datetime NOT NULL
) ENGINE=InnoDB DEFAULT CHARSET=utf8;

-- --------------------------------------------------------

--
-- Table structure for table `chat_request`
--

CREATE TABLE `chat_request` (
  `chat_request_id` int(11) NOT NULL,
  `sender_id` int(11) NOT NULL,
  `receiver_id` int(11) NOT NULL,
  `chat_request_status` enum('Accept','Reject') NOT NULL
) ENGINE=InnoDB DEFAULT CHARSET=utf8;

-- --------------------------------------------------------

--
-- Table structure for table `chat_user`
--

CREATE TABLE `chat_user` (
  `user_id` int(11) NOT NULL,
  `login_oauth_uid` varchar(100) NOT NULL,
  `first_name` varchar(250) NOT NULL,
  `last_name` varchar(250) NOT NULL,
  `email_address` varchar(250) NOT NULL,
  `profile_picture` varchar(250) NOT NULL,
  `created_at` datetime NOT NULL,
  `updated_at` datetime NOT NULL
) ENGINE=InnoDB DEFAULT CHARSET=utf8;

--
-- Table structure for table `login_data`
--

CREATE TABLE `login_data` (
  `login_data_id` int(11) NOT NULL,
  `user_id` int(11) NOT NULL,
  `last_activity` datetime NOT NULL,
  `is_type` enum('no', 'yes') NOT NULL
  `receiver_user_id` int(11) NOT NULL
) ENGINE=InnoDB DEFAULT CHARSET=utf8;

--
-- Indexes for dumped tables
--

--
-- Indexes for table `chat_messages`
--
ALTER TABLE `chat_messages`
  ADD PRIMARY KEY (`chat_messages_id`);

--
-- Indexes for table `chat_request`
--
ALTER TABLE `chat_request`
  ADD PRIMARY KEY (`chat_request_id`);

--
-- Indexes for table `chat_user`
--
ALTER TABLE `chat_user`
  ADD PRIMARY KEY (`user_id`);

--
-- Indexes for table `login_data`
--
ALTER TABLE `login_data`
  ADD PRIMARY KEY (`login_data_id`);

--
-- AUTO_INCREMENT for dumped tables
--

--
-- AUTO_INCREMENT for table `chat_messages`
--
ALTER TABLE `chat_messages`
  MODIFY `chat_messages_id` int(11) NOT NULL AUTO_INCREMENT;

--
-- AUTO_INCREMENT for table `chat_request`
--
ALTER TABLE `chat_request`
  MODIFY `chat_request_id` int(11) NOT NULL AUTO_INCREMENT;

--
-- AUTO_INCREMENT for table `chat_user`
--
ALTER TABLE `chat_user`
  MODIFY `user_id` int(11) NOT NULL AUTO_INCREMENT, AUTO_INCREMENT=9;

--
-- AUTO_INCREMENT for table `login_data`
--
ALTER TABLE `login_data`
  MODIFY `login_data_id` int(11) NOT NULL AUTO_INCREMENT;
Google Account Login Integration
In this chat application, we have use Google Account for login into system. This is because currently, most of the person have Google account, so then can directly login into system without register into this chat application.
In Codeigniter framework, First we have to define autoload libraries. So, every time define Codeigniter library we do want to define every time. For this, we have to open config/autoload.php file and define autoload libraries.
After define library, we can also define which helper we want to load at the time of initialize application. For this also we have to open config/autoload.php file.
$autoload['helper'] = array('url', 'form');
Now we want to define base url of Codeigniter chat application, for this we have open config/config.php file and define base url of this Codeigniter chat application.
After this we want to make database connection. So for database connection in Codeigniter framework, we have to open config/database.php file and in this file we have to define Mysql database configuration.
For integrate Google Account login into this Codeigniter Chat system, we have make following file Model Views and Controller files.
Controllers
In Controller folder we have make two file like Google_login.php and Chat.php file. In Google_login.php file, we have make following method.
__construct() - This is magic method and this method block of code will execute when new object of this class has been created and it will load Google_login_model.php all method.
index() - This is root method of this controller, and it will load login function.
login() - This method is communicate with Google API for validate User Google Account credential. If Google Account login detail is propert then it will redirect to this chat application url, which we have define at then time creating Google API key. After this User detail will store in database, and for validate User login here we have store user_id data has been store in session variable and at the time of login into system login date and time data has been store in database also. If Google login is proper then it will redirect to Chat application home page.
logout() - This method will logout user from this chat application, and redirect page to login page.
Here we have make one another controller class, which is Chat.php file and in this we have make following method.
__construct() - This method will load Chat_model.php class method, and here it will also check user session data for check user is login into system or not, If User is not login into system, then it will redirect page to Login page.
index() - This is root method of this Chat class, and it will load chat_view.php view file for display html output in browser.
controllers/Chat.php
<?php
defined('BASEPATH') OR exit('No direct script access allowed');

class Chat extends CI_Controller {

 public function __construct()
 {
  parent::__construct();
  $this->load->model('chat_model');
  if(!$this->session->userdata('user_id'))
  {
   redirect('google_login/login');
  }
 }

 function index()
 {
  $this->load->view('chat_view');
 }
}
?>
Models
For integrate Google Account login into chat system, we have to make Google_login_model.php models class and in this class we have make following method.
Is_already_register($id) - This will check particular user is already register in our system or not.
Update_user_data($data, $id) - This method will update existing user data in Mysql database.
Insert_user_data($data) - This method will insert new User data in Mysql database.
Get_user_id($id) - This method will return login user id based on open source authentic login id which has been provided by Google.
Insert_login_data($data) - This method will insert user login date and time data into mysql database.
models/Google_login_model.php
<?php
class Google_login_model extends CI_Model
{
 function Is_already_register($id)
 {
  $this->db->where('login_oauth_uid', $id);
  $query = $this->db->get('chat_user');
  if($query->num_rows() > 0)
  {
   return true;
  }
  else
  {
   return false;
  }
 }

 function Update_user_data($data, $id)
 {
  $this->db->where('login_oauth_uid', $id);
  $this->db->update('chat_user', $data);
 }

 function Insert_user_data($data)
 {
  $this->db->insert('chat_user', $data);
 }

 function Get_user_id($id)
 {
  $this->db->select('user_id');
  $this->db->from('chat_user');
  $this->db->where('login_oauth_uid', $id);
  $query = $this->db->get();
  foreach($query->result() as $row)
  {
   return $row->user_id;
  }
 }

 function Insert_login_data($data)
 {
  $this->db->insert('login_data', $data);
  return $this->db->insert_id();
 }
}
?>
Views
For integrate Google Account login, here we have we have make two views file like google_login.php and chat_view.php file.
views/google_login.php
<html>
 <head>
  <meta name="viewport" content="width=device-width, initial-scale=1">
  <meta http-equiv="Content-Type" content="text/html; charset=utf-8" />
  <title>Chat Application in Codeigniter</title>
  <meta content='width=device-width, initial-scale=1, maximum-scale=1' name='viewport'/>
  <script src="https://ajax.googleapis.com/ajax/libs/jquery/2.1.3/jquery.min.js"></script>
  <script src="https://maxcdn.bootstrapcdn.com/bootstrap/3.3.6/js/bootstrap.min.js"></script>
  <link href="https://maxcdn.bootstrapcdn.com/bootstrap/3.3.6/css/bootstrap.min.css" rel="stylesheet" />

  <style>
      /* Remove the navbar's default margin-bottom and rounded borders */
      .navbar {
        margin-bottom: 0;
        border-radius: 0;
      }

      /* Set height of the grid so .sidenav can be 100% (adjust as needed) */
      .row.content {height: 450px}

      /* Set gray background color and 100% height */
      .sidenav {
        padding-top: 20px;
        background-color: #f1f1f1;
        height: 100%;
      }

      /* Set black background color, white text and some padding */
      footer {
        background-color: #555;
        color: white;
        padding: 15px;
      }

      /* On small screens, set height to 'auto' for sidenav and grid */
      @media screen and (max-width: 767px) {
        .sidenav {
          height: auto;
          padding: 15px;
        }
        .row.content {height:auto;}
      }
    </style>

 </head>
 <body>
  <div class="container">
   <br />
   <h2 align="center"><a href="#">Chat Application in Codeigniter</a></h2>
                        <br />
   <div class="panel panel-default">
   <?php
   if(!isset($login_button))
   {
    redirect('chat');
   }
   else
   {
    echo '<div align="center">'.$login_button . '</div>';
   }
   ?>
   <br />
   <br />
   </div>
  </div>

 </body>
</html>
In this Chat application, for chat there is required some other person for chat. For this, here we have add chat user feature. By using this functionality, login user can search other person in this chat application.
Chat.php -
In this controller class, we have make forllowig method for make search feature in this Codeigniter chat application.
search_user() - This method will received Ajax request for search user data. This method has received data from model class method, and converted and store data in array formar and send back to Ajax request in json format.
In this model class, we have make following method for make search user functionality in this Chat application.
search_user_data($user_id, $query) - This method is used for fetch data from chat_user table. This method will not search user own data.
Check_request_status($sender_id, $receiver_id) - This method will check chat request status data in Mysql table.
<?php
class Chat_model extends CI_Model
{
 function search_user_data($user_id, $query)
 {
  $where = "user_id != '".$user_id."' AND (first_name LIKE '%".$query."%' OR last_name LIKE '%".$query."%')";

  $this->db->where($where);

  return $this->db->get('chat_user');
 }

 function Check_request_status($sender_id, $receiver_id)
 {
  $this->db->where('(sender_id = "'.$sender_id.'" OR sender_id = "'.$receiver_id.'")');
  $this->db->where('(receiver_id = "'.$receiver_id.'" OR receiver_id = "'.$sender_id.'")');
  $this->db->order_by('chat_request_id', 'DESC');
  $this->db->limit(1);
  $query = $this->db->get('chat_request');
  if($query->num_rows() > 0)
  {
   foreach($query->result() as $row)
   {
    return $row->chat_request_status;
   }
  }
 }
}
?>
chat_view.php
In this view file, first we have define on textbox for enter user name for search user and one button, after click on button, ajax request will triggered and it will send search user request send to server, and it will received data from server in json format and convert that data into html format and display in user search result on web page, without refresh for web page.
If you have start search new user in this Chat application, then in search result you can see user profile picture, user name and send request button. By click on send request button, user can send chat request to another user from search result. For this feature we have make following changes in Codeigniter Controllers, Models and views file.
Chat.php (Controllers)
For make send chat request functionality, in Codeigniter controller class, we have make following method.
send_request() - This method will received ajax request for send chat request to another user. It will send data to models class method for store chat request data into Mysql database.
This models class will handle database related operation for make send chat request feature in Codeigniter chat application. In this class we have make following method.
Insert_chat_request($data) - This method will insert chat request data in Mysql data. It will received data fron Controller class method.
<?php
class Chat_model extends CI_Model
{
 function search_user_data($user_id, $query)
 {
  $where = "user_id != '".$user_id."' AND (first_name LIKE '%".$query."%' OR last_name LIKE '%".$query."%')";

  $this->db->where($where);

  return $this->db->get('chat_user');
 }

 function Check_request_status($sender_id, $receiver_id)
 {
  $this->db->where('(sender_id = "'.$sender_id.'" OR sender_id = "'.$receiver_id.'")');
  $this->db->where('(receiver_id = "'.$receiver_id.'" OR receiver_id = "'.$sender_id.'")');
  $this->db->order_by('chat_request_id', 'DESC');
  $this->db->limit(1);
  $query = $this->db->get('chat_request');
  if($query->num_rows() > 0)
  {
   foreach($query->result() as $row)
   {
    return $row->chat_request_status;
   }
  }
 }

 function Insert_chat_request($data)
 {
  $this->db->insert('chat_request', $data);
 }
}
?>
chat_view.php (Views)
This view file will use Ajax request for send chat request to another user. For make Send request feature for Chat Application in this View file we have use Ajax request. By click on request button, this system will send chat request data to another user using Ajax request.
Once User has send chat request, then at receiver user side they will seen notification of chat request has been received at their chat system page. For this feature we have to make following method in Controller and models class.
Chat.php (Controllers)
In controller class, for load chat notification data at receiver user area, we have create following method in controller class.
load_notification() - This method will received ajax request for load notification data in notification area. This method will get data from Fetch_notification_data() model method, and convert that data into array for and send to ajax request in json format.
For load notification data in this chat application, In this models, we have make following method for Mysql database related operation.
Fetch_notification_data($receiver_id) - This method has been fetch notification data from Mysql database.
Get_user_data($user_id) - This method will fetch particular user data from Mysql database.
<?php
class Chat_model extends CI_Model
{
 function search_user_data($user_id, $query)
 {
  $where = "user_id != '".$user_id."' AND (first_name LIKE '%".$query."%' OR last_name LIKE '%".$query."%')";

  $this->db->where($where);

  return $this->db->get('chat_user');
 }

 function Check_request_status($sender_id, $receiver_id)
 {
  $this->db->where('(sender_id = "'.$sender_id.'" OR sender_id = "'.$receiver_id.'")');
  $this->db->where('(receiver_id = "'.$receiver_id.'" OR receiver_id = "'.$sender_id.'")');
  $this->db->order_by('chat_request_id', 'DESC');
  $this->db->limit(1);
  $query = $this->db->get('chat_request');
  if($query->num_rows() > 0)
  {
   foreach($query->result() as $row)
   {
    return $row->chat_request_status;
   }
  }
 }

 function Insert_chat_request($data)
 {
  $this->db->insert('chat_request', $data);
 }

 function Fetch_notification_data($receiver_id)
 {
  $this->db->where('receiver_id', $receiver_id);
  $this->db->where('chat_request_status', 'Pending');
  return $this->db->get('chat_request');
 }

 function Get_user_data($user_id)
 {
  $this->db->where('user_id', $user_id);
  $data = $this->db->get('chat_user');
  $output = array();
  foreach($data->result() as $row)
  {
   $output['first_name'] = $row->first_name;
   $output['last_name'] = $row->last_name;
   $output['email_address'] = $row->email_address;
   $output['profile_picture'] = $row->profile_picture;
  }
  return $output;
 }
}
?>
chat_view.php (Views)
In this view file, for load chat request notification data. First we have define division tag for display notification data and then after by using Ajax request. It will load chat request notification data. In Ajax it has been received data in JSON format and then after convert into HTML format and display on web page.
After load chat request notification data at receiver user, so at that chat request notification data, receiver user can also see accept button for approve chat request. By click on Accept button receiver user can approve chat request and sender and receiver user can chat with each other. For accept chat request in this Codeigniter Chat syste, we have make following method in Controllers, Models class and views file.
Chat.php (Controllers)
In controllers class we have make following method for accept chat request feature in this chat application.
accept_request() - This method will received Ajax request for accept chat request. This method will send this request to model Update_chat_request() method.
In this model class, we have to make following method for database related operation for accept chat request.
Update_chat_request($chat_request_id, $data) - This method will update chat request status in Mysql table.
<?php
class Chat_model extends CI_Model
{
 function search_user_data($user_id, $query)
 {
  $where = "user_id != '".$user_id."' AND (first_name LIKE '%".$query."%' OR last_name LIKE '%".$query."%')";

  $this->db->where($where);

  return $this->db->get('chat_user');
 }

 function Check_request_status($sender_id, $receiver_id)
 {
  $this->db->where('(sender_id = "'.$sender_id.'" OR sender_id = "'.$receiver_id.'")');
  $this->db->where('(receiver_id = "'.$receiver_id.'" OR receiver_id = "'.$sender_id.'")');
  $this->db->order_by('chat_request_id', 'DESC');
  $this->db->limit(1);
  $query = $this->db->get('chat_request');
  if($query->num_rows() > 0)
  {
   foreach($query->result() as $row)
   {
    return $row->chat_request_status;
   }
  }
 }

 function Insert_chat_request($data)
 {
  $this->db->insert('chat_request', $data);
 }

 function Fetch_notification_data($receiver_id)
 {
  $this->db->where('receiver_id', $receiver_id);
  $this->db->where('chat_request_status', 'Pending');
  return $this->db->get('chat_request');
 }

 function Get_user_data($user_id)
 {
  $this->db->where('user_id', $user_id);
  $data = $this->db->get('chat_user');
  $output = array();
  foreach($data->result() as $row)
  {
   $output['first_name'] = $row->first_name;
   $output['last_name'] = $row->last_name;
   $output['email_address'] = $row->email_address;
   $output['profile_picture'] = $row->profile_picture;
  }
  return $output;
 }

 function Update_chat_request($chat_request_id, $data)
 {
  $this->db->where('chat_request_id', $chat_request_id);
  $this->db->update('chat_request', $data);
 }
}
?>
chat_view.php - (Views)
In this view file, we have to write jquery code on accept button click event, and in this jquery, it will send Ajax request to controller method for accpet chat request.
In this chat appplication, next step is to load user who has accepted chat request. Once user has accept chat request, then after in this chat system load chat request accepted user at both side. So they can chat with each other. For this feature we have make following method in Codeigniter controller and models class, and in views file we have make following jquery Ajax function.
Chat.php (Controllers)
For load chat request accepted user, in this controller class we have make following method for accept http request for load chat request accepted user.
load_chat_user() - This method has received Ajax request for load chat requested user at both sender and receiver user. This method has received data from model method and send data to Ajax request in json format.
For Mysql database related operation for load chat request accepted user. For in this models class we have make following method.
Fetch_chat_user_data($user_id) - This method will fetch chat request accepted user data from Mysql table and send that data to controller class method.
<?php
class Chat_model extends CI_Model
{
 function search_user_data($user_id, $query)
 {
  $where = "user_id != '".$user_id."' AND (first_name LIKE '%".$query."%' OR last_name LIKE '%".$query."%')";

  $this->db->where($where);

  return $this->db->get('chat_user');
 }

 function Check_request_status($sender_id, $receiver_id)
 {
  $this->db->where('(sender_id = "'.$sender_id.'" OR sender_id = "'.$receiver_id.'")');
  $this->db->where('(receiver_id = "'.$receiver_id.'" OR receiver_id = "'.$sender_id.'")');
  $this->db->order_by('chat_request_id', 'DESC');
  $this->db->limit(1);
  $query = $this->db->get('chat_request');
  if($query->num_rows() > 0)
  {
   foreach($query->result() as $row)
   {
    return $row->chat_request_status;
   }
  }
 }

 function Insert_chat_request($data)
 {
  $this->db->insert('chat_request', $data);
 }

 function Fetch_notification_data($receiver_id)
 {
  $this->db->where('receiver_id', $receiver_id);
  $this->db->where('chat_request_status', 'Pending');
  return $this->db->get('chat_request');
 }

 function Get_user_data($user_id)
 {
  $this->db->where('user_id', $user_id);
  $data = $this->db->get('chat_user');
  $output = array();
  foreach($data->result() as $row)
  {
   $output['first_name'] = $row->first_name;
   $output['last_name'] = $row->last_name;
   $output['email_address'] = $row->email_address;
   $output['profile_picture'] = $row->profile_picture;
  }
  return $output;
 }

 function Update_chat_request($chat_request_id, $data)
 {
  $this->db->where('chat_request_id', $chat_request_id);
  $this->db->update('chat_request', $data);
 }

 function Fetch_chat_user_data($user_id)
 {
  $this->db->where('chat_request_status', 'Accept');
  $this->db->where('(sender_id = "'.$user_id.'" OR receiver_id = "'.$user_id.'")');
  $this->db->order_by('chat_request_id', 'DESC');
  return $this->db->get('chat_request');
 }
}
?>
chat_view.php (Views)
This view file has been display chat request accepted user data in browser in html format. In this file we have make one load_chat_user() jquery function which will send Ajax request to Controller class and received data in json format and convert that data into HTML format and display on web page.
Now we have come into right part of this Chat application. In this section you can learn how to send chat messages from one user to another user. For send chat message fuctionality in this Codeigniter Chat app, we have to make following methods in Controller and models class and write jquery ajax script in views file.
Chat.php (Controllers) -
For implement send chat messages in this chat application, we have to make following method in this controller class for handle http request for send chat messages.
send_chat() - This method will accept Ajax request for send chat messages. This method will received data from Ajax request and send that data to models class method for insert into Mysql table and send back request to Ajax request.
In this chat system for make send chat message feature, so for make this feature we have to make following method for handle database operation in this models class.
Insert_chat_message($data) - This method will insert chat data into Mysql table. This method will received data from controller method.
<?php
class Chat_model extends CI_Model
{
 function search_user_data($user_id, $query)
 {
  $where = "user_id != '".$user_id."' AND (first_name LIKE '%".$query."%' OR last_name LIKE '%".$query."%')";

  $this->db->where($where);

  return $this->db->get('chat_user');
 }

 function Check_request_status($sender_id, $receiver_id)
 {
  $this->db->where('(sender_id = "'.$sender_id.'" OR sender_id = "'.$receiver_id.'")');
  $this->db->where('(receiver_id = "'.$receiver_id.'" OR receiver_id = "'.$sender_id.'")');
  $this->db->order_by('chat_request_id', 'DESC');
  $this->db->limit(1);
  $query = $this->db->get('chat_request');
  if($query->num_rows() > 0)
  {
   foreach($query->result() as $row)
   {
    return $row->chat_request_status;
   }
  }
 }

 function Insert_chat_request($data)
 {
  $this->db->insert('chat_request', $data);
 }

 function Fetch_notification_data($receiver_id)
 {
  $this->db->where('receiver_id', $receiver_id);
  $this->db->where('chat_request_status', 'Pending');
  return $this->db->get('chat_request');
 }

 function Get_user_data($user_id)
 {
  $this->db->where('user_id', $user_id);
  $data = $this->db->get('chat_user');
  $output = array();
  foreach($data->result() as $row)
  {
   $output['first_name'] = $row->first_name;
   $output['last_name'] = $row->last_name;
   $output['email_address'] = $row->email_address;
   $output['profile_picture'] = $row->profile_picture;
  }
  return $output;
 }

 function Update_chat_request($chat_request_id, $data)
 {
  $this->db->where('chat_request_id', $chat_request_id);
  $this->db->update('chat_request', $data);
 }

 function Fetch_chat_user_data($user_id)
 {
  $this->db->where('chat_request_status', 'Accept');
  $this->db->where('(sender_id = "'.$user_id.'" OR receiver_id = "'.$user_id.'")');
  $this->db->order_by('chat_request_id', 'DESC');
  return $this->db->get('chat_request');
 }

 function Insert_chat_message($data)
 {
  $this->db->insert('chat_messages', $data);
 }
}
?>
chat_view.php (Views)
For send chat messages, in view file we have to create one division tag with contenteditable attribute property set to true, so user can type chat message in that tag. Then after we have write jQuery code on send chat button. So when user click on button then it will send Ajax request to controller method for send message to another user.
Once Chat message has been send in this chat application. Now we want to display chat history data on web page. So, in this section, we have make Load chat messages feature, which will load chat message on regular interval on web page. For this feature, we have make following method in Codeigniter controller and models class and make requireds changes in views file also.
Chat.php (Controllers)
For load chat message history, we have make followin method in Chat.php controller class.
load_chat_data() - This method will received Ajax request for fetch chat message history data from Mysql database. This method has received data from model method and converted into Array and send back to Ajax request in json string format.
For load chat message history, for this feature here in model class we have make following method for handle Mysql database related operation.
Update_chat_message_status($user_id) - This method will update chat message status.
Fetch_chat_data($sender_id, $receiver_id) - This method has fetch chat message conversation between two user from Mysql database.
<?php
class Chat_model extends CI_Model
{
 function search_user_data($user_id, $query)
 {
  $where = "user_id != '".$user_id."' AND (first_name LIKE '%".$query."%' OR last_name LIKE '%".$query."%')";

  $this->db->where($where);

  return $this->db->get('chat_user');
 }

 function Check_request_status($sender_id, $receiver_id)
 {
  $this->db->where('(sender_id = "'.$sender_id.'" OR sender_id = "'.$receiver_id.'")');
  $this->db->where('(receiver_id = "'.$receiver_id.'" OR receiver_id = "'.$sender_id.'")');
  $this->db->order_by('chat_request_id', 'DESC');
  $this->db->limit(1);
  $query = $this->db->get('chat_request');
  if($query->num_rows() > 0)
  {
   foreach($query->result() as $row)
   {
    return $row->chat_request_status;
   }
  }
 }

 function Insert_chat_request($data)
 {
  $this->db->insert('chat_request', $data);
 }

 function Fetch_notification_data($receiver_id)
 {
  $this->db->where('receiver_id', $receiver_id);
  $this->db->where('chat_request_status', 'Pending');
  return $this->db->get('chat_request');
 }

 function Get_user_data($user_id)
 {
  $this->db->where('user_id', $user_id);
  $data = $this->db->get('chat_user');
  $output = array();
  foreach($data->result() as $row)
  {
   $output['first_name'] = $row->first_name;
   $output['last_name'] = $row->last_name;
   $output['email_address'] = $row->email_address;
   $output['profile_picture'] = $row->profile_picture;
  }
  return $output;
 }

 function Update_chat_request($chat_request_id, $data)
 {
  $this->db->where('chat_request_id', $chat_request_id);
  $this->db->update('chat_request', $data);
 }

 function Fetch_chat_user_data($user_id)
 {
  $this->db->where('chat_request_status', 'Accept');
  $this->db->where('(sender_id = "'.$user_id.'" OR receiver_id = "'.$user_id.'")');
  $this->db->order_by('chat_request_id', 'DESC');
  return $this->db->get('chat_request');
 }

 function Insert_chat_message($data)
 {
  $this->db->insert('chat_messages', $data);
 }

 function Update_chat_message_status($user_id)
 {
  $data = array(
   'chat_messages_status'  => 'yes'
  );
  $this->db->where('receiver_id', $user_id);
  $this->db->where('chat_messages_status', 'no');
  $this->db->update('chat_messages', $data);
 }

 function Fetch_chat_data($sender_id, $receiver_id)
 {
  $this->db->where('(sender_id = "'.$sender_id.'" OR sender_id = "'.$receiver_id.'")');
  $this->db->where('(receiver_id = "'.$receiver_id.'" OR receiver_id = "'.$sender_id.'")');
  $this->db->order_by('chat_messages_id', 'ASC');
  return $this->db->get('chat_messages');
 }
}
?>
chat_view.php (Views)
This view file will display chat history message on web page. When user has been click on any user name, then that chat message conversation between login user and that user chat message will be display on web page. And after this by using setInterval() function, chat message data will be updated on every 5 second.
After send message to one user to another user, but that user is not login into system. So when he or she login into system then at that time they can see how many messages they have receiver from each user. For this feature, we have make following changes in this Chat application code.
In this section, we have one more feature in this Codeigniter Chat Application. In this section, we have add functionality like display user if online or offline in this chat application. If User is on chat page, then that user status will be display online, and if User is logout from system or not on chat page then that User status will be display offline. For this feature, we have make following chages in Model Views and Controller file.
In this section, we have add one more feature in this Chat application. Here we have add WhatsApp like display typing text at below user name. When one user has type then another user can know that user is typing something in his or her chat box. So, this type of feature we have add in this Codeigniter chat application by using Ajax jquery. For this User is typing or not feature, we have made following changes in Codeigniter Controllers, Models and View files.