Showing posts with label yajra. Show all posts

Monday, 15 July 2019

How to Implement Date Range Filter in Laravel 5.8 Datatable


Do you know Datatable is widely used for display data in tabular format on web page and Laravel is a widely used PHP framework for web development. Now here we will implement Datatable with Server side processing in Laravel 5.8 framework by using Ajax. Once we have implement Datatable server-side processing in Laravel 5.8 then we can do operation like searching of data, sorting of data, pagination and many more action with server side processing. In Laravel 5.8 we have to use yajra datatable package for implement server side processing of Datatable data. But now question arise how to will filter data which has come between two data, in short how to will filter Datatable data which has come between two date in Laravel 5.8 framework by using Ajax.

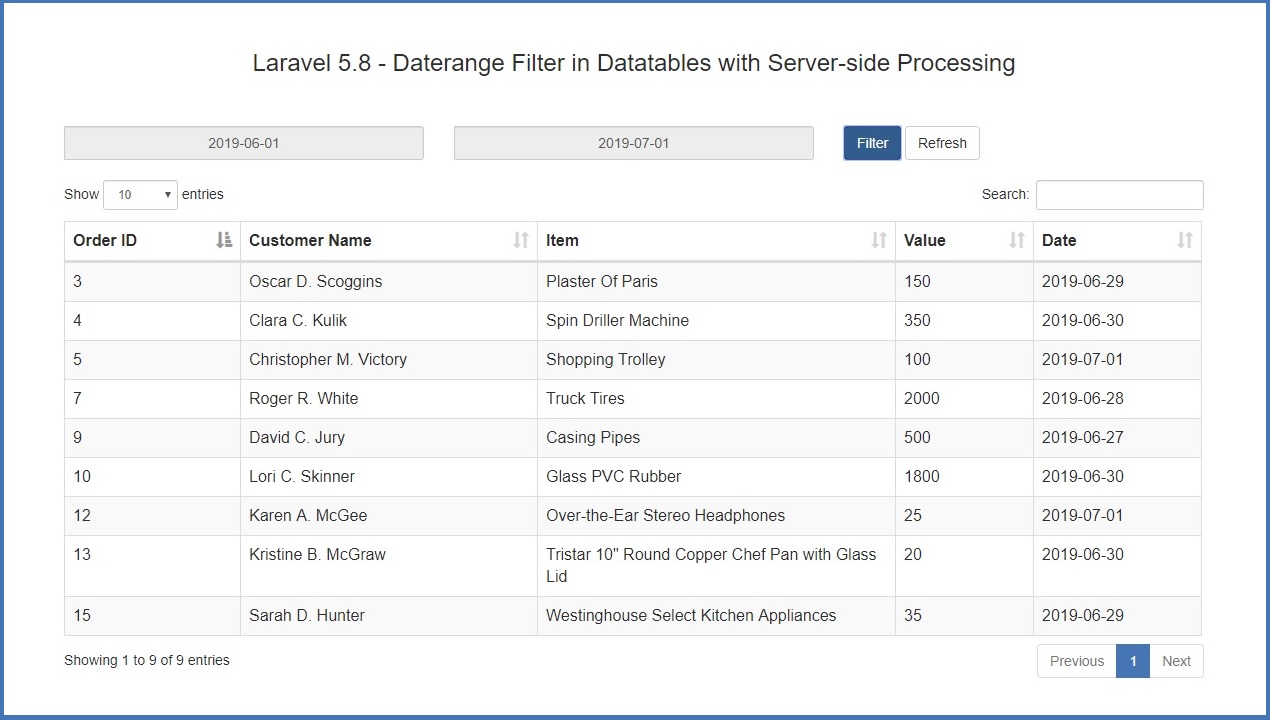
So, Here we will discuss how to make Datarange filter in Laravel 5.8 Datatable with Server side processing by using yajra Datatables package by using Ajax. Once we have implement Date range search then we can filter Datatable data which has come between two date. We have already recently published web tutorial on Laravel Data Range search using Ajax jQuery, but in that tutorial we have use simple table for display data but here we have use jQuery Datatable plugin for Date range filter in Laravel 5.8 application. By using jQuery Datatable plugin we can make single page Laravel 5.8 application in which we can date range search in datatables using Laravel 5.8 with Ajax. Below you can find step by step process for implement Date range filter in Laravel 5.8 Datatable.

  • Download Laravel 5.8 Application

  • Install yajra Laravel Datatables package

  • Create Controller

  • Create View Blade File

  • Set Routes

  • Run Laravel 5.8 Application


Download Laravel 5.8 Application


First we want to download Laravel 5.8 framework, for this we have to go command prompt and write following command.


composer create-project --prefer-dist laravel/laravel daterange


This command will download and install Laravel 5.8 application in define folder.


Install yajra Laravel Datatables package


Here we want to implement server-side processing of data in jQuery Datatable, for this in Laravel 5.8 application we have to install yajra jQuery Datatables api for Laravel 5.8 framework. For this we have go to command prompt and write follow command.


composer require yajra/laravel-datatables-oracle


This command will download yajra Laravel Datatable package in vendor folder. Now we want to publish this package in this Laravel 5.8 application. For we have to open config/app.php file and set providers and alias.


.....
'providers' => [
 ....
 Yajra\DataTables\DataTablesServiceProvider::class,
]
'aliases' => [
 ....
 'DataTables' => Yajra\DataTables\Facades\DataTables::class,
]
.....


Create Controller


After installing of yajra Laravel Datatable package, now we need to create controller for handle http request. For this we have go to command prompt and write following command.


php artisan make:controller DateRangeController


This command will make controller file in app/Http/Controllers/DateRangeController.php. In this file first we have write write use DB; statement. It will for handle database operation. In this controller class we have make one index() method. This is this root method of this class. This method has load view blade file in browser, and this method also received ajax request for load data in jQuery Datatable by using yajra Laravel Datatable package. Below you can find source code of this method.


<?php

namespace App\Http\Controllers;

use Illuminate\Http\Request;
use DB;

class DateRangeController extends Controller
{
    function index(Request $request)
    {
     if(request()->ajax())
     {
      if(!empty($request->from_date))
      {
       $data = DB::table('tbl_order')
         ->whereBetween('order_date', array($request->from_date, $request->to_date))
         ->get();
      }
      else
      {
       $data = DB::table('tbl_order')
         ->get();
      }
      return datatables()->of($data)->make(true);
     }
     return view('daterange');
    }
}

?>


Create View Blade File


View file has been used in Laravel for display html output on web page. In Laravel view file has been store under resources/views folder and here we have create daterange.blade.php file. In this file we have add jQuery, Bootstrap, Datatable and Datepicker library link. Here for date range filter we have use Date picker library for selecting date. Below you can find source of resources/views/daterange.blade.php file.


<html>
 <head>
  <meta name="viewport" content="width=device-width, initial-scale=1">
  <title>Laravel 5.8 - Daterange Filter in Datatables with Server-side Processing</title>
  <script src="https://ajax.googleapis.com/ajax/libs/jquery/2.2.0/jquery.min.js"></script>
  <link rel="stylesheet" href="https://maxcdn.bootstrapcdn.com/bootstrap/3.3.6/css/bootstrap.min.css" />
  <script src="https://cdn.datatables.net/1.10.12/js/jquery.dataTables.min.js"></script>
  <script src="https://cdn.datatables.net/1.10.12/js/dataTables.bootstrap.min.js"></script>  
  <link rel="stylesheet" href="https://cdn.datatables.net/1.10.12/css/dataTables.bootstrap.min.css" />
  <script src="https://maxcdn.bootstrapcdn.com/bootstrap/3.3.6/js/bootstrap.min.js"></script>
        <link rel="stylesheet" href="https://cdnjs.cloudflare.com/ajax/libs/bootstrap-datepicker/1.8.0/css/bootstrap-datepicker.css" />
        <script src="https://cdnjs.cloudflare.com/ajax/libs/bootstrap-datepicker/1.8.0/js/bootstrap-datepicker.js"></script>
 </head>
 <body>
  <div class="container">    
     <br />
     <h3 align="center">Laravel 5.8 - Daterange Filter in Datatables with Server-side Processing</h3>
     <br />
            <br />
            <div class="row input-daterange">
                <div class="col-md-4">
                    <input type="text" name="from_date" id="from_date" class="form-control" placeholder="From Date" readonly />
                </div>
                <div class="col-md-4">
                    <input type="text" name="to_date" id="to_date" class="form-control" placeholder="To Date" readonly />
                </div>
                <div class="col-md-4">
                    <button type="button" name="filter" id="filter" class="btn btn-primary">Filter</button>
                    <button type="button" name="refresh" id="refresh" class="btn btn-default">Refresh</button>
                </div>
            </div>
            <br />
   <div class="table-responsive">
    <table class="table table-bordered table-striped" id="order_table">
           <thead>
            <tr>
                <th>Order ID</th>
                <th>Customer Name</th>
                <th>Item</th>
                <th>Value</th>
                            <th>Date</th>
            </tr>
           </thead>
       </table>
   </div>
  </div>
 </body>
</html>

<script>
$(document).ready(function(){
 $('.input-daterange').datepicker({
  todayBtn:'linked',
  format:'yyyy-mm-dd',
  autoclose:true
 });

 load_data();

 function load_data(from_date = '', to_date = '')
 {
  $('#order_table').DataTable({
   processing: true,
   serverSide: true,
   ajax: {
    url:'{{ route("daterange.index") }}',
    data:{from_date:from_date, to_date:to_date}
   },
   columns: [
    {
     data:'order_id',
     name:'order_id'
    },
    {
     data:'order_customer_name',
     name:'order_customer_name'
    },
    {
     data:'order_item',
     name:'order_item'
    },
    {
     data:'order_value',
     name:'order_value'
    },
    {
     data:'order_date',
     name:'order_date'
    }
   ]
  });
 }

 $('#filter').click(function(){
  var from_date = $('#from_date').val();
  var to_date = $('#to_date').val();
  if(from_date != '' &&  to_date != '')
  {
   $('#order_table').DataTable().destroy();
   load_data(from_date, to_date);
  }
  else
  {
   alert('Both Date is required');
  }
 });

 $('#refresh').click(function(){
  $('#from_date').val('');
  $('#to_date').val('');
  $('#order_table').DataTable().destroy();
  load_data();
 });

});
</script>


Set Routes


In Laravel we have to set the route of all controller method, for this we have open routes/web.php file and in this file we have to define route.


Route::resource('daterange', 'DateRangeController');


Run Laravel 5.8 Application


Lastly, We have to run Laravel application. For this we have go to command prompt and write follow command.


php artisan serve


This command will start Laravel server and it will give base url of Laravel application. For access this daterange application we have to write follow url in browser.


http://127.0.0.1:8000/daterange


So, this is complete step by step process for implement date range filter in Laravel 5.8 Datatable by using yajra datatable package and Ajax.

Tuesday, 23 January 2018

Datatables Server Side Processing in Laravel


This post covered Datatables Server Side Processing using Ajax in Laravel Framework. How to Implementing JQuery Datatables in Laravel with Ajax Server Side processing. In this post we have describe this things step by step. Because Jquery Datatables will add some advance features like quick search of table data, it will make automatic pagination without write of code, table column ordering, sorting of table column and many more. And if this features we have use laravel application then it will add robust feature to your HTML table data. For Implement Datatables in Laravel we will use yajra/laravel-datatables-oracle package. By using this package we can implement Jquery Datatables plugin in Larvel Application.
First we want to download Laravel clone application, so we have to go to command prompt in which composer must be installed and we have to write following command.


composer create-project --prefer-dist laravel/laravel student_crud1 "5.4.*"


This command will download Laravel Clone application and installed in specified directory. After download Laravel first we want to make database connection, so we have to open .env file and in that file we have to define database configuration details.


DB_CONNECTION=mysql
DB_HOST=localhost
DB_PORT=3306
DB_DATABASE=laravel_testing
DB_USERNAME=root
DB_PASSWORD=


After this we have to define mysql database configuration details in config/database.php.


'mysql' => [
            'driver' => 'mysql',
            'host' => env('DB_HOST', 'localhost'),
            'port' => env('DB_PORT', '3306'),
            'database' => env('DB_DATABASE', 'laravel_testing'),
            'username' => env('DB_USERNAME', 'root'),
            'password' => env('DB_PASSWORD', ''),
            'unix_socket' => env('DB_SOCKET', ''),
            'charset' => 'utf8mb4',
            'collation' => 'utf8mb4_unicode_ci',
            'prefix' => '',
            'strict' => true,
            'engine' => null,
        ],


After making of database connection now we want to create model for create student table and for database operation. For this we have to write following command in cmd.


php artisan make:model Student -m


This command will create Student Model in app/Student.php folder and it will also create database migration file in database/migrations folder. In migration file we have add some code for create table in Mysql database.


<?php

use Illuminate\Support\Facades\Schema;
use Illuminate\Database\Schema\Blueprint;
use Illuminate\Database\Migrations\Migration;

class CreateStudentsTable extends Migration
{
    /**
     * Run the migrations.
     *
     * @return void
     */
    public function up()
    {
        Schema::create('students', function (Blueprint $table) {
            $table->increments('id');
            $table->string('first_name');
            $table->string('last_name');
            $table->timestamps();
        });
    }

    /**
     * Reverse the migrations.
     *
     * @return void
     */
    public function down()
    {
        Schema::dropIfExists('students');
    }
}


Now we want to migrate this code into Mysql database, so we have go to command prompt and write following command, this command will migrate student table in Mysql database and create student table in laravel_testing database.


php artisan migrate


Now We want to make one controller for manage data request and layout. For create new controller we should go to cmd prompt and write following command.


php artisan make:controller AjaxdataController


This command will create AjaxdataController.php file under app/Http/Controllers folder. After this we have create ajaxdata.blade.php view file for display output in browser. And in that file we have create one table in which we want to load data from student table by using datatables.


<!DOCTYPE html>
<html>
<head>
    <title>Datatables Server Side Processing in Laravel</title>
    <script src="https://ajax.googleapis.com/ajax/libs/jquery/2.2.0/jquery.min.js"></script>
    <link rel="stylesheet" href="https://maxcdn.bootstrapcdn.com/bootstrap/3.3.6/css/bootstrap.min.css" />
    <script src="https://cdn.datatables.net/1.10.12/js/jquery.dataTables.min.js"></script>
    <script src="https://cdn.datatables.net/1.10.12/js/dataTables.bootstrap.min.js"></script>       
    <link rel="stylesheet" href="https://cdn.datatables.net/1.10.12/css/dataTables.bootstrap.min.css" />
    <script src="https://maxcdn.bootstrapcdn.com/bootstrap/3.3.6/js/bootstrap.min.js"></script>
</head>
<body>

<div class="container">
    <br />
    <h3 align="center">Datatables Server Side Processing in Laravel</h3>
    <br />
    <table id="student_table" class="table table-bordered" style="width:100%">
        <thead>
            <tr>
                <th>First Name</th>
                <th>Last Name</th>
            </tr>
        </thead>
    </table>
</div>

</body>
</html>


Now we want to load this view file in browser, so for this we have to go to AjaxdataController.php file and under this we have to write following code.


<?php

namespace App\Http\Controllers;

use Illuminate\Http\Request;

class AjaxdataController extends Controller
{
    function index()
    {
     return view('student.ajaxdata');
     //http://127.0.0:8000/ajaxdata
    }
}


Now we want set route for this method, so we have to go to routes/web.php file and write following code for set route for index method.


Route::get('ajaxdata', 'AjaxdataController@index')->name('ajaxdata');


Now we want to download yajra/laravel-datatables-oracle package for use datatables in Laravel. For this we have to go to command prompt and write following command.


composer require yajra/laravel-datatables-oracle:"~7.0"


This command will download yajra/laravel-datatables-oracle package which we can found under vendor folder. Now we want to add service provider and alias details under config/app.php file.


'providers' => [
        ............
        Yajra\Datatables\DatatablesServiceProvider::class,

    ],


'aliases' => [
        ................
        'DataTables' => Yajra\DataTables\Facades\DataTables::class,

    ],


After adding service provider and alias details, now we want to publish following package under this application, so we can use this package under Laravel. So for this we have to go to command prompt and write following command.


php artisan vendor:publish --provider=Yajra\Datatables\DataTablesServiceProvider


After writing this command, now we can use this package in Laravel Application. For use this package first we want to add this package class under AjaxdataController.php file. Then after we have make one method for get data from student table and by using this package class method we can convert into format as per require in JQuery Datatables plugin which we can see below.


<?php

namespace App\Http\Controllers;

use Illuminate\Http\Request;
use App\Student;
use Datatables;

class AjaxdataController extends Controller
{
    function index()
    {
     return view('student.ajaxdata');
     //http://127.0.0:8000/ajaxdata
    }

    function getdata()
    {
     $students = Student::select('first_name', 'last_name');
     return Datatables::of($students)->make(true);
    }
}


After this we want to set route for this new method, so we have go to route/web.php file and add following code.


Route::get('ajaxdata/getdata', 'AjaxdataController@getdata')->name('ajaxdata.getdata');


Lastly we want to send ajax request from ajaxdata.blade.php file to this getdata() method of AjaxdataController.php file. Below we can ajax request code.


<!DOCTYPE html>
<html>
<head>
    <title>Datatables Server Side Processing in Laravel</title>
    <script src="https://ajax.googleapis.com/ajax/libs/jquery/2.2.0/jquery.min.js"></script>
    <link rel="stylesheet" href="https://maxcdn.bootstrapcdn.com/bootstrap/3.3.6/css/bootstrap.min.css" />
    <script src="https://cdn.datatables.net/1.10.12/js/jquery.dataTables.min.js"></script>
    <script src="https://cdn.datatables.net/1.10.12/js/dataTables.bootstrap.min.js"></script>       
    <link rel="stylesheet" href="https://cdn.datatables.net/1.10.12/css/dataTables.bootstrap.min.css" />
    <script src="https://maxcdn.bootstrapcdn.com/bootstrap/3.3.6/js/bootstrap.min.js"></script>
</head>
<body>

<div class="container">
    <br />
    <h3 align="center">Datatables Server Side Processing in Laravel</h3>
    <br />
    <table id="student_table" class="table table-bordered" style="width:100%">
        <thead>
            <tr>
                <th>First Name</th>
                <th>Last Name</th>
            </tr>
        </thead>
    </table>
</div>

<script type="text/javascript">
$(document).ready(function() {
     $('#student_table').DataTable({
        "processing": true,
        "serverSide": true,
        "ajax": "{{ route('ajaxdata.getdata') }}",
        "columns":[
            { "data": "first_name" },
            { "data": "last_name" }
        ]
     });
});
</script>
</body>
</html>


Lastly, we want to show output in browser, so we have to go to command prompt and write this command for run laravel application.


php artisan serve


This command will start Laravel Development Server and give you one url like . We can run laravel application by copy this url in browser and press enter, suppose we want to run tutorial which we have discuss in this post, so at that time we have write http://127.0.0:8000/ajaxdata. This url will directly load AjaxdataController.php file index() method in browser.