Showing posts with label read. Show all posts

Friday, 1 September 2023

Efficient Node.js CRUD App with MySQL: Enhanced by Bootstrap Offcanvas for a Seamless User Experience

Efficient Node.js CRUD App with MySQL: Enhanced by Bootstrap Offcanvas for a Seamless User Experience


In today's fast-paced world of web development, creating applications that can seamlessly manage data is a must. That's where CRUD (Create, Read, Update, Delete) applications come into play, enabling users to interact with data stored in databases efficiently. In this article, we'll guide you through building an efficient Node.js CRUD application, supercharged by MySQL as the database, and enhanced with Bootstrap Offcanvas for an exceptional user experience.

Getting Started with Node.js and MySQL


Before diving into the Offcanvas enhancements, let's set the foundation by creating a basic Node.js CRUD application with MySQL. We'll go step by step:

Step 1: Setting Up Your Development Environment


Make sure you have Node.js and MySQL installed on your system. If not, you can download and install them from their respective websites.

Step 2: Project Initialization


Create a new directory for your project and navigate to it in your terminal. Run the following command to initialize a Node.js project:


npm init -y

Step 3: Installing Dependencies


Install the necessary dependencies: express, mysql2, and body-parser using the following command:


npm install express mysql2 body-parser


Step 4: Creating the Server


Now, create a server.js file and set up your Express server. Import the required modules and configure your server:


const express = require('express');

const bodyParser = require('body-parser');

const mysql = require('mysql2');

const app = express();

app.use(bodyParser.urlencoded({ extended : true }));

const connection = mysql.createConnection({
	host : 'localhost',
	user : 'root',
	password : '',
	database : 'testing'
});

connection.connect((error) => {
	if(error){
		console.log('Error connecting to MySQL:', err);
		return;
	}
	console.log('Connected to MySQL database');
});

app.listen(3000, () => {
	console.log('Server is listening on port 3000');
});


Step 5: Setting Up CRUD Routes


Implement your CRUD operations by defining routes for creating, reading, updating, and deleting data in your MySQL database. Here's a simplified example for the "read" operation:

Index Route

When someone navigates to the root URL of our server, we serve an HTML file named form.html. We're essentially setting up the initial interface for users to interact with.


app.get('/', (request, response) => {
	response.sendFile(__dirname + '/form.html');
});


Select or Fetch Data


This route will handle requests for fetching data from our MySQL database.


app.get('/fetchData', (request, response) => {
	const { draw, start, length, order, columns, search } = request.query;

	const column_index = order && order[0] && order[0].column;

	const column_sort_order = order === undefined ? 'desc' : request.query.order[0]['dir'];

	const column_name = column_index ? columns[column_index] : 'id';

	const search_value = search.value;

	const search_query = search_value ? ` WHERE name LIKE '%${search_value}%' OR email LIKE '%${search_value}%'` : '';

	const query1 = `SELECT id, name, email FROM user ${search_query} ORDER BY ${column_name} ${column_sort_order} LIMIT ${start}, ${length}`;

	const query2 = `SELECT COUNT(*) AS Total FROM user`;

	const query3 = `SELECT COUNT(*) AS Total FROM user ${search_query}`;

	connection.query(query1, (dataError, dataResult) => {

		connection.query(query2, (totalDataError, totalDataResult) => {

			connection.query(query3, (totalFilterDataError, totalFilterDataResult) => {

				response.json({
					draw : request.query.draw,
					recordsTotal : totalDataResult[0]['Total'],
					recordsFiltered : totalFilterDataResult[0]['Total'],
					data : dataResult
				});

			})

		})

	})
});


Insert Update Delete Data


This route will handle requests for Insert Update Delete data from our MySQL database.


app.post('/submitData', (request, response) => {
	const id = request.body.id;
	const name = request.body.name;
	const email = request.body.email;
	const action = request.body.action;
	let query;
	let data;
	let message;
	if(action === 'Insert'){
		query = `INSERT INTO user (name, email) VALUES (?, ?)`;
		data = [name, email];
		message = 'Data has been inserted';
	}

	if(action === 'Edit'){
		query = `UPDATE user SET name = ?, email = ? WHERE id = ?`;
		data = [name, email, id];
		message = 'Data has been updated';
	}

	if(action === 'Delete'){
		query = `DELETE FROM user WHERE id = ?`;
		data = [id];
		message = 'Data has been deleted';
	}

	connection.query(query, data, (error, result) => {
		response.json({'message' : message});
	});
});


Fetch Single Data


This route will be used for fetch single data from MySQL Database.


app.get('/fetchData/:id', (request, response) => {
	const query = `SELECT * FROM user WHERE id = ?`;

	connection.query(query, [request.params.id], (error, result) => {
		response.json(result[0]);
	});
});


Enhancing User Experience with Bootstrap Offcanvas


Now that we have our Node.js CRUD application up and running, it's time to enhance the user experience with Bootstrap Offcanvas. The Offcanvas component provides a sleek and non-intrusive way to interact with data.

Step 1: Adding Bootstrap to Your Project


Include Bootstrap CSS and JavaScript files in your HTML. You can either download them and host them locally or use a Content Delivery Network (CDN). Here's an example of using CDN links:


<!doctype html>
<html lang="en">
    <head>
        <!-- Required meta tags -->
        <meta charset="utf-8">
        <meta name="viewport" content="width=device-width, initial-scale=1">

        <!-- Bootstrap CSS -->
        <link href="https://cdn.jsdelivr.net/npm/bootstrap@5.0.2/dist/css/bootstrap.min.css" rel="stylesheet" integrity="sha384-EVSTQN3/azprG1Anm3QDgpJLIm9Nao0Yz1ztcQTwFspd3yD65VohhpuuCOmLASjC" crossorigin="anonymous">
        <link href="https://cdn.datatables.net/1.13.6/css/dataTables.bootstrap5.min.css" rel="stylesheet">

        <title>Node.js CRUD with MySQL & Bootstrap Offcanvas</title>
    </head>
    <body>

        <script src="https://code.jquery.com/jquery-3.7.0.js"></script>
        <script src="https://cdn.jsdelivr.net/npm/bootstrap@5.0.2/dist/js/bootstrap.bundle.min.js" integrity="sha384-MrcW6ZMFYlzcLA8Nl+NtUVF0sA7MsXsP1UyJoMp4YLEuNSfAP+JcXn/tWtIaxVXM" crossorigin="anonymous"></script>
        <script src="https://cdn.datatables.net/1.13.6/js/jquery.dataTables.min.js"></script>
        <script src="https://cdn.datatables.net/1.13.6/js/dataTables.bootstrap5.min.js"></script>

    </body>
</html>


Step 2: Creating an Offcanvas


Now, let's implement an Offcanvas for editing user data. Add a button to trigger the Offcanvas:


<button type="button" class="btn btn-primary btn-sm float-end" onclick="addData()">Add</button>


Create the Offcanvas element with a form for editing user data:


<div class="offcanvas offcanvas-end" tabindex="-1" id="offcanvas_component">
            <div class="offcanvas-header">
                <h5 class="offcanvas-title" id="offcanvasLabel">Add Data</h5>
                <button type="button" class="btn-close" data-bs-dismiss="offcanvas" aria-label="Close"></button>
            </div>
            <div class="offcanvas-body">

            </div>
        </div>


Step 3: Implementing the Edit Form


Inside the Offcanvas body, add a form for adding or editing user data. So for this, we have make form field by using javascript function which we can you for both Insert or updata of data also.


function makeForm(id = '', name = '', email = '', action = 'Insert')
    {
        const output = `
        <div class="mb-3">
            <label for="name">Name:</label>
            <input type="text" name="name" id="name" class="form-control" value="${name}" />
        </div>
        <div class="mb-3">
            <label for="email">Email:</label>
            <input type="email" name="email" id="email" class="form-control" value="${email}" />
        </div>
        <input type="hidden" name="action" id="action" value="${action}" />
        <input type="hidden" name="id" id="id" value="${id}" />
        <input type="submit" class="btn btn-primary" onclick="submitForm();" value="${action}" />
        `;
        return output;
    }


Step 4: JavaScript for Offcanvas Interaction


Finally, use JavaScript to handle the Offcanvas interactions. Add an event listener to open the Offcanvas when the "Edit User" button is clicked:


let offcanvas;

    let offcanvas_body = document.querySelector('.offcanvas-body');

    let offcanvas_component = document.querySelector('#offcanvas_component');

    let offcanvasLabel = document.querySelector('#offcanvasLabel');

    offcanvas = new bootstrap.Offcanvas(offcanvas_component);


You can further enhance this by pre-populating the form with user data for editing and implementing the update functionality.

Complete Source Code


server.js

const express = require('express');

const bodyParser = require('body-parser');

const mysql = require('mysql2');

const app = express();

app.use(bodyParser.urlencoded({ extended : true }));

const connection = mysql.createConnection({
	host : 'localhost',
	user : 'root',
	password : '',
	database : 'testing'
});

connection.connect((error) => {
	if(error){
		console.log('Error connecting to MySQL:', err);
		return;
	}
	console.log('Connected to MySQL database');
});

app.get('/', (request, response) => {
	response.sendFile(__dirname + '/form.html');
});

app.get('/fetchData', (request, response) => {
	const { draw, start, length, order, columns, search } = request.query;

	const column_index = order && order[0] && order[0].column;

	const column_sort_order = order === undefined ? 'desc' : request.query.order[0]['dir'];

	const column_name = column_index ? columns[column_index] : 'id';

	const search_value = search.value;

	const search_query = search_value ? ` WHERE name LIKE '%${search_value}%' OR email LIKE '%${search_value}%'` : '';

	const query1 = `SELECT id, name, email FROM user ${search_query} ORDER BY ${column_name} ${column_sort_order} LIMIT ${start}, ${length}`;

	const query2 = `SELECT COUNT(*) AS Total FROM user`;

	const query3 = `SELECT COUNT(*) AS Total FROM user ${search_query}`;

	connection.query(query1, (dataError, dataResult) => {

		connection.query(query2, (totalDataError, totalDataResult) => {

			connection.query(query3, (totalFilterDataError, totalFilterDataResult) => {

				response.json({
					draw : request.query.draw,
					recordsTotal : totalDataResult[0]['Total'],
					recordsFiltered : totalFilterDataResult[0]['Total'],
					data : dataResult
				});

			})

		})

	})
});

app.post('/submitData', (request, response) => {
	const id = request.body.id;
	const name = request.body.name;
	const email = request.body.email;
	const action = request.body.action;
	let query;
	let data;
	let message;
	if(action === 'Insert'){
		query = `INSERT INTO user (name, email) VALUES (?, ?)`;
		data = [name, email];
		message = 'Data has been inserted';
	}

	if(action === 'Edit'){
		query = `UPDATE user SET name = ?, email = ? WHERE id = ?`;
		data = [name, email, id];
		message = 'Data has been updated';
	}

	if(action === 'Delete'){
		query = `DELETE FROM user WHERE id = ?`;
		data = [id];
		message = 'Data has been deleted';
	}

	connection.query(query, data, (error, result) => {
		response.json({'message' : message});
	});
});

app.get('/fetchData/:id', (request, response) => {
	const query = `SELECT * FROM user WHERE id = ?`;

	connection.query(query, [request.params.id], (error, result) => {
		response.json(result[0]);
	});
});

app.listen(3000, () => {
	console.log('Server is listening on port 3000');
});


form.html

<!doctype html>
<html lang="en">
    <head>
        <!-- Required meta tags -->
        <meta charset="utf-8">
        <meta name="viewport" content="width=device-width, initial-scale=1">

        <!-- Bootstrap CSS -->
        <link href="https://cdn.jsdelivr.net/npm/bootstrap@5.0.2/dist/css/bootstrap.min.css" rel="stylesheet" integrity="sha384-EVSTQN3/azprG1Anm3QDgpJLIm9Nao0Yz1ztcQTwFspd3yD65VohhpuuCOmLASjC" crossorigin="anonymous">
        <link href="https://cdn.datatables.net/1.13.6/css/dataTables.bootstrap5.min.css" rel="stylesheet">

        <title>Node.js CRUD with MySQL & Bootstrap Offcanvas</title>
    </head>
    <body>
        <div class="container">
            <h1 class="text-danger text-center mt-3"><b>Node.js CRUD with MySQL & Bootstrap Offcanvas - Delete Data</b></h1>
            <div class="card mt-5">
                <div class="card-header">
                    <div class="row">
                        <div class="col-md-11"><b>Node.js CRUD with MySQL & Bootstrap Offcanvas</b></div>
                        <div class="col-md-1">
                            <button type="button" class="btn btn-primary btn-sm float-end" onclick="addData()">Add</button>
                        </div>
                    </div>
                </div>
                <div class="card-body">
                    <div class="table-responsive">
                        <table class="table table-bordered" id="sample_data">
                            <thead>
                                <tr>
                                    <th>Name</th>
                                    <th>Email</th>
                                    <th>Action</th>
                                </tr>
                            </thead>
                            <tbody></tbody>
                        </table>
                    </div>
                </div>
            </div>
        </div>

        <div class="offcanvas offcanvas-end" tabindex="-1" id="offcanvas_component">
            <div class="offcanvas-header">
                <h5 class="offcanvas-title" id="offcanvasLabel">Add Data</h5>
                <button type="button" class="btn-close" data-bs-dismiss="offcanvas" aria-label="Close"></button>
            </div>
            <div class="offcanvas-body">

            </div>
        </div>

        <!-- Optional JavaScript; choose one of the two! -->

        <!-- Option 1: Bootstrap Bundle with Popper -->


        <script src="https://code.jquery.com/jquery-3.7.0.js"></script>
        <script src="https://cdn.jsdelivr.net/npm/bootstrap@5.0.2/dist/js/bootstrap.bundle.min.js" integrity="sha384-MrcW6ZMFYlzcLA8Nl+NtUVF0sA7MsXsP1UyJoMp4YLEuNSfAP+JcXn/tWtIaxVXM" crossorigin="anonymous"></script>
        <script src="https://cdn.datatables.net/1.13.6/js/jquery.dataTables.min.js"></script>
        <script src="https://cdn.datatables.net/1.13.6/js/dataTables.bootstrap5.min.js"></script>

    </body>
</html>

<script>

$(document).ready(function(){

    $('#sample_data').DataTable({
        ajax : '/fetchData',
        processing : true,
        serverSide : true,
        serverMethod : 'GET',
        order : [],
        columns : [
            { data : 'name' },
            { data : 'email' },
            {
                data : null,
                render : function (data, type, row){
                    return `<button class="btn btn-warning btn-sm" onclick="fetchData(${data.id})">Edit</button>&nbsp;<button class="btn btn-danger btn-sm" onclick="deleteData(${data.id})">Delete</button>`;
                }
            }
        ]
    });

});

    let offcanvas;

    let offcanvas_body = document.querySelector('.offcanvas-body');

    let offcanvas_component = document.querySelector('#offcanvas_component');

    let offcanvasLabel = document.querySelector('#offcanvasLabel');

    offcanvas = new bootstrap.Offcanvas(offcanvas_component);

    function addData()
    {
        offcanvas_body.innerHTML = makeForm();
        offcanvas.show();
    }

    function makeForm(id = '', name = '', email = '', action = 'Insert')
    {
        const output = `
        <div class="mb-3">
            <label for="name">Name:</label>
            <input type="text" name="name" id="name" class="form-control" value="${name}" />
        </div>
        <div class="mb-3">
            <label for="email">Email:</label>
            <input type="email" name="email" id="email" class="form-control" value="${email}" />
        </div>
        <input type="hidden" name="action" id="action" value="${action}" />
        <input type="hidden" name="id" id="id" value="${id}" />
        <input type="submit" class="btn btn-primary" onclick="submitForm();" value="${action}" />
        `;
        return output;
    }

    function submitForm()
    {
        const id = document.querySelector('#id').value;
        const name = document.querySelector('#name').value;
        const email = document.querySelector('#email').value;
        const action = document.querySelector('#action').value;

        $.ajax({
            url : '/submitData',
            method : 'POST',
            data : {id : id, name : name, email : email, action : action},
            dataType : 'JSON',
            success : function(data){
                $('#sample_data').DataTable().ajax.reload();
                offcanvas.hide();
                alert(data.message);
            }
        });
    }

    function fetchData(id)
    {
        $.ajax({
            url : '/fetchData/'+id,
            dataType : 'JSON',
            success : function(data){
                offcanvas_body.innerHTML = makeForm(data.id, data.name, data.email, 'Edit');
                offcanvasLabel.innerHTML = 'Edit Data';
                offcanvas.show();
            }
        });
    }

    function deleteData(id){
        let output = `
        <div class="text-center">
            <h3 class="text-danger mb-4">Are you sure you want to remove this data?</h3>
            <input type="hidden" id="id" value="${id}" />
            <input type="hidden" id="action" value="Delete" />
            <input type="hidden" id="name" value="" />
            <input type="hidden" id="email" value="" />
            <button type="button" class="btn btn-info" onclick="submitForm()">OK</button>
            <button type="button" class="btn btn-default" data-bs-dismiss="offcanvas">Cancel</button>
        </div>
        `;

        offcanvas_body.innerHTML = output;
        offcanvasLabel.innerHTML = 'Delete Data Confirmation';
        offcanvas.show();
    }

</script>


Run Node Application


For run Node.js Application, we have goes to terminal and goes into our working directory and run following command.


node server.js


This command will start our Node server and for check output in browser, we have to open this url in the browser window.


http://localhost:3000/


Conclusion


In this article, we've walked through the process of building an efficient Node.js CRUD application with MySQL. We've also explored how to enhance the user experience by integrating Bootstrap Offcanvas for a seamless and visually appealing interface. By combining the power of Node.js, MySQL, and Bootstrap Offcanvas, you can create dynamic and user-friendly applications that excel in data management.

Now, it's your turn to explore and expand upon these concepts to build feature-rich CRUD applications tailored to your specific requirements. Happy coding!
Saturday, 16 July 2022

Build Laravel 9 CRUD Application with MySQL & Bootstrap 5

Build Laravel 9 CRUD Application with MySQL & Bootstrap 5


In this tutorial, we are going to show you how to make CRUD Application Laravel 9 framework. We will explained you step by step, how can we perform CRUD Operation in Laravel 9 Framework. So if you beginner in Laravel framework then this tutorial will help you to build CRUD Application in Laravel 9 framework, and you will be able to create Laravel 9 CRUN Application. Here under this tutorial, we will use basic example to show you CRUD Operation in Laravel 9.

Recently Laravel has release Laravel 9 framework and in Laravel 9 framework there is several new features and LTS Support. Laravel 9 also introduced an Anonymous Sub Migration also and it also resolved migration class name Collison. One more things Laravel 9 framework has been use PHP 8 version and it has been support PHP string function, which are very useful for string operations. There are many new query builder function has been introduced under Laravel 9 framework which will more convenient when you have work with database operation. So you are learn Laravel framework first time then this tutorial will help you to create CRUD (Create, Read, Update and Delete) Operation in Laravel 9 framework.

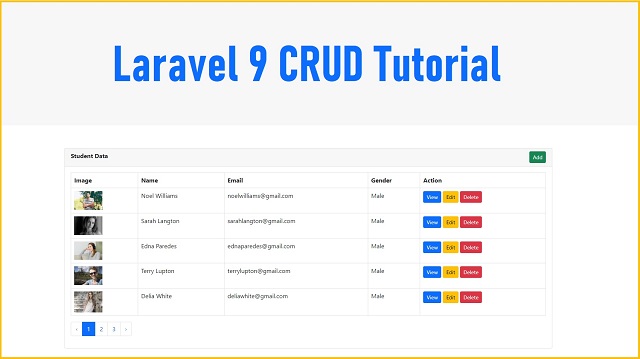
In this tutorial, we will create Student CRUD Application in Laravel 9 framework. Under this CRUD Application we will make Application, in which we can Add new Student Data, with student image upload, edit or change existing student data, with form data validation, show single student data on the web page, delete or remove student data from data and fetch all student data from MySQL database and display on the web page in HTML table format with dynamic pagination link. We will also create table in MySQL database from this Laravel 9 application using Laravel 9 Migration, and after this, we will create Controller, Models and views file for student crud application. Under this Laravel 9 crud application we will use Bootstrap 5 library for design web page. You have to following below steps to create CRUD Application in Laravel 9 framework.


Step 1 - Download & Install 9


In the First Steps of Laravel 9 CRUD Application, we have to download and install fresh Laravel 9 Application in our computer. So for this, you have to goes to command prompt and then after goes into directory where you have run PHP 8 script and then after you have to run following command.


composer create-project --prefer-dist laravel/laravel laravel_9_crud


Once we have run this command then it will create laravel_9_crud directory and under this directory it will download and install Laravel 9 Application.

Step 2 - Make Database Connection


After install Laravel 9 application, first we need to create database connection with MySQL database. So for this we have to open .env file and under this file, we need to add MySQL database configuration like MySQL database name, MySQL database user namd and password details. Once we have define this details, then it will make MySQL database connection in Laravel 9 framework. Below you can find MySQL database configuration details.

.env

DB_CONNECTION=mysql
DB_HOST=127.0.0.1
DB_PORT=3306
DB_DATABASE=testing
DB_USERNAME=root
DB_PASSWORD=


Step 3 - Create MySQL Table using Laravel 9 Migration


Under this step, we have to crate students table under MySQL database from this Laravel 9 Application using Migrations. So first we have to create migration file under Laravel 9 application, so we have to run following command in command prompt.


php artisan make:migration create_students_table --create=students


After run above command then you will find one new file under database/migrations directory. So for we have to open that file and under that file, we have to define following code under that migrations file for create students table in MySQL database.


<?php

use Illuminate\Database\Migrations\Migration;
use Illuminate\Database\Schema\Blueprint;
use Illuminate\Support\Facades\Schema;

return new class extends Migration
{
    /**
     * Run the migrations.
     *
     * @return void
     */
    public function up()
    {
        Schema::create('students', function (Blueprint $table) {
            $table->id();
            $table->string('student_name');
            $table->string('student_email');
            $table->enum('student_gender', ['Male', 'Female']);
            $table->string('student_image');
            $table->timestamps();
        });
    }

    /**
     * Reverse the migrations.
     *
     * @return void
     */
    public function down()
    {
        Schema::dropIfExists('students');
    }
};


After above code in migration file, now for create table in MySQL database from this Laravel 9 application, so for this, we have to run following command in command prompt and it will migrate MySQL table defination to MySQL database and create students table in MySQL database from this Laravel 9 Application.


php artisan migrate


Step 4 - Create CRUD Model and Controller


Under this step, we have to create Controller and Models file for CRUD Operation. So for this, we have goes to command prompt and run following command, which will create new CRUD StudentController and Student Model class file under Laravel 9 framework.


php artisan make:controller StudentController --resource --model=Student


So after run above command it will create Student.php model class file under app/Models directory and we have to open that file and put following code under that file.

app/Models/Student.php

<?php

namespace App\Models;

use Illuminate\Database\Eloquent\Factories\HasFactory;
use Illuminate\Database\Eloquent\Model;

class Student extends Model
{
    use HasFactory;

    protected $fillable = ['student_name', 'student_email', 'student_gender', 'student_image'];
}


And after run above command it will also create CRUD Controller with name StudentController.php file under app/Http/Controllers directory.

So this StudentController.php file has been created with seven method by default which you can seen below.

  1. index() - This is root method of this Controller class.
  2. create() - This is method has been used for load Add student form in the browser.
  3. store() - This method has been used for handle Add student data request.
  4. show() - This method has been used for display single student data on the web page.
  5. edit() - This method has been used for load edit student form in the browser.
  6. update() - This method has been receive student update form data request.
  7. destroy() - This method has been used for delete student data from database.

For create CRUD Application, you have to put folliowing code under StudentController.php file.

app/Http/Controllers/StudentController.php app/Http/Controllers/StudentController.php

<?php

namespace App\Http\Controllers;

use App\Models\Student;
use Illuminate\Http\Request;

class StudentController extends Controller
{
    /**
     * Display a listing of the resource.
     *
     * @return \Illuminate\Http\Response
     */
    public function index()
    {
        $data = Student::latest()->paginate(5);

        return view('index', compact('data'))->with('i', (request()->input('page', 1) - 1) * 5);
    }

    /**
     * Show the form for creating a new resource.
     *
     * @return \Illuminate\Http\Response
     */
    public function create()
    {
        return view('create');
    }

    /**
     * Store a newly created resource in storage.
     *
     * @param  \Illuminate\Http\Request  $request
     * @return \Illuminate\Http\Response
     */
    public function store(Request $request)
    {
        $request->validate([
            'student_name'          =>  'required',
            'student_email'         =>  'required|email|unique:students',
            'student_image'         =>  'required|image|mimes:jpg,png,jpeg,gif,svg|max:2048|dimensions:min_width=100,min_height=100,max_width=1000,max_height=1000'
        ]);

        $file_name = time() . '.' . request()->student_image->getClientOriginalExtension();

        request()->student_image->move(public_path('images'), $file_name);

        $student = new Student;

        $student->student_name = $request->student_name;
        $student->student_email = $request->student_email;
        $student->student_gender = $request->student_gender;
        $student->student_image = $file_name;

        $student->save();

        return redirect()->route('students.index')->with('success', 'Student Added successfully.');
    }

    /**
     * Display the specified resource.
     *
     * @param  \App\Models\Student  $student
     * @return \Illuminate\Http\Response
     */
    public function show(Student $student)
    {
        return view('show', compact('student'));
    }

    /**
     * Show the form for editing the specified resource.
     *
     * @param  \App\Models\Student  $student
     * @return \Illuminate\Http\Response
     */
    public function edit(Student $student)
    {
        return view('edit', compact('student'));
    }

    /**
     * Update the specified resource in storage.
     *
     * @param  \Illuminate\Http\Request  $request
     * @param  \App\Models\Student  $student
     * @return \Illuminate\Http\Response
     */
    public function update(Request $request, Student $student)
    {
        $request->validate([
            'student_name'      =>  'required',
            'student_email'     =>  'required|email',
            'student_image'     =>  'image|mimes:jpg,png,jpeg,gif,svg|max:2048|dimensions:min_width=100,min_height=100,max_width=1000,max_height=1000'
        ]);

        $student_image = $request->hidden_student_image;

        if($request->student_image != '')
        {
            $student_image = time() . '.' . request()->student_image->getClientOriginalExtension();

            request()->student_image->move(public_path('images'), $student_image);
        }

        $student = Student::find($request->hidden_id);

        $student->student_name = $request->student_name;

        $student->student_email = $request->student_email;

        $student->student_gender = $request->student_gender;

        $student->student_image = $student_image;

        $student->save();

        return redirect()->route('students.index')->with('success', 'Student Data has been updated successfully');
    }

    /**
     * Remove the specified resource from storage.
     *
     * @param  \App\Models\Student  $student
     * @return \Illuminate\Http\Response
     */
    public function destroy(Student $student)
    {
        $student->delete();

        return redirect()->route('students.index')->with('success', 'Student Data deleted successfully');
    }
}


Step 5 - Add Service Provider for Bootstrap Pagination


In Laravel 9 framework produce default style pagination link which will not properly display if you have Bootstrap library. So for this, we have to open app/Providers/AppServiceProvider.php and under this file, we have to add Paginator::useBootstrap() code under boot() method for support the bootstrap pagination.

app/Providers/AppServiceProvider.php

<?php

namespace App\Providers;

use Illuminate\Support\ServiceProvider;
use Illuminate\Pagination\Paginator;

class AppServiceProvider extends ServiceProvider
{
    /**
     * Register any application services.
     *
     * @return void
     */
    public function register()
    {
        //
    }

    /**
     * Bootstrap any application services.
     *
     * @return void
     */
    public function boot()
    {
        Paginator::useBootstrap();
    }
}


So after adding this code, you Laravel 9 application will display proper pagination link on the web page.

Step 6 - Create Views Blades File


Under this steps, we have to create blades files for display HTML output in the browser. In the Laravel 9 framework, blades files has been stored under resources/views directory. Under this Laravel 9 CRUD Application, we have to create following views blades files.

  1. master.blade.php - This is master template file.
  2. index.blade.php - This file we will used for display MySQL table data on the web page in HTML table format with pagination link.
  3. create.blade.php - This file has been used for load Create Student form on the web page.
  4. show.blade.php - This file has been used for display single student data on the web page.
  5. edit.blade.php - This file has been used for load student edit form in the browser.

Below you can find source code of all blade file.

resources/views/master.blade.php

<!DOCTYPE html>
<html lang="en">
<head>
    <meta charset="utf-8">
    <meta name="viewport" content="width=device-width, initial-scale=1">
    <title>Laravel 9 CRUD Application</title>
    <link href="https://cdn.jsdelivr.net/npm/bootstrap@5.0.1/dist/css/bootstrap.min.css" rel="stylesheet">
</head>
<body>
    <div class="container mt-5">
        
        <h1 class="text-primary mt-3 mb-4 text-center"><b>Laravel 9 Crud Application</b></h1>
        
        @yield('content')
        
    </div>
    
</body>
</html>


resources/views/index.blade.php

@extends('master')

@section('content')

@if($message = Session::get('success'))

<div class="alert alert-success">
	{{ $message }}
</div>

@endif

<div class="card">
	<div class="card-header">
		<div class="row">
			<div class="col col-md-6"><b>Student Data</b></div>
			<div class="col col-md-6">
				<a href="{{ route('students.create') }}" class="btn btn-success btn-sm float-end">Add</a>
			</div>
		</div>
	</div>
	<div class="card-body">
		<table class="table table-bordered">
			<tr>
				<th>Image</th>
				<th>Name</th>
				<th>Email</th>
				<th>Gender</th>
				<th>Action</th>
			</tr>
			@if(count($data) > 0)

				@foreach($data as $row)

					<tr>
						<td><img src="{{ asset('images/' . $row->student_image) }}" width="75" /></td>
						<td>{{ $row->student_name }}</td>
						<td>{{ $row->student_email }}</td>
						<td>{{ $row->student_gender }}</td>
						<td>
							<form method="post" action="{{ route('students.destroy', $row->id) }}">
								@csrf
								@method('DELETE')
								<a href="{{ route('students.show', $row->id) }}" class="btn btn-primary btn-sm">View</a>
								<a href="{{ route('students.edit', $row->id) }}" class="btn btn-warning btn-sm">Edit</a>
								<input type="submit" class="btn btn-danger btn-sm" value="Delete" />
							</form>
							
						</td>
					</tr>

				@endforeach

			@else
				<tr>
					<td colspan="5" class="text-center">No Data Found</td>
				</tr>
			@endif
		</table>
		{!! $data->links() !!}
	</div>
</div>

@endsection


resources/views/create.blade.php

@extends('master')

@section('content')

@if($errors->any())

<div class="alert alert-danger">
	<ul>
	@foreach($errors->all() as $error)

		<li>{{ $error }}</li>

	@endforeach
	</ul>
</div>

@endif

<div class="card">
	<div class="card-header">Add Student</div>
	<div class="card-body">
		<form method="post" action="{{ route('students.store') }}" enctype="multipart/form-data">
			@csrf
			<div class="row mb-3">
				<label class="col-sm-2 col-label-form">Student Name</label>
				<div class="col-sm-10">
					<input type="text" name="student_name" class="form-control" />
				</div>
			</div>
			<div class="row mb-3">
				<label class="col-sm-2 col-label-form">Student Email</label>
				<div class="col-sm-10">
					<input type="text" name="student_email" class="form-control" />
				</div>
			</div>
			<div class="row mb-4">
				<label class="col-sm-2 col-label-form">Student Gender</label>
				<div class="col-sm-10">
					<select name="student_gender" class="form-control">
						<option value="Male">Male</option>
						<option value="Female">Female</option>
					</select>
				</div>
			</div>
			<div class="row mb-4">
				<label class="col-sm-2 col-label-form">Student Image</label>
				<div class="col-sm-10">
					<input type="file" name="student_image" />
				</div>
			</div>
			<div class="text-center">
				<input type="submit" class="btn btn-primary" value="Add" />
			</div>	
		</form>
	</div>
</div>

@endsection('content')


resources/views/show.blade.php

@extends('master')

@section('content')

<div class="card">
	<div class="card-header">
		<div class="row">
			<div class="col col-md-6"><b>Student Details</b></div>
			<div class="col col-md-6">
				<a href="{{ route('students.index') }}" class="btn btn-primary btn-sm float-end">View All</a>
			</div>
		</div>
	</div>
	<div class="card-body">
		<div class="row mb-3">
			<label class="col-sm-2 col-label-form"><b>Student Name</b></label>
			<div class="col-sm-10">
				{{ $student->student_name }}
			</div>
		</div>
		<div class="row mb-3">
			<label class="col-sm-2 col-label-form"><b>Student Email</b></label>
			<div class="col-sm-10">
				{{ $student->student_email }}
			</div>
		</div>
		<div class="row mb-4">
			<label class="col-sm-2 col-label-form"><b>Student Gender</b></label>
			<div class="col-sm-10">
				{{ $student->student_gender }}
			</div>
		</div>
		<div class="row mb-4">
			<label class="col-sm-2 col-label-form"><b>Student Image</b></label>
			<div class="col-sm-10">
				<img src="{{ asset('images/' .  $student->student_image) }}" width="200" class="img-thumbnail" />
			</div>
		</div>
	</div>
</div>

@endsection('content')


resources/views/edit.blade.php

@extends('master')

@section('content')

<div class="card">
	<div class="card-header">Edit Student</div>
	<div class="card-body">
		<form method="post" action="{{ route('students.update', $student->id) }}" enctype="multipart/form-data">
			@csrf
			@method('PUT')
			<div class="row mb-3">
				<label class="col-sm-2 col-label-form">Student Name</label>
				<div class="col-sm-10">
					<input type="text" name="student_name" class="form-control" value="{{ $student->student_name }}" />
				</div>
			</div>
			<div class="row mb-3">
				<label class="col-sm-2 col-label-form">Student Email</label>
				<div class="col-sm-10">
					<input type="text" name="student_email" class="form-control" value="{{ $student->student_email }}" />
				</div>
			</div>
			<div class="row mb-4">
				<label class="col-sm-2 col-label-form">Student Gender</label>
				<div class="col-sm-10">
					<select name="student_gender" class="form-control">
						<option value="Male">Male</option>
						<option value="Female">Female</option>
					</select>
				</div>
			</div>
			<div class="row mb-4">
				<label class="col-sm-2 col-label-form">Student Image</label>
				<div class="col-sm-10">
					<input type="file" name="student_image" />
					<br />
					<img src="{{ asset('images/' . $student->student_image) }}" width="100" class="img-thumbnail" />
					<input type="hidden" name="hidden_student_image" value="{{ $student->student_image }}" />
				</div>
			</div>
			<div class="text-center">
				<input type="hidden" name="hidden_id" value="{{ $student->id }}" />
				<input type="submit" class="btn btn-primary" value="Edit" />
			</div>	
		</form>
	</div>
</div>
<script>
document.getElementsByName('student_gender')[0].value = "{{ $student->student_gender }}";
</script>

@endsection('content')


Step 7 - Set Resource Route


Under this step, we have to add resource route for student crud application. So for set route, we have to open routes/web.php file and under this file, we have to define resource route for Laravel 9 CRUD Application.

routes/web.php

<?php

use Illuminate\Support\Facades\Route;

use App\Http\Controllers\StudentController;

/*
|--------------------------------------------------------------------------
| Web Routes
|--------------------------------------------------------------------------
|
| Here is where you can register web routes for your application. These
| routes are loaded by the RouteServiceProvider within a group which
| contains the "web" middleware group. Now create something great!
|
*/

Route::get('/', function () {
    return view('welcome');
});


Route::resource('students', StudentController::class);


After adding above code, then it will set route for all method of StudentController.php file.

Step 8 - Run Laravel 9 CRUD Application


When we have follow all above steps, that means our Laravel 9 CRUD Application is ready for check output in the browser. So for check output in the browser, first we need to start Laravel 9 Application server, so for this, we have go to command prompt and run following command.


php artisan serve


So this command will start Laravel server and provide us base url of our Laravel 9 CRUD Application. So we have goes to browser, and type give below URL and view output of Laravel 9 CRUD Application.


http://127.0.0.1:8000/students


So this is complete step by step tutorial on Laravel 9 CRUD Application, so you have follow all above steps then you can able to learn How to perform Insert, Update, Delete and Read MySQL Data Operation in Laravel 9 framework and build CRUD Application Laravel 9 framework with MySQL database and Bootstrap 5 Library.

Laravel 9 CRUD Application Video Tutorial


1 - Load MySQL Data in HTML Table with Pagination Links


2 - Insert or Add Data into MySQL Table


3 - Retrieve MySQL Data & Display on Web page


4 - Update or Edit MySQL Data


5 - Delete or Remove Data From MySQL


Monday, 3 September 2018

Inline Table CRUD in Codeigniter using Ajax jquery


If you are beginner Codeigniter web developer then this tutorial will help you to learn something new in Codeigniter using Ajax. Because in this post we have covered topic like Live table Add Edit Delete Mysql records in Codeigniter using Ajax. We all know what is Live table or inline table, this is simple table grid which has been use not only for display data on web page but also in this table grid we can perform all CRUD operation like Insert, Update, Delete and Read mysql table data using Ajax. If you are regular reader of our blog then you have seen many tutorial on Live table CRUD in PHP using Ajax jQuery. So this type of feature we will make in Codeigniter framework. Because now most of the PHP developer has use any framework for their web development. So, we have publish this tutorial for Codeigniter beginner web developer who want to learn some advance topic in this framework with Ajax jQuery.

Live table or Inline table help user to perform their work faster because all work has been done on single page without going to another page and all server side operation has been done back end without refresh of web page. For Create new records he can do this task in table without open any open form and same as suppose user want to edit or update any records then he can also do this operation in table because all table column has been editable and user want to edit then he simply change data and data will be edited and for delete data also he has just click on delete button and records will be deleted. So all CRUD operation has been done on single page and all operation has been done without refresh of web page. So this all things we will done in Codeigniter framework using Ajax jQuery.


Create Database


By using following sql script you can create table in your mysql database. For this application you have to first create mysql table for all CRUD operation using Ajax in Codeigniter application.


--
-- Database: `testing`
--

-- --------------------------------------------------------

--
-- Table structure for table `sample_data`
--

CREATE TABLE `sample_data` (
  `id` int(10) NOT NULL,
  `first_name` varchar(255) NOT NULL,
  `last_name` varchar(255) NOT NULL,
  `age` int(3) NOT NULL
) ENGINE=InnoDB DEFAULT CHARSET=latin1;

--
-- Indexes for table `sample_data`
--
ALTER TABLE `sample_data`
  ADD PRIMARY KEY (`id`);

--
-- AUTO_INCREMENT for dumped tables
--

--
-- AUTO_INCREMENT for table `sample_data`
--
ALTER TABLE `sample_data`
  MODIFY `id` int(10) NOT NULL AUTO_INCREMENT, AUTO_INCREMENT=1;


Set Base Url


First in Codeigniter framework we have to first set base url of your application. This is root of your application and this url will run your main controller which you have set in route.php

application/config/config.php

<?php
defined('BASEPATH') OR exit('No direct script access allowed');

$config['base_url'] = 'http://localhost/tutorial/codeigniter-live-table-add-edit-delete-using-ajax/';

?>


Make Database Connection


In Codeigniter for make mysql database connection we have to go to application/config/database.php and under this page we have to define database details like host name, database name, username and password details. By defining this details it will make database connection in Codeigniter.

application/config/database.php

<?php
defined('BASEPATH') OR exit('No direct script access allowed');

$active_group = 'default';
$query_builder = TRUE;

$db['default'] = array(
 'dsn' => '',
 'hostname' => 'localhost',
 'username' => 'root',
 'password' => '',
 'database' => 'testing',
 'dbdriver' => 'mysqli',
 'dbprefix' => '',
 'pconnect' => FALSE,
 'db_debug' => (ENVIRONMENT !== 'production'),
 'cache_on' => FALSE,
 'cachedir' => '',
 'char_set' => 'utf8',
 'dbcollat' => 'utf8_general_ci',
 'swap_pre' => '',
 'encrypt' => FALSE,
 'compress' => FALSE,
 'stricton' => FALSE,
 'failover' => array(),
 'save_queries' => TRUE
);

?>


Create Controller


Now our application core part has been started and first we want to make controller with name like LiveTable.php in Codeigniter framework. In this controller we have make following function.

__construct() - This is magic function and it will be executed when new object of this Class has been created and it will load livetable_model class. So we do not want to load again and again livetable_model in our application.

index() - This is root function of this class, so when in browser we have type base url with this controller name then it will execute this function and it will load live_table view file.

load_data() - This function will received ajax request for read all data from mysql table and return data in json format using json_encode() function.

index() - This function is use for create or add or insert new data into Mysql table and for this operation this function will received Ajax request.

update() - Controller of this function will be executed if any edit or update data request then this function will received ajax request from view for edit mysql data.

delete() - This is last function of Controller will use for delete particular data from Mysql table and this function will also execute when it has received ajax request.

application/controllers/LiveTable.php

<?php
defined('BASEPATH') OR exit('No direct script access allowed');

class LiveTable extends CI_Controller {

 public function __construct()
 {
  parent::__construct();
  $this->load->model('livetable_model');
 }

 function index()
 {
  $this->load->view('live_table');
 }

 function load_data()
 {
  $data = $this->livetable_model->load_data();
  echo json_encode($data);
 }

 function insert()
 {
  $data = array(
   'first_name' => $this->input->post('first_name'),
   'last_name'  => $this->input->post('last_name'),
   'age'   => $this->input->post('age')
  );

  $this->livetable_model->insert($data);
 }

 function update()
 {
  $data = array(
   $this->input->post('table_column') => $this->input->post('value')
  );

  $this->livetable_model->update($data, $this->input->post('id'));
 }

 function delete()
 {
  $this->livetable_model->delete($this->input->post('id'));
 }
 

}

?>


Create Model


In Codeigniter framework Model has been used from perform all database operation like Insert Update Delete and Fetch data from database and in this Class function will be executed from Controllers method. Here we have make LiveTable_model.php and in this we have make following function in this Model.

load_data() - This function fetch data from Mysql database and return result in Array format by using result_array() function.

insert($data) - For Insert new record into Mysql database this function has been use and this function will received $data argument data get from LiveTable controller insert() method.

update($data, $id) - For Update or Edit any existing data in Mysql this function has been used and under this function $data and $id value has been pass from Controller function.

delete($id) - Same way for Delete data operation this function has been used and this function will received $id argument value from Controller function.

application/models/LiveTable_model.php

<?php
class LiveTable_model extends CI_Model
{
 function load_data()
 {
  $this->db->order_by('id', 'DESC');
  $query = $this->db->get('sample_data');
  return $query->result_array();
 }

 function insert($data)
 {
  $this->db->insert('sample_data', $data);
 }

 function update($data, $id)
 {
  $this->db->where('id', $id);
  $this->db->update('sample_data', $data);
 }

 function delete($id)
 {
  $this->db->where('id', $id);
  $this->db->delete('sample_data');
 }
}
?>


Create View


In Controller View file has been used for display HTML output in browser, we all see html output data on web page using this View file. So here also we have create view file under application/views/live_table.php. In this file we have use jQuery and Bootstrap library. Here we have make Live table grid, so here we have created one html and all data has been load under tag of table. In table we can edit table content by using contenteditable attribute. For all CRUD operation here we have use Ajax. In below code you can find complete source code of view file.


<html>
<head>
    <title>Codeigniter Live Table Add Edit Delete using Ajax</title>
    
    <script src="https://ajax.googleapis.com/ajax/libs/jquery/2.2.0/jquery.min.js"></script>
    <link rel="stylesheet" href="https://maxcdn.bootstrapcdn.com/bootstrap/3.3.6/css/bootstrap.min.css" />
    <script src="https://maxcdn.bootstrapcdn.com/bootstrap/3.3.6/js/bootstrap.min.js"></script>
    <style>
    body
    {
      margin:0;
      padding:0;
      background-color:#f1f1f1;
    }
    .box
    {
      width:900px;
      padding:20px;
      background-color:#fff;
      border:1px solid #ccc;
      border-radius:5px;
      margin-top:10px;
    }
  </style>
</head>
<body>
  <div class="container box">
    <h3 align="center">Codeigniter Live Table Add Edit Delete using Ajax</h3><br />
    <div class="table-responsive">
      <br />
      <table class="table table-striped table-bordered">
        <thead>
          <tr>
            <th>First Name</th>
            <th>Last Name</th>
            <th>Age</th>
            <th>Action</th>
          </tr>
        </thead>
        <tbody>
        </tbody>
      </table>   
    </div>
  </div>
</body>
</html>

<script type="text/javascript" language="javascript" >
$(document).ready(function(){
  
  function load_data()
  {
    $.ajax({
      url:"<?php echo base_url(); ?>livetable/load_data",
      dataType:"JSON",
      success:function(data){
        var html = '<tr>';
        html += '<td id="first_name" contenteditable placeholder="Enter First Name"></td>';
        html += '<td id="last_name" contenteditable placeholder="Enter Last Name"></td>';
        html += '<td id="age" contenteditable></td>';
        html += '<td><button type="button" name="btn_add" id="btn_add" class="btn btn-xs btn-success"><span class="glyphicon glyphicon-plus"></span></button></td></tr>';
        for(var count = 0; count < data.length; count++)
        {
          html += '<tr>';
          html += '<td class="table_data" data-row_id="'+data[count].id+'" data-column_name="first_name" contenteditable>'+data[count].first_name+'</td>';
          html += '<td class="table_data" data-row_id="'+data[count].id+'" data-column_name="last_name" contenteditable>'+data[count].last_name+'</td>';
          html += '<td class="table_data" data-row_id="'+data[count].id+'" data-column_name="age" contenteditable>'+data[count].age+'</td>';
          html += '<td><button type="button" name="delete_btn" id="'+data[count].id+'" class="btn btn-xs btn-danger btn_delete"><span class="glyphicon glyphicon-remove"></span></button></td></tr>';
        }
        $('tbody').html(html);
      }
    });
  }

  load_data();

  $(document).on('click', '#btn_add', function(){
    var first_name = $('#first_name').text();
    var last_name = $('#last_name').text();
    var age = $('#age').text();
    if(first_name == '')
    {
      alert('Enter First Name');
      return false;
    }
    if(last_name == '')
    {
      alert('Enter Last Name');
      return false;
    }
    $.ajax({
      url:"<?php echo base_url(); ?>livetable/insert",
      method:"POST",
      data:{first_name:first_name, last_name:last_name, age:age},
      success:function(data){
        load_data();
      }
    })
  });

  $(document).on('blur', '.table_data', function(){
    var id = $(this).data('row_id');
    var table_column = $(this).data('column_name');
    var value = $(this).text();
    $.ajax({
      url:"<?php echo base_url(); ?>livetable/update",
      method:"POST",
      data:{id:id, table_column:table_column, value:value},
      success:function(data)
      {
        load_data();
      }
    })
  });

  $(document).on('click', '.btn_delete', function(){
    var id = $(this).attr('id');
    if(confirm("Are you sure you want to delete this?"))
    {
      $.ajax({
        url:"<?php echo base_url(); ?>livetable/delete",
        method:"POST",
        data:{id:id},
        success:function(data){
          load_data();
        }
      })
    }
  });
  
});
</script>


By using above source code we can make Live table or Inline Table Crud Single page application in Codeigniter using Ajax which help user to perform their task easily without going to other page. If you want to download complete source code of this tutorial click on below link.