Showing posts with label autocomplete. Show all posts

Friday, 1 July 2022

Node.js Autocomplete Search with MySQL Database


In this tutorial, we are going to learn Live Autocomplete Search Textbox in Node.js Express by using Vanilla JavaScript Fetch API with MySQL Database. Here we will show you very simple and best example of Auto Suggest Textbox in Node.js using Vanilla JavaScript Fetch API. In this tutorial for send Ajax request we will use JavaScript Fetch API for getting data from MySQL database table. Under this post, we will create Autocomplete feature in Node.js by using Vanilla JavaScript Fetch API with MySQL Database.

For learn Autocomplete Search Textbox in Node.js, so here we have use Country Search Example. So In the MySQL Table we will insert all country name and then after from Node.js Application, when we have start type Country name in textbox then it will send Fetch API Ajax request to Node.js Express Application routes for search country name data from MySQL table and get list of country name which has been start with character, which we have type in the textbox and we can get the list of Country suggestion at below textbox and then after we can select particular country name from the list of Auto suggest country list. So this is the main benefits of Autocomplete Search Textbox feature in our web based application and we do not want to type complete country name but we can select country name from the list of country suggestion.


Node.js Autocomplete Search with MySQL Database


So in this tutorial, we will make Autocomplete Textbox in Node.js Express Application by using Vanilla JavaScript Fetch API with MySQL Database. Below you can find step by step process for create autocomplete textbox feature in Node.js by using JavaScript Fetch API with MySQL Database.

  1. MySQL Table Structure
  2. Download and Install Node.js Express framework
  3. Create MySQL Database Connection
  4. Create Routes
  5. Create Views File
  6. Check Output in the browser

Step 1 - MySQL Table Structure


For start this tutorial, first we have to create table in MySQL table for create Autocomplete Search Textbox in Node.js, so for create table in MySQL database, we have to run following script in your phpmyadmin area and it will create apps_countries table with pre inserting of country data.


--
-- Table structure for table `apps_countries`
--

CREATE TABLE `apps_countries` (
  `id` int(11) NOT NULL,
  `country_code` varchar(2) NOT NULL DEFAULT '',
  `country_name` varchar(100) NOT NULL DEFAULT ''
) ENGINE=MyISAM DEFAULT CHARSET=utf8;

--
-- Dumping data for table `apps_countries`
--

INSERT INTO `apps_countries` (`id`, `country_code`, `country_name`) VALUES
(1, 'AF', 'Afghanistan'),
(2, 'AL', 'Albania'),
(3, 'DZ', 'Algeria'),
(4, 'DS', 'American Samoa'),
(5, 'AD', 'Andorra'),
(6, 'AO', 'Angola'),
(7, 'AI', 'Anguilla'),
(8, 'AQ', 'Antarctica'),
(9, 'AG', 'Antigua and Barbuda'),
(10, 'AR', 'Argentina'),
(11, 'AM', 'Armenia'),
(12, 'AW', 'Aruba'),
(13, 'AU', 'Australia'),
(14, 'AT', 'Austria'),
(15, 'AZ', 'Azerbaijan'),
(16, 'BS', 'Bahamas'),
(17, 'BH', 'Bahrain'),
(18, 'BD', 'Bangladesh'),
(19, 'BB', 'Barbados'),
(20, 'BY', 'Belarus'),
(21, 'BE', 'Belgium'),
(22, 'BZ', 'Belize'),
(23, 'BJ', 'Benin'),
(24, 'BM', 'Bermuda'),
(25, 'BT', 'Bhutan'),
(26, 'BO', 'Bolivia'),
(27, 'BA', 'Bosnia and Herzegovina'),
(28, 'BW', 'Botswana'),
(29, 'BV', 'Bouvet Island'),
(30, 'BR', 'Brazil'),
(31, 'IO', 'British Indian Ocean Territory'),
(32, 'BN', 'Brunei Darussalam'),
(33, 'BG', 'Bulgaria'),
(34, 'BF', 'Burkina Faso'),
(35, 'BI', 'Burundi'),
(36, 'KH', 'Cambodia'),
(37, 'CM', 'Cameroon'),
(38, 'CA', 'Canada'),
(39, 'CV', 'Cape Verde'),
(40, 'KY', 'Cayman Islands'),
(41, 'CF', 'Central African Republic'),
(42, 'TD', 'Chad'),
(43, 'CL', 'Chile'),
(44, 'CN', 'China'),
(45, 'CX', 'Christmas Island'),
(46, 'CC', 'Cocos (Keeling) Islands'),
(47, 'CO', 'Colombia'),
(48, 'KM', 'Comoros'),
(49, 'CG', 'Congo'),
(50, 'CK', 'Cook Islands'),
(51, 'CR', 'Costa Rica'),
(52, 'HR', 'Croatia (Hrvatska)'),
(53, 'CU', 'Cuba'),
(54, 'CY', 'Cyprus'),
(55, 'CZ', 'Czech Republic'),
(56, 'DK', 'Denmark'),
(57, 'DJ', 'Djibouti'),
(58, 'DM', 'Dominica'),
(59, 'DO', 'Dominican Republic'),
(60, 'TP', 'East Timor'),
(61, 'EC', 'Ecuador'),
(62, 'EG', 'Egypt'),
(63, 'SV', 'El Salvador'),
(64, 'GQ', 'Equatorial Guinea'),
(65, 'ER', 'Eritrea'),
(66, 'EE', 'Estonia'),
(67, 'ET', 'Ethiopia'),
(68, 'FK', 'Falkland Islands (Malvinas)'),
(69, 'FO', 'Faroe Islands'),
(70, 'FJ', 'Fiji'),
(71, 'FI', 'Finland'),
(72, 'FR', 'France'),
(73, 'FX', 'France, Metropolitan'),
(74, 'GF', 'French Guiana'),
(75, 'PF', 'French Polynesia'),
(76, 'TF', 'French Southern Territories'),
(77, 'GA', 'Gabon'),
(78, 'GM', 'Gambia'),
(79, 'GE', 'Georgia'),
(80, 'DE', 'Germany'),
(81, 'GH', 'Ghana'),
(82, 'GI', 'Gibraltar'),
(83, 'GK', 'Guernsey'),
(84, 'GR', 'Greece'),
(85, 'GL', 'Greenland'),
(86, 'GD', 'Grenada'),
(87, 'GP', 'Guadeloupe'),
(88, 'GU', 'Guam'),
(89, 'GT', 'Guatemala'),
(90, 'GN', 'Guinea'),
(91, 'GW', 'Guinea-Bissau'),
(92, 'GY', 'Guyana'),
(93, 'HT', 'Haiti'),
(94, 'HM', 'Heard and Mc Donald Islands'),
(95, 'HN', 'Honduras'),
(96, 'HK', 'Hong Kong'),
(97, 'HU', 'Hungary'),
(98, 'IS', 'Iceland'),
(99, 'IN', 'India'),
(100, 'IM', 'Isle of Man'),
(101, 'ID', 'Indonesia'),
(102, 'IR', 'Iran (Islamic Republic of)'),
(103, 'IQ', 'Iraq'),
(104, 'IE', 'Ireland'),
(105, 'IL', 'Israel'),
(106, 'IT', 'Italy'),
(107, 'CI', 'Ivory Coast'),
(108, 'JE', 'Jersey'),
(109, 'JM', 'Jamaica'),
(110, 'JP', 'Japan'),
(111, 'JO', 'Jordan'),
(112, 'KZ', 'Kazakhstan'),
(113, 'KE', 'Kenya'),
(114, 'KI', 'Kiribati'),
(115, 'KP', 'Korea, Democratic People\'s Republic of'),
(116, 'KR', 'Korea, Republic of'),
(117, 'XK', 'Kosovo'),
(118, 'KW', 'Kuwait'),
(119, 'KG', 'Kyrgyzstan'),
(120, 'LA', 'Lao People\'s Democratic Republic'),
(121, 'LV', 'Latvia'),
(122, 'LB', 'Lebanon'),
(123, 'LS', 'Lesotho'),
(124, 'LR', 'Liberia'),
(125, 'LY', 'Libyan Arab Jamahiriya'),
(126, 'LI', 'Liechtenstein'),
(127, 'LT', 'Lithuania'),
(128, 'LU', 'Luxembourg'),
(129, 'MO', 'Macau'),
(130, 'MK', 'Macedonia'),
(131, 'MG', 'Madagascar'),
(132, 'MW', 'Malawi'),
(133, 'MY', 'Malaysia'),
(134, 'MV', 'Maldives'),
(135, 'ML', 'Mali'),
(136, 'MT', 'Malta'),
(137, 'MH', 'Marshall Islands'),
(138, 'MQ', 'Martinique'),
(139, 'MR', 'Mauritania'),
(140, 'MU', 'Mauritius'),
(141, 'TY', 'Mayotte'),
(142, 'MX', 'Mexico'),
(143, 'FM', 'Micronesia, Federated States of'),
(144, 'MD', 'Moldova, Republic of'),
(145, 'MC', 'Monaco'),
(146, 'MN', 'Mongolia'),
(147, 'ME', 'Montenegro'),
(148, 'MS', 'Montserrat'),
(149, 'MA', 'Morocco'),
(150, 'MZ', 'Mozambique'),
(151, 'MM', 'Myanmar'),
(152, 'NA', 'Namibia'),
(153, 'NR', 'Nauru'),
(154, 'NP', 'Nepal'),
(155, 'NL', 'Netherlands'),
(156, 'AN', 'Netherlands Antilles'),
(157, 'NC', 'New Caledonia'),
(158, 'NZ', 'New Zealand'),
(159, 'NI', 'Nicaragua'),
(160, 'NE', 'Niger'),
(161, 'NG', 'Nigeria'),
(162, 'NU', 'Niue'),
(163, 'NF', 'Norfolk Island'),
(164, 'MP', 'Northern Mariana Islands'),
(165, 'NO', 'Norway'),
(166, 'OM', 'Oman'),
(167, 'PK', 'Pakistan'),
(168, 'PW', 'Palau'),
(169, 'PS', 'Palestine'),
(170, 'PA', 'Panama'),
(171, 'PG', 'Papua New Guinea'),
(172, 'PY', 'Paraguay'),
(173, 'PE', 'Peru'),
(174, 'PH', 'Philippines'),
(175, 'PN', 'Pitcairn'),
(176, 'PL', 'Poland'),
(177, 'PT', 'Portugal'),
(178, 'PR', 'Puerto Rico'),
(179, 'QA', 'Qatar'),
(180, 'RE', 'Reunion'),
(181, 'RO', 'Romania'),
(182, 'RU', 'Russian Federation'),
(183, 'RW', 'Rwanda'),
(184, 'KN', 'Saint Kitts and Nevis'),
(185, 'LC', 'Saint Lucia'),
(186, 'VC', 'Saint Vincent and the Grenadines'),
(187, 'WS', 'Samoa'),
(188, 'SM', 'San Marino'),
(189, 'ST', 'Sao Tome and Principe'),
(190, 'SA', 'Saudi Arabia'),
(191, 'SN', 'Senegal'),
(192, 'RS', 'Serbia'),
(193, 'SC', 'Seychelles'),
(194, 'SL', 'Sierra Leone'),
(195, 'SG', 'Singapore'),
(196, 'SK', 'Slovakia'),
(197, 'SI', 'Slovenia'),
(198, 'SB', 'Solomon Islands'),
(199, 'SO', 'Somalia'),
(200, 'ZA', 'South Africa'),
(201, 'GS', 'South Georgia South Sandwich Islands'),
(202, 'ES', 'Spain'),
(203, 'LK', 'Sri Lanka'),
(204, 'SH', 'St. Helena'),
(205, 'PM', 'St. Pierre and Miquelon'),
(206, 'SD', 'Sudan'),
(207, 'SR', 'Suriname'),
(208, 'SJ', 'Svalbard and Jan Mayen Islands'),
(209, 'SZ', 'Swaziland'),
(210, 'SE', 'Sweden'),
(211, 'CH', 'Switzerland'),
(212, 'SY', 'Syrian Arab Republic'),
(213, 'TW', 'Taiwan'),
(214, 'TJ', 'Tajikistan'),
(215, 'TZ', 'Tanzania, United Republic of'),
(216, 'TH', 'Thailand'),
(217, 'TG', 'Togo'),
(218, 'TK', 'Tokelau'),
(219, 'TO', 'Tonga'),
(220, 'TT', 'Trinidad and Tobago'),
(221, 'TN', 'Tunisia'),
(222, 'TR', 'Turkey'),
(223, 'TM', 'Turkmenistan'),
(224, 'TC', 'Turks and Caicos Islands'),
(225, 'TV', 'Tuvalu'),
(226, 'UG', 'Uganda'),
(227, 'UA', 'Ukraine'),
(228, 'AE', 'United Arab Emirates'),
(229, 'GB', 'United Kingdom'),
(230, 'US', 'United States'),
(231, 'UM', 'United States minor outlying islands'),
(232, 'UY', 'Uruguay'),
(233, 'UZ', 'Uzbekistan'),
(234, 'VU', 'Vanuatu'),
(235, 'VA', 'Vatican City State'),
(236, 'VE', 'Venezuela'),
(237, 'VN', 'Vietnam'),
(238, 'VG', 'Virgin Islands (British)'),
(239, 'VI', 'Virgin Islands (U.S.)'),
(240, 'WF', 'Wallis and Futuna Islands'),
(241, 'EH', 'Western Sahara'),
(242, 'YE', 'Yemen'),
(243, 'ZR', 'Zaire'),
(244, 'ZM', 'Zambia'),
(245, 'ZW', 'Zimbabwe');

--
-- Indexes for dumped tables
--

--
-- Indexes for table `apps_countries`
--
ALTER TABLE `apps_countries`
  ADD PRIMARY KEY (`id`);

--
-- AUTO_INCREMENT for dumped tables
--

--
-- AUTO_INCREMENT for table `apps_countries`
--
ALTER TABLE `apps_countries`
  MODIFY `id` int(11) NOT NULL AUTO_INCREMENT, AUTO_INCREMENT=246;


Step 2 - Download and Install Node.js Express framework


In this Node.js tutorial, we have use Express.js Framework, So first we need to download and install Node.js Express framework. So for this, first we have to go into directory in which we have run our node code and under that directory, we have to create autocomplete directory and then after we have goes into that directory, so for this, we have to run following command.


mkdir autocomplete
cd autocomplete


Once we have goes into autocomplete directory, now first we wan to download and install node express genderator, so for this, in the command prompt we have to run following command, which will download and install node.js express generator.


npm install -g express-generator


Next we want to download and install node.js express framework, so for this in the command prompt we have to run following command which will download and install node.js express framework under autocomplete directory.


npx express --view=ejs


In this downloaded Node.js Express framework, we have use ejs template engine for display HTML output in the browser and once we have run this command then it will display following node.js express directory structure which you can seen below.


create : public\
   create : public\javascripts\
   create : public\images\
   create : public\stylesheets\
   create : public\stylesheets\style.css
   create : routes\
   create : routes\index.js
   create : routes\users.js
   create : views\
   create : views\error.ejs
   create : views\index.ejs
   create : app.js
   create : package.json
   create : bin\
   create : bin\www

   install dependencies:
     > npm install

   run the app:
     > SET DEBUG=crud:* & npm start


And lastly under node.js express download and install process we have to run following command for install required node.js default module for express framework.


npm install


After run above command, so here our Node.js Express download and install process is completed.

Step 3 - Create MySQL Database Connection


After download and install Node.js Express framework, now we want to connect this applicatioin with MySQL Database, so for make MySQL database connection, first we have to download node mysql module. So for this, we have to run following command in command prompt.


npm install mysql


Once Node Mysql module has been install in our node express application, next we need to create one database.js file for create mysql database connection, and under this file, we have to define MySQL database configuration for connection node express application with MySQL database.

database.js

const mysql = require('mysql');

var connection = mysql.createConnection({
	host : 'localhost',
	database : 'testing',
	user : 'root',
	password : ''
});

connection.connect(function(error){
	if(error)
	{
		throw error;
	}
	else
	{
		console.log('MySQL Database is connected Successfully');
	}
});

module.exports = connection;


Step 4 - Create Routes


Generally in routes directory, we have to create server side script, and here we have use Node Express framework, so by default index.js and user.js file has been created by default. In this tutorial, we will use index.js file.

Under this file, first we will include MySQL database connection file for make mysql database.

Under this file, we have create two route, one is for display country name textbox on the web page and another route is for handle fetch API ajax request for search data in mysql table and send back data to ajax request in json format.

routes/index.js

var express = require('express');
var router = express.Router();

var database = require('../database');

/* GET home page. */
router.get('/', function(req, res, next) {
    res.render('index', { title: 'AutoComplete Search in Node.js with MySQL' });
});

router.get('/get_data', function(request, response, next){

    var search_query = request.query.search_query;

    var query = `
    SELECT country_name FROM apps_countries 
    WHERE country_name LIKE '%${search_query}%' 
    LIMIT 10
    `;

    database.query(query, function(error, data){

        response.json(data);

    });

});

module.exports = router;


Step 5 - Create Views File


In the Node.js Express framework, views directory file has been used for display HTML output in the browser. Here we have use ejs template engine for display HTML output in the browser in Node.js Express Application.

In this tutorial, we have use views/index.ejs and first will remove default code of this file and put our HTML code with Bootstrap 5 library.

Under this file, first we will create one textbox for enter country name details and then after we will write vanilla javascript code for make Autocomplete Search Textbox in Node.js.

views/index.ejs

<!doctype html>
<html lang="en">
    <head>
        <!-- Required meta tags -->
        <meta charset="utf-8">
        <meta name="viewport" content="width=device-width, initial-scale=1">

        <!-- Bootstrap CSS -->
        <link href="https://cdn.jsdelivr.net/npm/bootstrap@5.0.2/dist/css/bootstrap.min.css" rel="stylesheet" integrity="sha384-EVSTQN3/azprG1Anm3QDgpJLIm9Nao0Yz1ztcQTwFspd3yD65VohhpuuCOmLASjC" crossorigin="anonymous">

        <title>AutoComplete Search in Node.js with MySQL</title>
    </head>
    <body>
        <div class="container">
            <h1 class="text-center text-primary mt-3 mb-3">AutoComplete Search in Node.js with MySQL</h1>

            <!--<div class="card">
                <div class="card-header">Autocomplete Search Example</div>
                <div class="card-body">!-->
                        
                    <input type="text" id="autocomplete_search" class="form-control form-control-lg" placeholder="Type Country Name Here" />
                    <span id="search_result"></span>

                <!--</div>
            </div>!-->
        </div>
  </body>
</html>

<script>

    function load_data(query = '')
    {
        fetch('/get_data?search_query='+query+'').then(function(response){

            return response.json();

        }).then(function(responseData){

            var html = '<ul class="list-group">';

            if(responseData.length > 0)
            {
                for(var count = 0; count < responseData.length; count++)
                {
                    var regular_expression = new RegExp('('+query+')', 'gi');

                    html += '<a href="#" class="list-group-item list-group-item-action" onclick="get_text(this)">'+responseData[count].country_name.replace(regular_expression, '<span class="text-primary fw-bold">$1</span>')+'</a>';
                }
            }
            else
            {
                html += '<a href="#" class="list-group-item list-group-item-action disabled">No Data Found</a>';
            }

            html += '</ul>';

            document.getElementById('search_result').innerHTML = html;

        });
    }

    var search_element = document.getElementById("autocomplete_search");

    search_element.onkeyup = function(){

        var query = search_element.value;

        load_data(query);

    };

    search_element.onfocus = function(){

        var query = search_element.value;

        load_data(query);

    };

    function get_text(event)
    {
        var country_name = event.textContent;

        console.log(country_name);

        document.getElementById('autocomplete_search').value = country_name;

        document.getElementById('search_result').innerHTML = '';
    }

</script>


Step 6 - Check Output in the browser

Once we have follow all above step, so we are able to check output in the browser. So for check output in the browser, first we have goes to command prompt and run following command.


npm start


This command will start Node.js server and then after we can goes to browser and following URL.


http://localhost:3000/


So once we have hit above url then it will display one textbox for type country name and once we have start write country name, then after type character then it will display auto search result at below textbox and when we have type more character then it will narrow filter data and display exact country name. So here in this tutorial, we have make Autocomplete textbox in Node.js Express framework using Vanilla JavaScript Fetch API with MySQL database.


Friday, 28 January 2022

Typeahead Autocomplete Textbox using JavaScript in PHP for Bootstrap 5


Autocomplete Textbox is a very useful feature in the Web based application, because if you have thousand of data and then it is not possible to load that all data in single select or dropdown list box, then at that time Autocomplete Textbox is better than select box. This is because when user has been type something in textbox then at the real time data related to that character will be dropdown below textbox and user can select appropriate option from the list of option.

In this tutorial, We will use autocomplete.js pure JavaScript library which is just like Typeahead library and this library is compatible with latest Bootstrap Library. So if you are planning to use Bootstrap 5 library in your web application then this vanilla JavaScript library will help to implement Typeahead Autocomplete Textbox with Bootstrap 5 by using Vanilla JavaScript, PHP Script and MySQL database.

Below you can find the step by step process for How to implement Typeahead Autocomplete Textbox in your Bootstrap 5 application using JavaScript, PHP and MySQL Database.


Typeahead Autocomplete Textbox using JavaScript in PHP for Bootstrap 5


Database


Before you have to start to follow below step, first you need to create apps_countries tables with data, so you can test below code in your computer. So for this you have to run following sql script in your phpMyAdmin and it will create table with data in your MySQL Database.


--
-- Database: `testing`
--

-- --------------------------------------------------------

--
-- Table structure for table `apps_countries`
--

CREATE TABLE `apps_countries` (
  `id` int(11) NOT NULL,
  `country_code` varchar(2) NOT NULL DEFAULT '',
  `country_name` varchar(100) NOT NULL DEFAULT ''
) ENGINE=MyISAM DEFAULT CHARSET=utf8;

--
-- Dumping data for table `apps_countries`
--

INSERT INTO `apps_countries` (`id`, `country_code`, `country_name`) VALUES
(1, 'AF', 'Afghanistan'),
(2, 'AL', 'Albania'),
(3, 'DZ', 'Algeria'),
(4, 'DS', 'American Samoa'),
(5, 'AD', 'Andorra'),
(6, 'AO', 'Angola'),
(7, 'AI', 'Anguilla'),
(8, 'AQ', 'Antarctica'),
(9, 'AG', 'Antigua and Barbuda'),
(10, 'AR', 'Argentina'),
(11, 'AM', 'Armenia'),
(12, 'AW', 'Aruba'),
(13, 'AU', 'Australia'),
(14, 'AT', 'Austria'),
(15, 'AZ', 'Azerbaijan'),
(16, 'BS', 'Bahamas'),
(17, 'BH', 'Bahrain'),
(18, 'BD', 'Bangladesh'),
(19, 'BB', 'Barbados'),
(20, 'BY', 'Belarus'),
(21, 'BE', 'Belgium'),
(22, 'BZ', 'Belize'),
(23, 'BJ', 'Benin'),
(24, 'BM', 'Bermuda'),
(25, 'BT', 'Bhutan'),
(26, 'BO', 'Bolivia'),
(27, 'BA', 'Bosnia and Herzegovina'),
(28, 'BW', 'Botswana'),
(29, 'BV', 'Bouvet Island'),
(30, 'BR', 'Brazil'),
(31, 'IO', 'British Indian Ocean Territory'),
(32, 'BN', 'Brunei Darussalam'),
(33, 'BG', 'Bulgaria'),
(34, 'BF', 'Burkina Faso'),
(35, 'BI', 'Burundi'),
(36, 'KH', 'Cambodia'),
(37, 'CM', 'Cameroon'),
(38, 'CA', 'Canada'),
(39, 'CV', 'Cape Verde'),
(40, 'KY', 'Cayman Islands'),
(41, 'CF', 'Central African Republic'),
(42, 'TD', 'Chad'),
(43, 'CL', 'Chile'),
(44, 'CN', 'China'),
(45, 'CX', 'Christmas Island'),
(46, 'CC', 'Cocos (Keeling) Islands'),
(47, 'CO', 'Colombia'),
(48, 'KM', 'Comoros'),
(49, 'CG', 'Congo'),
(50, 'CK', 'Cook Islands'),
(51, 'CR', 'Costa Rica'),
(52, 'HR', 'Croatia (Hrvatska)'),
(53, 'CU', 'Cuba'),
(54, 'CY', 'Cyprus'),
(55, 'CZ', 'Czech Republic'),
(56, 'DK', 'Denmark'),
(57, 'DJ', 'Djibouti'),
(58, 'DM', 'Dominica'),
(59, 'DO', 'Dominican Republic'),
(60, 'TP', 'East Timor'),
(61, 'EC', 'Ecuador'),
(62, 'EG', 'Egypt'),
(63, 'SV', 'El Salvador'),
(64, 'GQ', 'Equatorial Guinea'),
(65, 'ER', 'Eritrea'),
(66, 'EE', 'Estonia'),
(67, 'ET', 'Ethiopia'),
(68, 'FK', 'Falkland Islands (Malvinas)'),
(69, 'FO', 'Faroe Islands'),
(70, 'FJ', 'Fiji'),
(71, 'FI', 'Finland'),
(72, 'FR', 'France'),
(73, 'FX', 'France, Metropolitan'),
(74, 'GF', 'French Guiana'),
(75, 'PF', 'French Polynesia'),
(76, 'TF', 'French Southern Territories'),
(77, 'GA', 'Gabon'),
(78, 'GM', 'Gambia'),
(79, 'GE', 'Georgia'),
(80, 'DE', 'Germany'),
(81, 'GH', 'Ghana'),
(82, 'GI', 'Gibraltar'),
(83, 'GK', 'Guernsey'),
(84, 'GR', 'Greece'),
(85, 'GL', 'Greenland'),
(86, 'GD', 'Grenada'),
(87, 'GP', 'Guadeloupe'),
(88, 'GU', 'Guam'),
(89, 'GT', 'Guatemala'),
(90, 'GN', 'Guinea'),
(91, 'GW', 'Guinea-Bissau'),
(92, 'GY', 'Guyana'),
(93, 'HT', 'Haiti'),
(94, 'HM', 'Heard and Mc Donald Islands'),
(95, 'HN', 'Honduras'),
(96, 'HK', 'Hong Kong'),
(97, 'HU', 'Hungary'),
(98, 'IS', 'Iceland'),
(99, 'IN', 'India'),
(100, 'IM', 'Isle of Man'),
(101, 'ID', 'Indonesia'),
(102, 'IR', 'Iran (Islamic Republic of)'),
(103, 'IQ', 'Iraq'),
(104, 'IE', 'Ireland'),
(105, 'IL', 'Israel'),
(106, 'IT', 'Italy'),
(107, 'CI', 'Ivory Coast'),
(108, 'JE', 'Jersey'),
(109, 'JM', 'Jamaica'),
(110, 'JP', 'Japan'),
(111, 'JO', 'Jordan'),
(112, 'KZ', 'Kazakhstan'),
(113, 'KE', 'Kenya'),
(114, 'KI', 'Kiribati'),
(115, 'KP', 'Korea, Democratic People\'s Republic of'),
(116, 'KR', 'Korea, Republic of'),
(117, 'XK', 'Kosovo'),
(118, 'KW', 'Kuwait'),
(119, 'KG', 'Kyrgyzstan'),
(120, 'LA', 'Lao People\'s Democratic Republic'),
(121, 'LV', 'Latvia'),
(122, 'LB', 'Lebanon'),
(123, 'LS', 'Lesotho'),
(124, 'LR', 'Liberia'),
(125, 'LY', 'Libyan Arab Jamahiriya'),
(126, 'LI', 'Liechtenstein'),
(127, 'LT', 'Lithuania'),
(128, 'LU', 'Luxembourg'),
(129, 'MO', 'Macau'),
(130, 'MK', 'Macedonia'),
(131, 'MG', 'Madagascar'),
(132, 'MW', 'Malawi'),
(133, 'MY', 'Malaysia'),
(134, 'MV', 'Maldives'),
(135, 'ML', 'Mali'),
(136, 'MT', 'Malta'),
(137, 'MH', 'Marshall Islands'),
(138, 'MQ', 'Martinique'),
(139, 'MR', 'Mauritania'),
(140, 'MU', 'Mauritius'),
(141, 'TY', 'Mayotte'),
(142, 'MX', 'Mexico'),
(143, 'FM', 'Micronesia, Federated States of'),
(144, 'MD', 'Moldova, Republic of'),
(145, 'MC', 'Monaco'),
(146, 'MN', 'Mongolia'),
(147, 'ME', 'Montenegro'),
(148, 'MS', 'Montserrat'),
(149, 'MA', 'Morocco'),
(150, 'MZ', 'Mozambique'),
(151, 'MM', 'Myanmar'),
(152, 'NA', 'Namibia'),
(153, 'NR', 'Nauru'),
(154, 'NP', 'Nepal'),
(155, 'NL', 'Netherlands'),
(156, 'AN', 'Netherlands Antilles'),
(157, 'NC', 'New Caledonia'),
(158, 'NZ', 'New Zealand'),
(159, 'NI', 'Nicaragua'),
(160, 'NE', 'Niger'),
(161, 'NG', 'Nigeria'),
(162, 'NU', 'Niue'),
(163, 'NF', 'Norfolk Island'),
(164, 'MP', 'Northern Mariana Islands'),
(165, 'NO', 'Norway'),
(166, 'OM', 'Oman'),
(167, 'PK', 'Pakistan'),
(168, 'PW', 'Palau'),
(169, 'PS', 'Palestine'),
(170, 'PA', 'Panama'),
(171, 'PG', 'Papua New Guinea'),
(172, 'PY', 'Paraguay'),
(173, 'PE', 'Peru'),
(174, 'PH', 'Philippines'),
(175, 'PN', 'Pitcairn'),
(176, 'PL', 'Poland'),
(177, 'PT', 'Portugal'),
(178, 'PR', 'Puerto Rico'),
(179, 'QA', 'Qatar'),
(180, 'RE', 'Reunion'),
(181, 'RO', 'Romania'),
(182, 'RU', 'Russian Federation'),
(183, 'RW', 'Rwanda'),
(184, 'KN', 'Saint Kitts and Nevis'),
(185, 'LC', 'Saint Lucia'),
(186, 'VC', 'Saint Vincent and the Grenadines'),
(187, 'WS', 'Samoa'),
(188, 'SM', 'San Marino'),
(189, 'ST', 'Sao Tome and Principe'),
(190, 'SA', 'Saudi Arabia'),
(191, 'SN', 'Senegal'),
(192, 'RS', 'Serbia'),
(193, 'SC', 'Seychelles'),
(194, 'SL', 'Sierra Leone'),
(195, 'SG', 'Singapore'),
(196, 'SK', 'Slovakia'),
(197, 'SI', 'Slovenia'),
(198, 'SB', 'Solomon Islands'),
(199, 'SO', 'Somalia'),
(200, 'ZA', 'South Africa'),
(201, 'GS', 'South Georgia South Sandwich Islands'),
(202, 'ES', 'Spain'),
(203, 'LK', 'Sri Lanka'),
(204, 'SH', 'St. Helena'),
(205, 'PM', 'St. Pierre and Miquelon'),
(206, 'SD', 'Sudan'),
(207, 'SR', 'Suriname'),
(208, 'SJ', 'Svalbard and Jan Mayen Islands'),
(209, 'SZ', 'Swaziland'),
(210, 'SE', 'Sweden'),
(211, 'CH', 'Switzerland'),
(212, 'SY', 'Syrian Arab Republic'),
(213, 'TW', 'Taiwan'),
(214, 'TJ', 'Tajikistan'),
(215, 'TZ', 'Tanzania, United Republic of'),
(216, 'TH', 'Thailand'),
(217, 'TG', 'Togo'),
(218, 'TK', 'Tokelau'),
(219, 'TO', 'Tonga'),
(220, 'TT', 'Trinidad and Tobago'),
(221, 'TN', 'Tunisia'),
(222, 'TR', 'Turkey'),
(223, 'TM', 'Turkmenistan'),
(224, 'TC', 'Turks and Caicos Islands'),
(225, 'TV', 'Tuvalu'),
(226, 'UG', 'Uganda'),
(227, 'UA', 'Ukraine'),
(228, 'AE', 'United Arab Emirates'),
(229, 'GB', 'United Kingdom'),
(230, 'US', 'United States'),
(231, 'UM', 'United States minor outlying islands'),
(232, 'UY', 'Uruguay'),
(233, 'UZ', 'Uzbekistan'),
(234, 'VU', 'Vanuatu'),
(235, 'VA', 'Vatican City State'),
(236, 'VE', 'Venezuela'),
(237, 'VN', 'Vietnam'),
(238, 'VG', 'Virgin Islands (British)'),
(239, 'VI', 'Virgin Islands (U.S.)'),
(240, 'WF', 'Wallis and Futuna Islands'),
(241, 'EH', 'Western Sahara'),
(242, 'YE', 'Yemen'),
(243, 'ZR', 'Zaire'),
(244, 'ZM', 'Zambia'),
(245, 'ZW', 'Zimbabwe');

--
-- Indexes for dumped tables
--

--
-- Indexes for table `apps_countries`
--
ALTER TABLE `apps_countries`
  ADD PRIMARY KEY (`id`);

--
-- AUTO_INCREMENT for dumped tables
--

--
-- AUTO_INCREMENT for table `apps_countries`
--
ALTER TABLE `apps_countries`
  MODIFY `id` int(11) NOT NULL AUTO_INCREMENT, AUTO_INCREMENT=246;


Step 1 - In the first step, we want include bootstrap 5 and autocomplete.js files into the head section of the web page.


<head>
        <!-- Required meta tags -->
        <meta charset="utf-8">
        <meta name="viewport" content="width=device-width, initial-scale=1">

        <!-- Bootstrap CSS -->
        <link href="library/bootstrap-5/bootstrap.min.css" rel="stylesheet" />
        <script src="library/bootstrap-5/bootstrap.bundle.min.js"></script>
        <script src="library/autocomplete.js"></script>

        <title>Typeahead Autocomplete using JavaScript in PHP for Bootstrap 5</title>
    </head>


Step 2 - In the Second Step, we need to create HTML Input textbox for Autocomplete Search using using Bootstrap 5 Library.


<div class="row">
                <div class="col-md-3">&nbsp;</div>
                <div class="col-md-6">
                    <input type="text" name="country_name" id="country_name" class="form-control form-control-lg" placeholder="Country Name" />
                </div>
                <div class="col-md-3">&nbsp;</div>
            </div>


Step 3 - In the third step, we want to fetch data from MySQL table and then after we need to convert that data into JSON format.


$connect = new PDO("mysql:host=localhost; dbname=testing", "root", "");

$query = "
SELECT country_name FROM apps_countries 
ORDER BY country_name ASC
";

$result = $connect->query($query);

$data = array();

foreach($result as $row)
{
    $data[] = array(
        'label'     =>  $row["country_name"],
        'value'     =>  $row["country_name"]
    );
}


Step 4 - In the fourth step, we need to initialize Autocomplete.js library on HTML Input Textbox. Here we can initialize Typeahead Autocomplete library by using Autocomplete() method, and under this method, we have use following option for make Auto Suggest Textbox.

data - Under this option, we have to define data in JSON format for autocomplete suggestion list.

maximumItems - By using this option, We can determine the maximum number of auto suggest items to display. Suppose if we have not use this option then this library will display 5 Auto suggest data by default.

highlightTyped - This option will enable style for matched character and it will display match character in different color.

highlightClass - In this option we we have to define Bootstrap 5 library class for set the style for highlighted character.


<script>

var auto_complete = new Autocomplete(document.getElementById('country_name'), {
    data:<?php echo json_encode($data); ?>,
    maximumItems:10,
    highlightTyped:true,
    highlightClass : 'fw-bold text-primary'
}); 

</script>


If you have follow all above step one by one then you can able to add dyanamic and fast Autocomplete Textbox like Typeahead for Bootstrap 5 by using JavaScript with PHP Script and MySQL Database. In this post we have also share complete source code for this Autocomplete Typeahead for Bootstrap 5 and here you can also check online demo of this tutorial also.


Thursday, 22 July 2021

Autocomplete Search in Laravel 8 using Typeahead.js


Autocomplete or Live Search is nice functionality, because it has give us auto suggestion or recommendations, when we have start type in input field. If you have not know but Autocomplete feature has provide helps to User in different ways like auto search suggestion when we have search some specific product or some specific category. So when we have start type then it has provide suggestion which has fetch from database and display in autocomplete search suggestion dropdown list.

Under this Laravel 8 tutorial, we will implement Autocomplete Search by using Typeahead.js library. So this is Laravel 8 Autocomplete tutorial in which you can find how to add Autocomplete Search feature in Laravel 8 Application by using Typeahead JS with Mysql database.

If you want to make Autocomplete Search feature for your web application, then typeahead.js is the best solution. Typeahead.js is a Javascript library which helps us to make an outstanding Autocomplete Search functionality in our Laravel 8 Application.

Now we have proceed for create Autocomplete Search Module in our Laravel 8 application. In this tutorial, we will create model and migration and add fake data in Mysql database and from that data we will fetch and display in autocomplete search suggestion in our Laravel 8 application. So here we will build dynamic Autocomplete Search in Laravel 8 using Typeahead JS. For this you have to follow following steps.


Autocomplete Search in Laravel 8 using Typeahead.js

How to Implement Dynamic Autocomplete Search in Laravel using Typeahead.js


  1. Step 1 : Download & Install Laravel Framework
  2. Step 2 : Make Database Connection
  3. Step 3 : Create User Table in Database
  4. Step 4 : Generate Fake Records
  5. Step 5 : Create Controller
  6. Step 6 : Create index() method in Controller
  7. Step 7 : Create Blade View File
  8. Step 8 : Create action() method in Controller
  9. Step 9 : Set Routes for Controller Method
  10. Step 10 : Start Development Server
  11. Step 11 : Check Output in Browser

Step 1 : Download & Install Laravel Framework


For build Autocomplete search feature, first we want to install latest version of Laravel framework. For this we have go to command prompt and run following command.


composer create-project --prefer-dist laravel/laravel typeahead_autocomplete


This command will create typeahead_autocomplete directory and under that directory it will download latest version of Laravel framework. After download Laravel framework, then after we have go into typeahead_autocomplete this directory. For this we have to run following command in command prompt.


cd typeahead_autocomplete


Step 2 : Make Database Connection


In second step we have make Mysql Database connection with our Laravel 8 application. For this we have to open .env file and under this we have to define MySQL credential which you can seen below.


DB_CONNECTION=mysql
DB_HOST=localhost
DB_PORT=3306
DB_DATABASE=testing
DB_USERNAME=root
DB_PASSWORD=


Step 3 : Create User Table in Database


In third step, we have to create User table in Mysql database. So when we have download latest version of Laravel framework then by default User.php model class and users table migration file will be available under this Laravel framework. So for create users we have to go command prompt and run following command. This command will create users table in MySQL database.


php artisan migrate

Step 4 : Generate Fake Records


Once if you have create users table then under this steps we have to insert fake records under this table. For this we have to open database/seeders/DatabaseSeeder.php file and under this file we have to write following code.

database/seeders/DatabaseSeeder.php

<?php

namespace Database\Seeders;

use Illuminate\Database\Seeder;

use App\Models\User;

class DatabaseSeeder extends Seeder
{
    /**
     * Seed the application's database.
     *
     * @return void
     */
    public function run()
    {
        // \App\Models\User::factory(10)->create();

        User::factory(100)->create();
    }
}
?>


After this we have open command prompt and run following command. This command will insert 100 fake data under this users table in MySQL Database.


php artisan db:seed --force


Step 5 : Create Controller


In fifth steps, we have to create controller class under Laravel framework. For this we have to open command prompt and fun following command.


php artisan make:controller TypeaheadAutocompleteController

This command will create TypeaheadAutocompleteController.php controller class file in app/Http/Controllers folder. Under this file first we want to import User models class. For this we have to write following code at header of this class file.


use App\Models\User;


Step 6 : Create index() method in Controller


After create controller class file, now in step six, we need to create index() method under this class. So this method will load typeahead_autocomplete.blade.php file in browser.


<?php

namespace App\Http\Controllers;

use Illuminate\Http\Request;

use App\Models\User;

class TypeaheadAutocompleteController extends Controller
{
    function index()
    {
        return view('typeahead_autocomplete');
    }
}
?>


Step 7 : Create Blade View File


In this step 7, we have need to create blade view file for display html output in browser. So here we have create typeahead_autocomplete.blade.php under resources/views directory. In the blade view, we need to import Typeahead js and bootstrap 4 library for make autocomplete in Laravel 8 app.


<html>
    <head>
        <meta name="viewport" content="width=device-width, initial-scale=1">
        <title>Typeahead JS Live Autocomplete Search in Laravel 8</title>
        <link rel="stylesheet" href="https://stackpath.bootstrapcdn.com/bootstrap/4.5.2/css/bootstrap.min.css" integrity="sha384-JcKb8q3iqJ61gNV9KGb8thSsNjpSL0n8PARn9HuZOnIxN0hoP+VmmDGMN5t9UJ0Z" crossorigin="anonymous">
        <script src="https://code.jquery.com/jquery-3.4.1.min.js"></script>
        <script src="https://cdnjs.cloudflare.com/ajax/libs/bootstrap-3-typeahead/4.0.2/bootstrap3-typeahead.min.js" ></script>
    </head>
    <body>
        <div class="container">    
            <br />
            <h1 class="text-center text-primary">Typeahead JS Live Autocomplete Search in Laravel 8</h1>
            <br />
            <input type="text" name="user_name" id="user_name" class="form-control-lg" placeholder="Enter User Name..." />
        </div>
    </body>
</html>

<script>

var path = "{{ url('typeahead_autocomplete/action') }}";

$('#user_name').typeahead({

    source: function(query, process){

        return $.get(path, {query:query}, function(data){

            return process(data);

        });

    }

});

</script>


Step 8 : Create action() method in Controller


In steps 8, we have to crate action() method in Controller class file. Because this method will received ajax request from typeahead.js for fetch match data from database, and this method will send data to ajax request in JSON format.


<?php

namespace App\Http\Controllers;

use Illuminate\Http\Request;

use App\Models\User;

class TypeaheadAutocompleteController extends Controller
{
    function index()
    {
        return view('typeahead_autocomplete');
    }

    function action(Request $request)
    {
        $data = $request->all();

        $query = $data['query'];

        $filter_data = User::select('name')
                        ->where('name', 'LIKE', '%'.$query.'%')
                        ->get();

        return response()->json($filter_data);
    }
}


Step 9 : Set Routes for Controller Method


In steps 9, we need to set route for two method of controller class. For set route, we have to open routes/web.php file and under this file first we need to import TypeaheadAutocompleteController.php class file and then after write code for set route.


<?php

use Illuminate\Support\Facades\Route;

use App\Http\Controllers\TypeaheadAutocompleteController;

Route::get('/', function () {
    return view('welcome');
});

Route::get('/typeahead_autocomplete', [TypeaheadAutocompleteController::class, 'index']);

Route::get('/typeahead_autocomplete/action', [TypeaheadAutocompleteController::class, 'action'])->name('typeahead_autocomplete.action');


Step 10 : Start Development Server


Once we have follow all above step, so here our Laravel 8 application is ready with Autocomplete Search feature. So for check output in browser, first we have need to start Laravel development server. For this we have to open command prompt and run following command. This command will start server and provide us base url of our Laravel application.


php artisan serve


Step 11 : Check Output in Browser


After start development server, now we want to check output in browser. So in browser we have hit following url for check Autocomplete Search in Laravel 8 application.


http://localhost:8000/typeahead_autocomplete


Conclusion


So under this tutorial, we have seen how easily we can implement Typeahead.js Autocomplete search in Laravel 8 framework. So making this Autocomplete Search feature, we have seen that it is very useful in our web application, because when we have type something then this feature has provide us suggestion related to text which we have type in input field, and user can get filter suggestion and from that suggestion user can select option.

Wednesday, 3 June 2020

Vue.js Autocomplete Textbox using PHP Mysql


In this PHP and Vue.js tutorials, We are going to learn how to use Ajax live search for build Autocomplete feature using Vue JS in PHP application with Mysql database. Here We will learn How to make an autocomplete component using Vue.js with PHP script and Mysql Database.

In this tutorial, we will build simple application for demonstrate the example of Autocomplete in Vue.js using PHP and Mysql. We will use Axios package for send Ajax request to fetch data from Mysql table.

As a web developer, we have already familiar with functionality of Ajax Live Dynamic Search or Autocomplete feature for search activity. In current scenario we all have made search on Google search engine or Youtube and any other social media website on internet, then we have seen like search with autocomplete. This type of live search or Autocomplete feature has been made by using Ajax technology, which will provide you search result or search query suggestion, which will be related with search query which you have entered in search textbox.

For make Ajax live search or Autocomplete feature for your website, there are many tools like jQuery UI or Typeahead etc. are available for create Autocomplete feature for your website. But here we will use Vue.js will be used with PHP script and Mysql database for build Autocomplete textbox. Here we have use Vue.js library for build Autocomplete feature, this is because Vue.js has component instance, by using Vue.js component, we can make HTML template which we can reuse in Vue.js application again and again.

So, in this article we will create ajax search autocomplete using Vue.js PHP Mysql and for this we will Axios package for use the functionality of ajax. Ajax is required for create Autocomplete feature, this is because it will fetch data from Mysql database without refresh of web page. So, in this post, we will make ajax autocomplete search with Vue.js using PHP with Mysql database. Below you can find complete source of Vue.js autocomplete from Mysql database using PHP.


Vue.js Autocomplete Textbox using PHP Mysql


Source Code

Mysql Database


--
-- Database: `testing`
--

-- --------------------------------------------------------

--
-- Table structure for table `apps_countries`
--

CREATE TABLE `apps_countries` (
  `id` int(11) NOT NULL,
  `country_code` varchar(2) NOT NULL DEFAULT '',
  `country_name` varchar(100) NOT NULL DEFAULT ''
) ENGINE=MyISAM DEFAULT CHARSET=utf8;

--
-- Dumping data for table `apps_countries`
--

INSERT INTO `apps_countries` (`id`, `country_code`, `country_name`) VALUES
(1, 'AF', 'Afghanistan'),
(2, 'AL', 'Albania'),
(3, 'DZ', 'Algeria'),
(4, 'DS', 'American Samoa'),
(5, 'AD', 'Andorra'),
(6, 'AO', 'Angola'),
(7, 'AI', 'Anguilla'),
(8, 'AQ', 'Antarctica'),
(9, 'AG', 'Antigua and Barbuda'),
(10, 'AR', 'Argentina'),
(11, 'AM', 'Armenia'),
(12, 'AW', 'Aruba'),
(13, 'AU', 'Australia'),
(14, 'AT', 'Austria'),
(15, 'AZ', 'Azerbaijan'),
(16, 'BS', 'Bahamas'),
(17, 'BH', 'Bahrain'),
(18, 'BD', 'Bangladesh'),
(19, 'BB', 'Barbados'),
(20, 'BY', 'Belarus'),
(21, 'BE', 'Belgium'),
(22, 'BZ', 'Belize'),
(23, 'BJ', 'Benin'),
(24, 'BM', 'Bermuda'),
(25, 'BT', 'Bhutan'),
(26, 'BO', 'Bolivia'),
(27, 'BA', 'Bosnia and Herzegovina'),
(28, 'BW', 'Botswana'),
(29, 'BV', 'Bouvet Island'),
(30, 'BR', 'Brazil'),
(31, 'IO', 'British Indian Ocean Territory'),
(32, 'BN', 'Brunei Darussalam'),
(33, 'BG', 'Bulgaria'),
(34, 'BF', 'Burkina Faso'),
(35, 'BI', 'Burundi'),
(36, 'KH', 'Cambodia'),
(37, 'CM', 'Cameroon'),
(38, 'CA', 'Canada'),
(39, 'CV', 'Cape Verde'),
(40, 'KY', 'Cayman Islands'),
(41, 'CF', 'Central African Republic'),
(42, 'TD', 'Chad'),
(43, 'CL', 'Chile'),
(44, 'CN', 'China'),
(45, 'CX', 'Christmas Island'),
(46, 'CC', 'Cocos (Keeling) Islands'),
(47, 'CO', 'Colombia'),
(48, 'KM', 'Comoros'),
(49, 'CG', 'Congo'),
(50, 'CK', 'Cook Islands'),
(51, 'CR', 'Costa Rica'),
(52, 'HR', 'Croatia (Hrvatska)'),
(53, 'CU', 'Cuba'),
(54, 'CY', 'Cyprus'),
(55, 'CZ', 'Czech Republic'),
(56, 'DK', 'Denmark'),
(57, 'DJ', 'Djibouti'),
(58, 'DM', 'Dominica'),
(59, 'DO', 'Dominican Republic'),
(60, 'TP', 'East Timor'),
(61, 'EC', 'Ecuador'),
(62, 'EG', 'Egypt'),
(63, 'SV', 'El Salvador'),
(64, 'GQ', 'Equatorial Guinea'),
(65, 'ER', 'Eritrea'),
(66, 'EE', 'Estonia'),
(67, 'ET', 'Ethiopia'),
(68, 'FK', 'Falkland Islands (Malvinas)'),
(69, 'FO', 'Faroe Islands'),
(70, 'FJ', 'Fiji'),
(71, 'FI', 'Finland'),
(72, 'FR', 'France'),
(73, 'FX', 'France, Metropolitan'),
(74, 'GF', 'French Guiana'),
(75, 'PF', 'French Polynesia'),
(76, 'TF', 'French Southern Territories'),
(77, 'GA', 'Gabon'),
(78, 'GM', 'Gambia'),
(79, 'GE', 'Georgia'),
(80, 'DE', 'Germany'),
(81, 'GH', 'Ghana'),
(82, 'GI', 'Gibraltar'),
(83, 'GK', 'Guernsey'),
(84, 'GR', 'Greece'),
(85, 'GL', 'Greenland'),
(86, 'GD', 'Grenada'),
(87, 'GP', 'Guadeloupe'),
(88, 'GU', 'Guam'),
(89, 'GT', 'Guatemala'),
(90, 'GN', 'Guinea'),
(91, 'GW', 'Guinea-Bissau'),
(92, 'GY', 'Guyana'),
(93, 'HT', 'Haiti'),
(94, 'HM', 'Heard and Mc Donald Islands'),
(95, 'HN', 'Honduras'),
(96, 'HK', 'Hong Kong'),
(97, 'HU', 'Hungary'),
(98, 'IS', 'Iceland'),
(99, 'IN', 'India'),
(100, 'IM', 'Isle of Man'),
(101, 'ID', 'Indonesia'),
(102, 'IR', 'Iran (Islamic Republic of)'),
(103, 'IQ', 'Iraq'),
(104, 'IE', 'Ireland'),
(105, 'IL', 'Israel'),
(106, 'IT', 'Italy'),
(107, 'CI', 'Ivory Coast'),
(108, 'JE', 'Jersey'),
(109, 'JM', 'Jamaica'),
(110, 'JP', 'Japan'),
(111, 'JO', 'Jordan'),
(112, 'KZ', 'Kazakhstan'),
(113, 'KE', 'Kenya'),
(114, 'KI', 'Kiribati'),
(115, 'KP', 'Korea, Democratic People\'s Republic of'),
(116, 'KR', 'Korea, Republic of'),
(117, 'XK', 'Kosovo'),
(118, 'KW', 'Kuwait'),
(119, 'KG', 'Kyrgyzstan'),
(120, 'LA', 'Lao People\'s Democratic Republic'),
(121, 'LV', 'Latvia'),
(122, 'LB', 'Lebanon'),
(123, 'LS', 'Lesotho'),
(124, 'LR', 'Liberia'),
(125, 'LY', 'Libyan Arab Jamahiriya'),
(126, 'LI', 'Liechtenstein'),
(127, 'LT', 'Lithuania'),
(128, 'LU', 'Luxembourg'),
(129, 'MO', 'Macau'),
(130, 'MK', 'Macedonia'),
(131, 'MG', 'Madagascar'),
(132, 'MW', 'Malawi'),
(133, 'MY', 'Malaysia'),
(134, 'MV', 'Maldives'),
(135, 'ML', 'Mali'),
(136, 'MT', 'Malta'),
(137, 'MH', 'Marshall Islands'),
(138, 'MQ', 'Martinique'),
(139, 'MR', 'Mauritania'),
(140, 'MU', 'Mauritius'),
(141, 'TY', 'Mayotte'),
(142, 'MX', 'Mexico'),
(143, 'FM', 'Micronesia, Federated States of'),
(144, 'MD', 'Moldova, Republic of'),
(145, 'MC', 'Monaco'),
(146, 'MN', 'Mongolia'),
(147, 'ME', 'Montenegro'),
(148, 'MS', 'Montserrat'),
(149, 'MA', 'Morocco'),
(150, 'MZ', 'Mozambique'),
(151, 'MM', 'Myanmar'),
(152, 'NA', 'Namibia'),
(153, 'NR', 'Nauru'),
(154, 'NP', 'Nepal'),
(155, 'NL', 'Netherlands'),
(156, 'AN', 'Netherlands Antilles'),
(157, 'NC', 'New Caledonia'),
(158, 'NZ', 'New Zealand'),
(159, 'NI', 'Nicaragua'),
(160, 'NE', 'Niger'),
(161, 'NG', 'Nigeria'),
(162, 'NU', 'Niue'),
(163, 'NF', 'Norfolk Island'),
(164, 'MP', 'Northern Mariana Islands'),
(165, 'NO', 'Norway'),
(166, 'OM', 'Oman'),
(167, 'PK', 'Pakistan'),
(168, 'PW', 'Palau'),
(169, 'PS', 'Palestine'),
(170, 'PA', 'Panama'),
(171, 'PG', 'Papua New Guinea'),
(172, 'PY', 'Paraguay'),
(173, 'PE', 'Peru'),
(174, 'PH', 'Philippines'),
(175, 'PN', 'Pitcairn'),
(176, 'PL', 'Poland'),
(177, 'PT', 'Portugal'),
(178, 'PR', 'Puerto Rico'),
(179, 'QA', 'Qatar'),
(180, 'RE', 'Reunion'),
(181, 'RO', 'Romania'),
(182, 'RU', 'Russian Federation'),
(183, 'RW', 'Rwanda'),
(184, 'KN', 'Saint Kitts and Nevis'),
(185, 'LC', 'Saint Lucia'),
(186, 'VC', 'Saint Vincent and the Grenadines'),
(187, 'WS', 'Samoa'),
(188, 'SM', 'San Marino'),
(189, 'ST', 'Sao Tome and Principe'),
(190, 'SA', 'Saudi Arabia'),
(191, 'SN', 'Senegal'),
(192, 'RS', 'Serbia'),
(193, 'SC', 'Seychelles'),
(194, 'SL', 'Sierra Leone'),
(195, 'SG', 'Singapore'),
(196, 'SK', 'Slovakia'),
(197, 'SI', 'Slovenia'),
(198, 'SB', 'Solomon Islands'),
(199, 'SO', 'Somalia'),
(200, 'ZA', 'South Africa'),
(201, 'GS', 'South Georgia South Sandwich Islands'),
(202, 'ES', 'Spain'),
(203, 'LK', 'Sri Lanka'),
(204, 'SH', 'St. Helena'),
(205, 'PM', 'St. Pierre and Miquelon'),
(206, 'SD', 'Sudan'),
(207, 'SR', 'Suriname'),
(208, 'SJ', 'Svalbard and Jan Mayen Islands'),
(209, 'SZ', 'Swaziland'),
(210, 'SE', 'Sweden'),
(211, 'CH', 'Switzerland'),
(212, 'SY', 'Syrian Arab Republic'),
(213, 'TW', 'Taiwan'),
(214, 'TJ', 'Tajikistan'),
(215, 'TZ', 'Tanzania, United Republic of'),
(216, 'TH', 'Thailand'),
(217, 'TG', 'Togo'),
(218, 'TK', 'Tokelau'),
(219, 'TO', 'Tonga'),
(220, 'TT', 'Trinidad and Tobago'),
(221, 'TN', 'Tunisia'),
(222, 'TR', 'Turkey'),
(223, 'TM', 'Turkmenistan'),
(224, 'TC', 'Turks and Caicos Islands'),
(225, 'TV', 'Tuvalu'),
(226, 'UG', 'Uganda'),
(227, 'UA', 'Ukraine'),
(228, 'AE', 'United Arab Emirates'),
(229, 'GB', 'United Kingdom'),
(230, 'US', 'United States'),
(231, 'UM', 'United States minor outlying islands'),
(232, 'UY', 'Uruguay'),
(233, 'UZ', 'Uzbekistan'),
(234, 'VU', 'Vanuatu'),
(235, 'VA', 'Vatican City State'),
(236, 'VE', 'Venezuela'),
(237, 'VN', 'Vietnam'),
(238, 'VG', 'Virgin Islands (British)'),
(239, 'VI', 'Virgin Islands (U.S.)'),
(240, 'WF', 'Wallis and Futuna Islands'),
(241, 'EH', 'Western Sahara'),
(242, 'YE', 'Yemen'),
(243, 'ZR', 'Zaire'),
(244, 'ZM', 'Zambia'),
(245, 'ZW', 'Zimbabwe');

--
-- Indexes for dumped tables
--

--
-- Indexes for table `apps_countries`
--
ALTER TABLE `apps_countries`
  ADD PRIMARY KEY (`id`);

--
-- AUTO_INCREMENT for dumped tables
--

--
-- AUTO_INCREMENT for table `apps_countries`
--
ALTER TABLE `apps_countries`
  MODIFY `id` int(11) NOT NULL AUTO_INCREMENT, AUTO_INCREMENT=246;


index.php


<!DOCTYPE html>
<html>
  <head>
    <title>Vue.js Autocomplete Textbox with PHP Mysql</title>
    <link href="https://maxcdn.bootstrapcdn.com/bootstrap/3.3.7/css/bootstrap.min.css" rel="stylesheet">
    <script src="https://cdn.jsdelivr.net/npm/vue/dist/vue.js"></script>
    <script src="https://unpkg.com/axios/dist/axios.min.js"></script>
  </head>
  <body>
    <br />
    <br />
    <div class="container" id="autocomplete_app">
      <h3 align="center">Vue.js Autocomplete Textbox with PHP Mysql</h3>
      <br />
      <br />
      <br />
      <div class="row">
        <div class="col-md-3">

        </div>
        <div class="col-md-6">
          <auto-complete></auto-complete>
        </div>
        <div class="col-md-3">

        </div>
      </div>
    </div>
  </body>
</html>

<script>

  Vue.component('auto-complete', {
    template:`
    <div>
      <input type="text" placeholder="Enter Country name..." v-model="query" @keyup="getData()" autocomplete="off" class="form-control input-lg" />
      <div class="panel-footer" v-if="search_data.length">
        <ul class="list-group">
          <a href="#" class="list-group-item" v-for="data1 in search_data" @click="getName(data1.country_name)">{{ data1.country_name }}</a>
        </ul>
      </div>
    </div>
    `,
    data:function(){
      return{
        query:'',
        search_data:[]
      }
    },
    methods:{
      getData:function(){
        this.search_data = [];
        axios.post('fetch.php', {
          query:this.query
        }).then(response => {
          this.search_data = response.data;
        });
      },
      getName:function(name){
        this.query = name;
        this.search_data = [];
      }
    }
  });

  var application = new Vue({
    el:'#autocomplete_app'
  });

</script>


fetch.php


<?php

//fetch.php;

$connect = new PDO("mysql:host=localhost; dbname=testing", "root", "");

$received_data = json_decode(file_get_contents("php://input"));

$data = array();

if($received_data->query != '')
{
 $query = "
 SELECT country_name FROM apps_countries 
 WHERE country_name LIKE '%".$received_data->query."%' 
 ORDER BY country_name ASC 
 LIMIT 10
 ";

 $statement = $connect->prepare($query);

 $statement->execute();

 while($row = $statement->fetch(PDO::FETCH_ASSOC))
 {
  $data[] = $row;
 }
}

echo json_encode($data);

?>


Sunday, 19 January 2020

How to Create AutoComplete Textbox using PHP with jQuery Ajax


Do you know what is AutoSuggest or AutoComplete textbox? The AutoSuggest Textbox means when user has type in search textbox, then they can get quickly get result according what they has type in search box, and they can select value form pre populated search suggestion from the list. This AutoSuggestion feature will load suggestion automatically, when user has type some character into Search textbox field. Here we will make lightweight AutoSuggest or AutoComplete textbox by using PHP script with Mysql Database, jQuery and Ajax.

Now in your mind one question will arise, How it called light weight AutoSuggest Textbox. This is because here when user has type in search textbox, then it will only one time fetch data from Mysql database, and then after by using jQuery plugin it will filter data from data which has fetch from database and display filter result in AutoSuggest search result. So, Here we have called this light weight AutoSuggest or AutoComplete Textbox, because it is only send one request to Mysql database and fetch data and by using jQuery plugin it has filter result from that data and display as AutoSuggest result below Search box.

In Most of AutoComplete or AutoSuggest tutorial, we have seen on every character type, it has send request to Mysql database using Ajax and display search result, but In this tutorial, it will only send one Ajax request to Mysql database and then after data will be filter by using jQuery and display one web page. For make this tutorial, here we have use jQuery "JsLocalSearch" plugin, which is very light weight and fast jquery plugin, which used for filter records from client side data and which is mainly used for filter and search a of element which we have provide. It main feature is to search html content which we have provide. Below you can find source code of How to make AutoSuggest Textbox with Bootstrap library by using PHP script with jQuery Ajax and Mysql database.


Database


--
-- Database: `testing`
--

-- --------------------------------------------------------

--
-- Table structure for table `customer_table`
--

CREATE TABLE `customer_table` (
  `customer_id` int(11) NOT NULL,
  `customer_first_name` varchar(200) NOT NULL,
  `customer_last_name` varchar(200) NOT NULL,
  `customer_email` varchar(300) NOT NULL,
  `customer_gender` varchar(30) NOT NULL
) ENGINE=InnoDB DEFAULT CHARSET=latin1;

--
-- Indexes for dumped tables
--

--
-- Indexes for table `customer_table`
--
ALTER TABLE `customer_table`
  ADD PRIMARY KEY (`customer_id`);

--
-- AUTO_INCREMENT for dumped tables
--

--
-- AUTO_INCREMENT for table `customer_table`
--
ALTER TABLE `customer_table`
  MODIFY `customer_id` int(11) NOT NULL AUTO_INCREMENT;


index.php


<!DOCTYPE html>
<html>
 <head>
  <title>jQuery Auto Suggest Textbox with Bootstrap 4 using PHP Ajax</title>
  <script src="https://code.jquery.com/jquery-1.12.4.min.js"></script>
  <script src="https://cdnjs.cloudflare.com/ajax/libs/popper.js/1.12.9/umd/popper.min.js"></script>
  <script src="https://maxcdn.bootstrapcdn.com/bootstrap/4.0.0/js/bootstrap.min.js"></script>
  <script src="JsLocalSearch.js"></script>
  <link rel="stylesheet" href="https://maxcdn.bootstrapcdn.com/bootstrap/4.0.0/css/bootstrap.min.css" />
  <style> 
  .mark {
    background-color: #d7ffe7 !important
  }

  .mark .gsearch{
    font-size: 20px
  }

  .unmark {
    background-color: #e8e8e8 !important
  }

  .unmark .gsearch{
    font-size: 10px
  }
  
  .marktext
  {
   font-weight:bold;
   background-color: antiquewhite;
  }
  </style>
 </head>
 <body>
  <br />
  <br />
  <div class="container">
   <h3 align="center">jQuery Auto Suggest Textbox with Bootstrap 4 using PHP Ajax</h3>
   <br />
   <br />
   <div class="row">
    <div class="col-md-3"></div>
    <div class="col-md-6">
     <input type="text" id="gsearchsimple" class="form-control input-lg" placeholder="Search..." />

     <ul class="list-group">

     </ul>
     <div id="localSearchSimple"></div>
     <div id="detail" style="margin-top:16px;"></div>
    </div>
    <div class="col-md-3"></div>
   </div>
  </div>
 </body>
</html>
<script>
$(document).ready(function(){
 $('#gsearchsimple').keyup(function(){
  var query = $('#gsearchsimple').val();
  $('#detail').html('');
  $('.list-group').css('display', 'block');
  if(query.length == 2)
  {
   $.ajax({
    url:"fetch.php",
    method:"POST",
    data:{query:query},
    success:function(data)
    {
     $('.list-group').html(data);
    }
   })
  }
  if(query.length == 0)
  {
   $('.list-group').css('display', 'none');
  }
 });

 $('#localSearchSimple').jsLocalSearch({
  action:"Show",
  html_search:true,
  mark_text:"marktext"
 });

 $(document).on('click', '.gsearch', function(){
  var email = $(this).text();
  $('#gsearchsimple').val(email);
  $('.list-group').css('display', 'none');
  $.ajax({
   url:"fetch.php",
   method:"POST",
   data:{email:email},
   success:function(data)
   {
    $('#detail').html(data);
   }
  })
 });
});
</script>


fetch.php


<?php

//fetch.php;

$connect = new PDO("mysql:host=localhost; dbname=testing", "root", "");

if(isset($_POST['query']))
{
 $query = "
 SELECT DISTINCT customer_email FROM customer_table 
 WHERE customer_email LIKE '%".trim($_POST["query"])."%'
 ";

 $statement = $connect->prepare($query);

 $statement->execute();

 $result = $statement->fetchAll();

 $output = '';

 foreach($result as $row)
 {
  $output .= '
  <li class="list-group-item contsearch">
   <a href="javascript:void(0)" class="gsearch" style="color:#333;text-decoration:none;">'.$row["customer_email"].'</a>
  </li>
  ';
 }

 echo $output;
}

if(isset($_POST['email']))
{
 $query = "
 SELECT * FROM customer_table 
 WHERE customer_email = '".trim($_POST["email"])."' 
 LIMIT 1
 ";

 $statement = $connect->prepare($query);

 $statement->execute();

 $result = $statement->fetchAll();

 $output = '
 <table class="table table-bordered table-striped">
  <tr>
   <th>First Name</th>
   <th>Last Name</th>
   <th>Email</th>
   <th>Gender</th>
  </tr>
 ';

 foreach($result as $row)
 {
  $output .= '
  <tr>
   <td>'.$row["customer_first_name"].'</td>
   <td>'.$row["customer_last_name"].'</td>
   <td>'.$row["customer_email"].'</td>
   <td>'.$row["customer_gender"].'</td>
  </tr>
  ';
 }
 $output .= '</table>';

 echo $output;
}

?>


So, If you have follow above source code, then you can learn How to Create Light Weight dynamic AutoSuggest or AutoComplete Textbox by using PHP script with Mysql database, jQuery and Ajax. If you want to get this tutorial source code file in zip folder, you can email us at webslesson@gmail.com.

Sunday, 17 November 2019

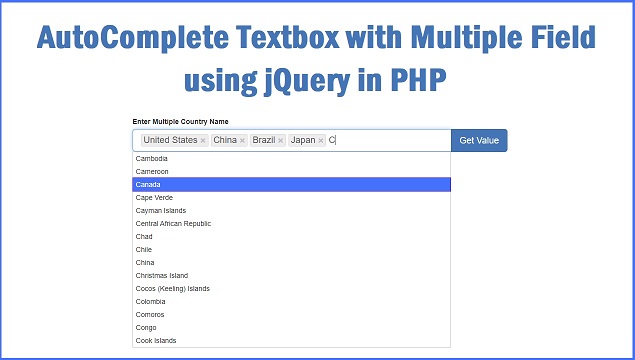
AutoComplete Textbox with Multiple Field using jQuery in PHP


In this post, We arg going to learn How to make Autocomplete Textbox with feature like selection of multiple option by using Bootstrap Tokenfield plugin with Ajax, PHP and dynamic Mysql data. We have already seen how Autocomplete textbox work with single option by using jQuery UI library, but here we will learn Autocomplete textbox with multi select feature. So, in this tutorial, we will make an example of Add multiple input tags with Autocomplete search result from Mysql database table using Bootstrap Tokenfield plugin with Ajax and PHP.

In web application, sometimes we have to required give feature like user can enter multiple input tags. At that time we have to require to use jQuery plugin for input multiple tags. But here also we want to make autocomplete textbox for enter multiple input tag. For this here we have use Bootstrap token field plugin, which is advanced tagging or tokenizing plugin for jQuery and Bootstrap library.

We all know Autocomplete Textbox which display the auto suggestion below input field, and user can allow to select value from pre populated search list. This type of feature help to user to search and pick the required value from auto suggested search result. Here when user has try to typing something in textbox and it has fetched respective data from Mysql database and it will display suggestion as dropdown under input textbox field. We can easily make dynamic autocomplete textbox by using jQuery UI library with PHP.

But generally autocomplete textbox has allow user to select single value from pre-populated list. But here want to allow user to select multiple value from auto-suggestion list from autocomplete textbox. Now in this tutorial, we have seen how to make autocomplete textbox in which user can select multiple items from the dynamic pre-populated list by using Aajx with PHP and Mysql database. Below you can find short process of create autocomplete textbox with multiple selection values in PHP.

  • First Make Mysql Database connection
  • Get the search query with GET parameter with name query
  • Send GET parameter variable value to PHP script using Ajax
  • Search match data from Mysql database in PHP script
  • Store search match data into array
  • Send data in JSON format to Ajax request


Source Code


index.php


<!DOCTYPE html>
<html>
    <head>
        <title>AutoComplete Textbox with Multiple Field using jQuery in PHP</title>
        <script src="https://ajax.googleapis.com/ajax/libs/jquery/3.1.0/jquery.min.js"></script>
        
        <script src="https://maxcdn.bootstrapcdn.com/bootstrap/3.3.7/js/bootstrap.min.js"></script>
        <link rel="stylesheet" href="https://maxcdn.bootstrapcdn.com/bootstrap/3.3.6/css/bootstrap.min.css" />
        <link rel="stylesheet" type="text/css" href="https://cdnjs.cloudflare.com/ajax/libs/jqueryui/1.12.1/jquery-ui.min.css">
        <link rel="stylesheet" type="text/css" href="https://cdnjs.cloudflare.com/ajax/libs/bootstrap-tokenfield/0.12.0/css/bootstrap-tokenfield.min.css">
        <script src="https://cdnjs.cloudflare.com/ajax/libs/jqueryui/1.12.1/jquery-ui.min.js"></script>
        <script src="https://cdnjs.cloudflare.com/ajax/libs/bootstrap-tokenfield/0.12.0/bootstrap-tokenfield.js"></script>
    </head>
    <body>
        <br />
        <br />
        <div class="container">
            <h1 align="center">AutoComplete Textbox with Multiple Field using jQuery in PHP</h1>
            <br />
            <br />
            <br />
            <div class="row">
                <div class="col-md-2">

                </div>
                <div class="col-md-8">
                    <div class="form-group">
                        <label>Enter Multiple Country Name</label>
                        <div class="input-group">
                            <input type="text" id="search_data" placeholder="" autocomplete="off" class="form-control input-lg" />
                            <div class="input-group-btn">
                                <button type="button" class="btn btn-primary btn-lg" id="search">Get Value</button>
                            </div>
                        </div>
                        <br />
                        <span id="country_name"></span>
                    </div>
                </div>
                <div class="col-md-2">

                </div>
            </div>
        </div>
    </body>
</html>
<script>
  $(document).ready(function(){
      
    $('#search_data').tokenfield({
        autocomplete :{
            source: function(request, response)
            {
                jQuery.get('fetch.php', {
                    query : request.term
                }, function(data){
                    data = JSON.parse(data);
                    response(data);
                });
            },
            delay: 100
        }
    });

    $('#search').click(function(){
        $('#country_name').text($('#search_data').val());
    });

  });
</script>


fetch.php


<?php

//fetch.php;

$data = array();

if(isset($_GET["query"]))
{
 $connect = new PDO("mysql:host=localhost; dbname=testing", "root", "");

 $query = "
 SELECT country_name FROM apps_countries 
 WHERE country_name LIKE '".$_GET["query"]."%' 
 ORDER BY country_name ASC 
 LIMIT 15
 ";

 $statement = $connect->prepare($query);

 $statement->execute();

 while($row = $statement->fetch(PDO::FETCH_ASSOC))
 {
  $data[] = $row["country_name"];
 }
}

echo json_encode($data);

?>

Sunday, 10 November 2019

How to Display Image in jQuery UI AutoComplete Textbox in PHP


If you are using PHP as your Web Development and if you have build any PHP based website, then in your website you have to require any Search feature. Then in that Search Textbox, if you have add auto complete search list, and if you have one more feature like display image with that auto search list. So, it will add one advance level of feature in your Website UI experience.

In most of the website we have generally seen autocomplete textbox with name or email or simple text, but there are very less website has display image in pre-populated search result. Here we will make autocomplete textbox, in which make list pre-populated search result with image. This feature we will make by add custom html tag in jQuery UI autocomplete method by add _renderItem. Here we will use __renderItem method, by using this method we will add custom HTML code in autocomplete textbox.

By using jQery UI, we can easily implement autocomplete widget on any input textbox element. This autocomplete widget has provide us many customizing option as per our requirement. So, here our requirement is display image with search result. So, It has provide this _renderItem method, in which we can define custom html code for display image in auto suggest search list.


This jQuery UI autocomplete plugin is very easy to integrate in our existing code. By using simple autocomplete() method we can initialize this plugin on any define input textbox element. This plugin has use Ajax request for fetch data from PHP script. We have to define PHP file name under source option. When it send Ajax request to PHP script and it will received response from PHP script in JSON format and it will as auto suggest search result on web page without refresh of web page. So, this autocomplete widget gives auto suggestion as search result, which user can see below autocomplete textbox while searching value in the textbox element. Below you can fine complete source with online demo link also.


Database


--
-- Database: `testing`
--

-- --------------------------------------------------------

--
-- Table structure for table `tbl_student`
--

CREATE TABLE `tbl_student` (
  `student_id` int(11) NOT NULL,
  `student_name` varchar(250) NOT NULL,
  `student_phone` varchar(20) NOT NULL,
  `image` varchar(255) NOT NULL
) ENGINE=MyISAM DEFAULT CHARSET=latin1;

--
-- Dumping data for table `tbl_student`
--

INSERT INTO `tbl_student` (`student_id`, `student_name`, `student_phone`, `image`) VALUES
(1, 'Pauline S. Rich', '412-735-0224', 'image_1.jpg'),
(2, 'Sarah C. White', '320-552-9961', 'image_2.jpg'),
(3, 'Samuel L. Leslie', '201-324-8264', 'image_3.jpg'),
(4, 'Norma R. Manly', '478-322-4715', 'image_4.jpg'),
(5, 'Kimberly R. Castro', '479-966-6788', 'image_5.jpg'),
(6, 'Elaine R. Davis', '701-685-8912', 'image_6.jpg'),
(7, 'Concepcion S. Gardner', '607-829-8758', 'image_7.jpg'),
(8, 'Patricia J. White', '803-789-0429', 'image_8.jpg'),
(9, 'Michael M. Bothwell', '214-585-0737', 'image_9.jpg'),
(10, 'Ronald C. Vansickle', '630-571-4107', 'image_10.jpg'),
(11, 'Clarence A. Rich', '904-459-3747', 'image_11.jpg'),
(12, 'Elizabeth W. Peterson', '404-380-9481', 'image_12.jpg'),
(13, 'Renee R. Hewitt', '323-350-4973', 'image_13.jpg'),
(14, 'John K. Love', '337-229-1983', 'image_14.jpg'),
(15, 'Teresa J. Rincon', '216-394-6894', 'image_15.jpg'),
(16, 'Erin S. Huckaby', '503-284-8652', 'image_16.jpg'),
(17, 'Brian A. Handley', '989-304-7122', 'image_17.jpg'),
(18, 'Michelle A. Polk', '540-232-0351', 'image_18.jpg'),
(19, 'Wanda M. Brown', '718-262-7466', 'image_19.jpg'),
(20, 'Phillip A. Hatcher', '407-492-5727', 'image_20.jpg'),
(21, 'Dennis J. Terrell', '903-863-5810', 'image_21.jpg'),
(22, 'Britney F. Johnson', '972-421-6933', 'image_22.jpg'),
(23, 'Rachelle J. Martin', '920-397-4224', 'image_23.jpg'),
(24, 'Leila E. Ledoux', '615-425-9930', 'image_24.jpg'),
(25, 'Darrell A. Fields', '708-887-1913', 'image_25.jpg'),
(26, 'Linda D. Carter', '909-386-7998', 'image_26.jpg'),
(27, 'Melva J. Palmisano', '630-643-8763', 'image_27.jpg'),
(28, 'Jessica V. Windham', '513-807-9224', 'image_28.jpg'),
(29, 'Karen T. Martin', '847-385-1621', 'image_29.jpg'),
(30, 'Jack K. McDonough', '561-641-4509', 'image_30.jpg'),
(31, 'John M. Williams', '508-269-9346', 'image_31.jpg'),
(32, 'Amelia W. Davis', '347-537-8052', 'image_32.jpg'),
(33, 'Gertrude W. Lawrence', '510-702-7415', 'image_33.jpg'),
(34, 'Michael L. Harris', '252-219-4076', 'image_34.jpg'),
(35, 'Casey A. Groves', '810-334-9674', 'image_35.jpg'),
(36, 'James H. Wilson', '865-259-6772', 'image_36.jpg'),
(37, 'James A. Wesley', '443-217-1859', 'image_37.jpg'),
(38, 'Armando C. Gay', '716-252-9230', 'image_38.jpg'),
(39, 'James M. Duarte', '402-840-0541', 'image_39.jpg'),
(40, 'Jason E. West', '360-610-7730', 'image_40.jpg'),
(41, 'Gloria H. Saucedo', '205-861-3306', 'image_41.jpg'),
(42, 'Paul T. Moody', '914-683-4994', 'image_42.jpg'),
(43, 'Sandra L. Williams', '310-335-1336', 'image_43.jpg'),
(44, 'Elaine T. Deville', '626-513-8306', 'image_44.jpg'),
(45, 'Robyn L. Spangler', '754-224-7023', 'image_45.jpg'),
(46, 'Sam A. Pino', '806-823-5344', 'image_46.jpg'),
(47, 'Joseph H. Marble', '201-917-2804', 'image_47.jpg'),
(48, 'Mark M. Bassett', '206-592-4665', 'image_48.jpg'),
(49, 'Edgar M. Billy', '978-365-0324', 'image_49.jpg'),
(50, 'Connie M. Yang', '815-288-5435', 'image_50.jpg');

--
-- Indexes for dumped tables
--

--
-- Indexes for table `tbl_student`
--
ALTER TABLE `tbl_student`
  ADD PRIMARY KEY (`student_id`);

--
-- AUTO_INCREMENT for dumped tables
--

--
-- AUTO_INCREMENT for table `tbl_student`
--
ALTER TABLE `tbl_student`
  MODIFY `student_id` int(11) NOT NULL AUTO_INCREMENT, AUTO_INCREMENT=71;


index.php


<!DOCTYPE html>
<html>
  <head>
    <title>jQuery UI Autocomplete with Images and Custom HTML in PHP</title>
    <script src="https://ajax.googleapis.com/ajax/libs/jquery/3.1.0/jquery.min.js"></script>
    <script src="https://cdnjs.cloudflare.com/ajax/libs/jqueryui/1.12.1/jquery-ui.js"></script>
    <link rel="stylesheet" href="https://cdnjs.cloudflare.com/ajax/libs/jqueryui/1.12.1/jquery-ui.css" />
    <link rel="stylesheet" href="https://maxcdn.bootstrapcdn.com/bootstrap/3.3.6/css/bootstrap.min.css" />
    <script src="https://maxcdn.bootstrapcdn.com/bootstrap/3.3.7/js/bootstrap.min.js"></script>

    <style type="text/css">
      .ui-autocomplete-row
      {
        padding:8px;
        background-color: #f4f4f4;
        border-bottom:1px solid #ccc;
        font-weight:bold;
      }
      .ui-autocomplete-row:hover
      {
        background-color: #ddd;
      }
    </style>
  </head>
  <body>
    <br />
    <br />
    <div class="container">
      <h3 align="center">Ajax AutoComplete Textbox with Image using jQuery UI in PHP</h3>
      <br />
      <br />
      <br />
      <div class="row">
        <div class="col-md-3">

        </div>
        <div class="col-md-6">
          <input type="text" id="search_data" placeholder="Enter Student name..." autocomplete="off" class="form-control input-lg" />
        </div>
        <div class="col-md-3">

        </div>
      </div>
    </div>
  </body>
</html>
<script>
  $(document).ready(function(){
      
    $('#search_data').autocomplete({
      source: "fetch.php",
      minLength: 1,
      select: function(event, ui)
      {
        $('#search_data').val(ui.item.value);
      }
    }).data('ui-autocomplete')._renderItem = function(ul, item){
      return $("<li class='ui-autocomplete-row'></li>")
        .data("item.autocomplete", item)
        .append(item.label)
        .appendTo(ul);
    };

  });
</script>


fetch.php


<?php

//fetch.php;

if(isset($_GET["term"]))
{
 $connect = new PDO("mysql:host=localhost; dbname=testing", "root", "");

 $query = "
 SELECT * FROM tbl_student 
 WHERE student_name LIKE '%".$_GET["term"]."%' 
 ORDER BY student_name ASC
 ";

 $statement = $connect->prepare($query);

 $statement->execute();

 $result = $statement->fetchAll();

 $total_row = $statement->rowCount();

 $output = array();
 if($total_row > 0)
 {
  foreach($result as $row)
  {
   $temp_array = array();
   $temp_array['value'] = $row['student_name'];
   $temp_array['label'] = '<img src="images/'.$row['image'].'" width="70" />&nbsp;&nbsp;&nbsp;'.$row['student_name'].'';
   $output[] = $temp_array;
  }
 }
 else
 {
  $output['value'] = '';
  $output['label'] = 'No Record Found';
 }

 echo json_encode($output);
}

?>


Monday, 23 July 2018

Autocomplete Search Box using Typeahead in Codeigniter


In this post We are going to discuss how to make autocomplete or auto search or auto suggest textbox in Codeigniter application by using Typeahead.js bootstrap jquery plugin. By using Typeahead.js plugin with Codeigniter framework we will make dynamic real time auto suggest search box with not only display text suggestion data but also it will also display images with auto suggest search. In most of the tutorial you can find simple how to use typeahead.js with Codeigniter framework and it will only describe autocomplete search records below textbox, but in this tutorial we have also add one more feature like how to load images in Autocomplete search with custom html template using typeahead.js plugin. So when we have type something in textbox then it will not only autocomplete search but also it will also load images with autocomplete search also using typeahead.js with codeigniter.

We all know Codeigniter is a MVC framework which has build using PHP and it is very famouse and widely use this framework for development of web application. So, in web application we have to provide one feature like search box, so user can search into system any required data. For in search if you user has start type his query and he has get all possible result of his query in auto suggest search drop down textbox then he can easily get result without type whole word. So this type of functionality we have to build here in our codeigniter application. For this we have using Typeahead.js library which is flexible javascript library and it has provide us strong foundation for auto suggest or autocomplete search. For if you want to make dynamic real time autocomplete feature which search data into mysql database and fetch that data and display into autocomplete search result in real time for this we have to use typeahead.js library which has provide great autocomplete search functionality with stylish UI also and we can easily customize also.


Step 1: Create Table


This is first step and in this we have to create one table and in this table we have insert some dummy data. For this we have make one "tbl_student" table and inserted some records which you can find below.

tbl_student table

--
-- Database: `testing`
--

-- --------------------------------------------------------

--
-- Table structure for table `tbl_student`
--

CREATE TABLE `tbl_student` (
  `student_id` int(11) NOT NULL,
  `student_name` varchar(250) NOT NULL,
  `student_phone` varchar(20) NOT NULL,
  `image` varchar(255) NOT NULL
) ENGINE=MyISAM DEFAULT CHARSET=latin1;

--
-- Dumping data for table `tbl_student`
--

INSERT INTO `tbl_student` (`student_id`, `student_name`, `student_phone`, `image`) VALUES
(1, 'Pauline S. Rich', '412-735-0224', 'image_1.jpg'),
(2, 'Sarah C. White', '320-552-9961', 'image_2.jpg'),
(3, 'Samuel L. Leslie', '201-324-8264', 'image_3.jpg'),
(4, 'Norma R. Manly', '478-322-4715', 'image_4.jpg'),
(5, 'Kimberly R. Castro', '479-966-6788', 'image_5.jpg'),
(6, 'Elaine R. Davis', '701-685-8912', 'image_6.jpg'),
(7, 'Concepcion S. Gardner', '607-829-8758', 'image_7.jpg'),
(8, 'Patricia J. White', '803-789-0429', 'image_8.jpg'),
(9, 'Michael M. Bothwell', '214-585-0737', 'image_9.jpg'),
(10, 'Ronald C. Vansickle', '630-571-4107', 'image_10.jpg'),
(11, 'Clarence A. Rich', '904-459-3747', 'image_11.jpg'),
(12, 'Elizabeth W. Peterson', '404-380-9481', 'image_12.jpg'),
(13, 'Renee R. Hewitt', '323-350-4973', 'image_13.jpg'),
(14, 'John K. Love', '337-229-1983', 'image_14.jpg'),
(15, 'Teresa J. Rincon', '216-394-6894', 'image_15.jpg'),
(16, 'Erin S. Huckaby', '503-284-8652', 'image_16.jpg'),
(17, 'Brian A. Handley', '989-304-7122', 'image_17.jpg'),
(18, 'Michelle A. Polk', '540-232-0351', 'image_18.jpg'),
(19, 'Wanda M. Brown', '718-262-7466', 'image_19.jpg'),
(20, 'Phillip A. Hatcher', '407-492-5727', 'image_20.jpg'),
(21, 'Dennis J. Terrell', '903-863-5810', 'image_21.jpg'),
(22, 'Britney F. Johnson', '972-421-6933', 'image_22.jpg'),
(23, 'Rachelle J. Martin', '920-397-4224', 'image_23.jpg'),
(24, 'Leila E. Ledoux', '615-425-9930', 'image_24.jpg'),
(25, 'Darrell A. Fields', '708-887-1913', 'image_25.jpg'),
(26, 'Linda D. Carter', '909-386-7998', 'image_26.jpg'),
(27, 'Melva J. Palmisano', '630-643-8763', 'image_27.jpg'),
(28, 'Jessica V. Windham', '513-807-9224', 'image_28.jpg'),
(29, 'Karen T. Martin', '847-385-1621', 'image_29.jpg'),
(30, 'Jack K. McDonough', '561-641-4509', 'image_30.jpg'),
(31, 'John M. Williams', '508-269-9346', 'image_31.jpg'),
(32, 'Amelia W. Davis', '347-537-8052', 'image_32.jpg'),
(33, 'Gertrude W. Lawrence', '510-702-7415', 'image_33.jpg'),
(34, 'Michael L. Harris', '252-219-4076', 'image_34.jpg'),
(35, 'Casey A. Groves', '810-334-9674', 'image_35.jpg'),
(36, 'James H. Wilson', '865-259-6772', 'image_36.jpg'),
(37, 'James A. Wesley', '443-217-1859', 'image_37.jpg'),
(38, 'Armando C. Gay', '716-252-9230', 'image_38.jpg'),
(39, 'James M. Duarte', '402-840-0541', 'image_39.jpg'),
(40, 'Jason E. West', '360-610-7730', 'image_40.jpg'),
(41, 'Gloria H. Saucedo', '205-861-3306', 'image_41.jpg'),
(42, 'Paul T. Moody', '914-683-4994', 'image_42.jpg'),
(43, 'Sandra L. Williams', '310-335-1336', 'image_43.jpg'),
(44, 'Elaine T. Deville', '626-513-8306', 'image_44.jpg'),
(45, 'Robyn L. Spangler', '754-224-7023', 'image_45.jpg'),
(46, 'Sam A. Pino', '806-823-5344', 'image_46.jpg'),
(47, 'Joseph H. Marble', '201-917-2804', 'image_47.jpg'),
(48, 'Mark M. Bassett', '206-592-4665', 'image_48.jpg'),
(49, 'Edgar M. Billy', '978-365-0324', 'image_49.jpg'),
(50, 'Connie M. Yang', '815-288-5435', 'image_50.jpg');

--
-- Indexes for dumped tables
--

--
-- Indexes for table `tbl_student`
--
ALTER TABLE `tbl_student`
  ADD PRIMARY KEY (`student_id`);

--
-- AUTO_INCREMENT for dumped tables
--

--
-- AUTO_INCREMENT for table `tbl_student`
--
ALTER TABLE `tbl_student`
  MODIFY `student_id` int(11) NOT NULL AUTO_INCREMENT, AUTO_INCREMENT=51;


Step 2: Make Database Connection in Codeigniter


Now we have to make database connection by defining required information like hostname, database name, username and password. By this credential we can make database connection in codeigniter.

application/config/database.php


<?php
defined('BASEPATH') OR exit('No direct script access allowed');

$active_group = 'default';
$query_builder = TRUE;

$db['default'] = array(
 'dsn' => '',
 'hostname' => 'localhost',
 'username' => 'root',
 'password' => '',
 'database' => 'testing',
 'dbdriver' => 'mysqli',
 'dbprefix' => '',
 'pconnect' => FALSE,
 'db_debug' => (ENVIRONMENT !== 'production'),
 'cache_on' => FALSE,
 'cachedir' => '',
 'char_set' => 'utf8',
 'dbcollat' => 'utf8_general_ci',
 'swap_pre' => '',
 'encrypt' => FALSE,
 'compress' => FALSE,
 'stricton' => FALSE,
 'failover' => array(),
 'save_queries' => TRUE
);


Step 3: Create Controller


After making of database connection in Codeigniter Application then we have to make controller for handle http request. So, here we have make Autocomplete Controller in application/controllers folder. This controller will received user request and it will send request to model and from model it will received data which it will send to view file. Here index() method will load root of this controller and fetch() will received ajax request for fetch data.

application/controllers/Autocomplete.php


<?php
defined('BASEPATH') OR exit('No direct script access allowed');

class Autocomplete extends CI_Controller {
 
 function index()
 {
  $this->load->view('autocomplete_view') ;
 }
 function fetch()
 {
  $this->load->model('autocomplete_model');
  echo $this->autocomplete_model->fetch_data($this->uri->segment(3));
 }
}
?>


Step 4: Create Models


After Creating controllers we have to make models, in this model we can perform database side operation, so here we will write login for search data from mysql table, which we can found below.

application/models/Autocomplete_model.php


<?php
class Autocomplete_model extends CI_Model
{
 function fetch_data($query)
 {
  $this->db->like('student_name', $query);
  $query = $this->db->get('tbl_student');
  if($query->num_rows() > 0)
  {
   foreach($query->result_array() as $row)
   {
    $output[] = array(
     'name'  => $row["student_name"],
     'image'  => $row["image"]
    );
   }
   echo json_encode($output);
  }
 }
}

?>


Step 5: Create View


Lastly we have to create view file, which is an output file of our Codeigniter framework, last and final output has been display using this view file. In this file we can define css and javascript file details. Here we have imported required library of Typeahead.js library required file. Below we can find complete source code of this file.

application/views/autocomplete_view.php


<html>
<head>
    <title>Autocomplete Search Box using Typeahead in Codeigniter</title>
    
 <script src="https://ajax.googleapis.com/ajax/libs/jquery/2.2.0/jquery.min.js"></script>
 <link rel="stylesheet" href="https://maxcdn.bootstrapcdn.com/bootstrap/3.3.6/css/bootstrap.min.css" />
 <script src="https://maxcdn.bootstrapcdn.com/bootstrap/3.3.6/js/bootstrap.min.js"></script>
 <link rel="stylesheet" href="https://twitter.github.io/typeahead.js/css/examples.css" /> 
 <script src="https://cdnjs.cloudflare.com/ajax/libs/bootstrap-3-typeahead/4.0.2/bootstrap3-typeahead.min.js"></script>
 <script src="https://twitter.github.io/typeahead.js/js/handlebars.js"></script>
 <script src="https://twitter.github.io/typeahead.js/releases/latest/typeahead.bundle.js"></script>

 <style>
 .box
 {
  width:100%;
  max-width: 650px;
  margin:0 auto;
 }
 </style>
</head>
<body>
 <div class="container">
  <br />
  <br />
  <h3 align="center">Autocomplete Search Box using Typeahead in Codeigniter</h3>
  <br />
  <div id="prefetch">
   <input type="text" name="search_box" id="search_box" class="form-control input-lg typeahead" placeholder="Search Here" />
  </div>
 </div>
</body>
</html>
<script>
$(document).ready(function(){
  var sample_data = new Bloodhound({
   datumTokenizer: Bloodhound.tokenizers.obj.whitespace('value'),
   queryTokenizer: Bloodhound.tokenizers.whitespace,
   prefetch:'<?php echo base_url(); ?>autocomplete/fetch',
   remote:{
    url:'<?php echo base_url(); ?>autocomplete/fetch/%QUERY',
    wildcard:'%QUERY'
   }
  });
  

  $('#prefetch .typeahead').typeahead(null, {
   name: 'sample_data',
   display: 'name',
   source:sample_data,
   limit:10,
   templates:{
    suggestion:Handlebars.compile('<div class="row"><div class="col-md-2" style="padding-right:5px; padding-left:5px;"><img src="student_image/{{image}}" class="img-thumbnail" width="48" /></div><div class="col-md-10" style="padding-right:5px; padding-left:5px;">{{name}}</div></div>')
   }
  });
});
</script>


So, this is complete step by step process for how to use Typeahead.js with Codeigniter framework and make autocomplete textbox in which we have load images with search result on webpage.