Showing posts with label live. Show all posts

Tuesday, 14 March 2023

Ajax Live Search using Node.js with MySQL


In today's fast-paced world, users expect web applications to be responsive and efficient. One of the ways to achieve this is by implementing an Ajax live search feature on your website. This feature allows users to search for content on your website without having to reload the page. In this article, we will show you how to implement an Ajax live search feature using Node.js and MySQL.

Node.js is an open-source, cross-platform JavaScript runtime environment that allows developers to build server-side applications with JavaScript. MySQL is a popular open-source relational database management system that is widely used in web development. Together, they provide a powerful combination for building web applications.

To get started, you will need to have Node.js and MySQL installed on your machine. You will also need to have a basic understanding of JavaScript, HTML, and CSS.


Ajax Live Search using Node.js with MySQL


Step 1: Setting up the Database


The first step is to set up the database. You will need to create a table to store the data that will be searched. For this example, we will create a table called "customers" with columns for "customer_id", "customer_first_name", "customer_last_name", "customer_email" and "customer_gender". Below you can find .sql script for create customers table and it will insert some sample data into that table.


--
-- Database: `testing`
--

-- --------------------------------------------------------

--
-- Table structure for table `customers`
--

CREATE TABLE `customers` (
  `customer_id` int(11) NOT NULL,
  `customer_first_name` varchar(200) NOT NULL,
  `customer_last_name` varchar(200) NOT NULL,
  `customer_email` varchar(300) NOT NULL,
  `customer_gender` varchar(30) NOT NULL
) ENGINE=InnoDB DEFAULT CHARSET=latin1;

--
-- Dumping data for table `customers`
--

INSERT INTO `customers` (`customer_id`, `customer_first_name`, `customer_last_name`, `customer_email`, `customer_gender`) VALUES
(1, 'Mathilda', 'Garnam', 'mgarnam0@rediff.com', 'Female'),
(2, 'Tymon', 'McEniry', 'tmceniry1@free.fr', 'Male'),
(3, 'Margarette', 'Danilyak', 'mdanilyak2@joomla.org', 'Female'),
(4, 'Ermanno', 'Huebner', 'ehuebner3@wikipedia.org', 'Male'),
(5, 'Agnes', 'Barabich', 'abarabich4@delicious.com', 'Female'),
(6, 'Hamil', 'De Zuani', 'hdezuani5@hostgator.com', 'Male'),
(7, 'Corrie', 'Althorpe', 'calthorpe6@themeforest.net', 'Female'),
(8, 'Ricard', 'Dumelow', 'rdumelow7@china.com.cn', 'Male'),
(9, 'D\'arcy', 'Crayton', 'dcrayton8@furl.net', 'Male'),
(10, 'Kayle', 'Stonier', 'kstonier9@thetimes.co.uk', 'Female'),
(11, 'Julissa', 'Bogeys', 'jbogeysa@w3.org', 'Female'),
(12, 'Saul', 'Hyam', 'shyamb@senate.gov', 'Male'),
(13, 'Saleem', 'Pettengell', 'spettengellc@si.edu', 'Male'),
(14, 'Ives', 'Osmon', 'iosmond@forbes.com', 'Male'),
(15, 'Wendie', 'Acton', 'wactone@army.mil', 'Female'),
(16, 'Ches', 'Redd', 'creddf@un.org', 'Male'),
(17, 'Sarine', 'Cossum', 'scossumg@hubpages.com', 'Female'),
(18, 'Farly', 'Arsmith', 'farsmithh@linkedin.com', 'Male'),
(19, 'Althea', 'Tavernor', 'atavernori@printfriendly.com', 'Female'),
(20, 'Gayla', 'Billes', 'gbillesj@miitbeian.gov.cn', 'Female'),
(21, 'Teodoor', 'Shreenan', 'tshreenank@hp.com', 'Male'),
(22, 'Rich', 'Frusher', 'rfrusherl@cbc.ca', 'Male'),
(23, 'Lissie', 'Glazier', 'lglazierm@elpais.com', 'Female'),
(24, 'Glyn', 'Dealey', 'gdealeyn@unesco.org', 'Male'),
(25, 'Kathy', 'Swansborough', 'kswansborougho@amazon.de', 'Female'),
(26, 'Dudley', 'Hopkyns', 'dhopkynsp@mozilla.com', 'Male'),
(27, 'Byran', 'Ealles', 'beallesq@engadget.com', 'Male'),
(28, 'Kenon', 'MacGray', 'kmacgrayr@stumbleupon.com', 'Male'),
(29, 'Sibilla', 'Norres', 'snorress@smugmug.com', 'Female'),
(30, 'Melita', 'Redman', 'mredmant@a8.net', 'Female'),
(31, 'Ki', 'Brydson', 'kbrydsonu@google.ca', 'Female'),
(32, 'Bernardine', 'Follis', 'bfollisv@unc.edu', 'Female'),
(33, 'Farleigh', 'Sudy', 'fsudyw@unc.edu', 'Male'),
(34, 'Belle', 'Dearness', 'bdearnessx@google.co.uk', 'Female'),
(35, 'Onfre', 'Kee', 'okeey@archive.org', 'Male');

--
-- Indexes for dumped tables
--

--
-- Indexes for table `customers`
--
ALTER TABLE `customers`
  ADD PRIMARY KEY (`customer_id`);

--
-- AUTO_INCREMENT for dumped tables
--

--
-- AUTO_INCREMENT for table `customers`
--
ALTER TABLE `customers`
  MODIFY `customer_id` int(11) NOT NULL AUTO_INCREMENT, AUTO_INCREMENT=36;


Step 2: Setting up the Server


Next, we will set up the server using Node.js. We will use the Express framework to handle the HTTP requests and responses. You can install Express using npm, the package manager for Node.js, by running the following command in your terminal:


cd f:

In my computer, We will create node application in f: drive, so we have goes into this f: drive.


cd node

After this we have goes into node in which we will create Ajax Live data Search Node Application.


mkdir ajax_live_data_search

This command will create ajax_live_data_search directory under node directory.


cd ajax_live_data_search

After this we have goes inti this ajax_live_data_search directory in which we will download different node module.


npm install express mysql

This command will download Node Express Module and MySQL Module under this ajax_live_data_search directory.


After installing Express, create a new file called "app.js" and add the following code:

app.js

const express = require('express');

const mysql = require('mysql');

const app = express();

const port = 3000;

const pool = mysql.createPool({
	connectionLimit : 10,
	host : 'localhost',
	user : 'root',
	password : '',
	database : 'testing'
});

app.get('/', (request, response) => {

	response.sendFile(__dirname + '/index.html');

});

app.listen(port, () => {

	console.log(`Server listening on port ${port}`);

});


This code sets up a basic Express server that listens on port 3000. You can test that the server is working by running "node app.js" in your terminal and navigating to "http://localhost:3000" in your browser and it will load HTML content of index.html file.

Step 3: Implementing the Ajax Live Search


Now we will implement the Ajax live search feature. We will use Vanilla JavaScript to make Ajax requests to the server and update the search results in real-time. You can include Vanilla JavaScript in your index.html file by adding the following code:

index.html

<!DOCTYPE html>
<html>
<head>
    <meta charset="utf-8">
    <title>Ajax Live Data Search in Node.js with MySql</title>
    <link href="https://getbootstrap.com/docs/5.1/dist/css/bootstrap.min.css" rel="stylesheet" integrity="sha384-1BmE4kWBq78iYhFldvKuhfTAU6auU8tT94WrHftjDbrCEXSU1oBoqyl2QvZ6jIW3" crossorigin="anonymous">
</head>
<body>
    <div class="container mt-5 mb-5">
        <h1 class="text-primary text-center"><b>Ajax Live Data Search in Node.js with MySql</b></h1>
        <div class="mt-3 mb-3">
            <div class="card">
                <div class="card-header">Customer Data</div>
                <div class="card-body">
                    <div class="mb-3">
                        <input type="text" id="search" placeholder="Search..." class="form-control" autocomplete="off">
                        <table class="table table-bordered mt-3">
                            <thead>
                                <tr>
                                    <th>ID</th>
                                    <th>First Name</th>
                                    <th>Last Name</th>
                                    <th>Email</th>
                                    <th>Gender</th>
                                </tr>
                            </thead>
                            <tbody id="results">

                            </tbody>
                        </table>
                    </div>
                </div>
            </div>
        </div>
    </div>
</body>
</html>
<script type="text/javascript">

const searchInput = document.querySelector('#search');

const results_body = document.querySelector('#results');

load_data();

function load_data(query = '')
{
    const request = new XMLHttpRequest();

    request.open('GET', `/search?q=${query}`);

    request.onload = () => {

        const results = JSON.parse(request.responseText);

        let html = '';

        if(results.length > 0)
        {
            results.forEach(result => {
                html += `
                <tr>
                    <td>`+result.customer_id+`</td>
                    <td>`+result.customer_first_name+`</td>
                    <td>`+result.customer_last_name+`</td>
                    <td>`+result.customer_email+`</td>
                    <td>`+result.customer_gender+`</td>
                </tr>
                `;
            });
        }
        else
        {
            html += `
            <tr>
                <td colspan="5" class="text-center">No Data Found</td>
            </tr>
            `;
        }

        results_body.innerHTML = html;

    };

    request.send();
}

searchInput.addEventListener('input', () => {

    const query = searchInput.value;

    load_data(query);

});

</script>


This code listens for keyup events on the search input field and makes an Ajax request to the server with the search query. The server responds with a JSON object containing the search results, which are then displayed in the search results list.

To handle the Ajax requests on the server, add the following code to "app.js":

app.js

app.get('/search', (request, response) => {

	const query = request.query.q;

	var sql = '';

	if(query != '')
	{
		sql = `SELECT * FROM customers WHERE customer_first_name LIKE '%${query}%' OR customer_last_name LIKE '%${query}%' OR customer_email LIKE '%${query}%'`;
	}
	else
	{
		sql = `SELECT * FROM customers ORDER BY customer_id`;
	}

	pool.query(sql, (error, results) => {

		if (error) throw error;

		response.send(results);

	});

});


This code creates a MySQL connection and listens for GET requests to "/search". It retrieves the search query from the GET request URL and executes a SQL query to search for customers whose first name, last name or email matches the query. The results are returned as a JSON object.

Step 4: Run Node Application


So here our code is ready now for check output in the browser, we have goes to terminal and run following command.


node app.js


This command will start node server and we can access this node application in browser by this http://localhost:3000 url.

Conclusion


In this article, we have shown you how to implement an Ajax live search feature using Node.js and MySQL. By using these technologies, you can build responsive and efficient web applications that provide a great user experience. With a few lines of code, you can easily add this feature to your web application and improve its functionality.

Complete Source Code


app.js


const express = require('express');

const mysql = require('mysql');

const app = express();

const port = 3000;

const pool = mysql.createPool({
	connectionLimit : 10,
	host : 'localhost',
	user : 'root',
	password : '',
	database : 'testing'
});

app.get('/', (request, response) => {

	response.sendFile(__dirname + '/index.html');

});

app.get('/search', (request, response) => {

	const query = request.query.q;

	var sql = '';

	if(query != '')
	{
		sql = `SELECT * FROM customers WHERE customer_first_name LIKE '%${query}%' OR customer_last_name LIKE '%${query}%' OR customer_email LIKE '%${query}%'`;
	}
	else
	{
		sql = `SELECT * FROM customers ORDER BY customer_id`;
	}

	pool.query(sql, (error, results) => {

		if (error) throw error;

		response.send(results);

	});

});

app.listen(port, () => {

	console.log(`Server listening on port ${port}`);

});


index.html


<!DOCTYPE html>
<html>
<head>
    <meta charset="utf-8">
    <title>Ajax Live Data Search in Node.js with MySql</title>
    <link href="https://getbootstrap.com/docs/5.1/dist/css/bootstrap.min.css" rel="stylesheet" integrity="sha384-1BmE4kWBq78iYhFldvKuhfTAU6auU8tT94WrHftjDbrCEXSU1oBoqyl2QvZ6jIW3" crossorigin="anonymous">
</head>
<body>
    <div class="container mt-5 mb-5">
        <h1 class="text-primary text-center"><b>Ajax Live Data Search in Node.js with MySql</b></h1>
        <div class="mt-3 mb-3">
            <div class="card">
                <div class="card-header">Customer Data</div>
                <div class="card-body">
                    <div class="mb-3">
                        <input type="text" id="search" placeholder="Search..." class="form-control" autocomplete="off">
                        <table class="table table-bordered mt-3">
                            <thead>
                                <tr>
                                    <th>ID</th>
                                    <th>First Name</th>
                                    <th>Last Name</th>
                                    <th>Email</th>
                                    <th>Gender</th>
                                </tr>
                            </thead>
                            <tbody id="results">

                            </tbody>
                        </table>
                    </div>
                </div>
            </div>
        </div>
    </div>
</body>
</html>
<script type="text/javascript">

const searchInput = document.querySelector('#search');

const results_body = document.querySelector('#results');

load_data();

function load_data(query = '')
{
    const request = new XMLHttpRequest();

    request.open('GET', `/search?q=${query}`);

    request.onload = () => {

        const results = JSON.parse(request.responseText);

        let html = '';

        if(results.length > 0)
        {
            results.forEach(result => {
                html += `
                <tr>
                    <td>`+result.customer_id+`</td>
                    <td>`+result.customer_first_name+`</td>
                    <td>`+result.customer_last_name+`</td>
                    <td>`+result.customer_email+`</td>
                    <td>`+result.customer_gender+`</td>
                </tr>
                `;
            });
        }
        else
        {
            html += `
            <tr>
                <td colspan="5" class="text-center">No Data Found</td>
            </tr>
            `;
        }

        results_body.innerHTML = html;

    };

    request.send();
}

searchInput.addEventListener('input', () => {

    const query = searchInput.value;

    load_data(query);

});

</script>


Sunday, 12 March 2023

How to check if an email address already exists with Node.js & MySQL

As the popularity of web applications continues to grow, it has become increasingly important to implement robust authentication systems that can verify user identities. One critical aspect of user authentication is ensuring that users do not create multiple accounts using the same email address. In this blog, we will explore how to use Node.js and MySQL to check if an email address already exists in a database.

Create Working Directory


First we have to make Node.js working envrionment, so first we have goes to directory from where we have to run node.js application. So in command prompt we have to run following command.


f:
cd node
mkdir email_exists_or_not


So this command will first goes to F: drive and then after it will goes into node directory and after this it will create email_exists_or_not directory in which we will make node.js application for check email address exists or not in MySQL database.

Next we want to download Node.js Express module, so in command prompt we have to run following command.


npm install express


So this command will download Node.js Express module under this email_exists_or_not directory. Now we can open this email_exists_or_not directory in text editor for create Node.js Email Exists or not with MySQL Database.


How to check if an email address already exists with Node.js & MySQL


MySQL database Structure


Below you can find MySQL database structure for create Node.js Email Exists or not Application with MySQL database.


--
-- Database: `testing`
--

-- --------------------------------------------------------

--
-- Table structure for table `users`
--

CREATE TABLE `users` (
  `id` int(10) UNSIGNED NOT NULL,
  `name` varchar(255) COLLATE utf8mb4_unicode_ci NOT NULL,
  `email` varchar(255) COLLATE utf8mb4_unicode_ci NOT NULL,
  `password` varchar(255) COLLATE utf8mb4_unicode_ci NOT NULL,
  `remember_token` varchar(100) COLLATE utf8mb4_unicode_ci DEFAULT NULL,
  `created_at` timestamp NULL DEFAULT NULL,
  `updated_at` timestamp NULL DEFAULT NULL
) ENGINE=InnoDB DEFAULT CHARSET=utf8mb4 COLLATE=utf8mb4_unicode_ci;

--
-- Dumping data for table `users`
--

INSERT INTO `users` (`id`, `name`, `email`, `password`, `remember_token`, `created_at`, `updated_at`) VALUES
(1, 'John Smith', 'john_smith@gmail.com', '$2y$10$8am2/JEN1ARvndVsgl.YvegRpbrPZuhG0nA79k8sYNk5RdDNKNcS2', 'ksxo8HGQLFpUenlAFKfTfWMqk2cJuDhqrnoBa6ogZBf1ZbRwkNzAxE4AFn7o', '2018-03-05 00:29:44', '2018-03-05 00:29:44');

--
-- Indexes for dumped tables
--

--
-- Indexes for table `users`
--
ALTER TABLE `users`
  ADD PRIMARY KEY (`id`);

--
-- AUTO_INCREMENT for dumped tables
--

--
-- AUTO_INCREMENT for table `users`
--
ALTER TABLE `users`
  MODIFY `id` int(10) UNSIGNED NOT NULL AUTO_INCREMENT, AUTO_INCREMENT=2;
COMMIT;


After this under email_exists_or_not directory, we have to create index.html file and under this file we have to create one HTML form for get email address details from user and after this we have to write JavaScript for send Ajax request to node.js application for check email exists or not in MySQL Database.

index.html - (Client-side (HTML with AJAX))

<!DOCTYPE html>
<html>
<head>
    <meta charset="utf-8">
    <title>Email Availability Checker</title>
    <link href="https://getbootstrap.com/docs/5.1/dist/css/bootstrap.min.css" rel="stylesheet" integrity="sha384-1BmE4kWBq78iYhFldvKuhfTAU6auU8tT94WrHftjDbrCEXSU1oBoqyl2QvZ6jIW3" crossorigin="anonymous">
</head>
<body>
    <div class="container mt-5 mb-5">
        <h3>How to check if email address is already in use or not in Node.js ?</h3>
        <div class="mt-3 mb-3">
            <div class="card">
                <div class="card-header">Enter your eMail</div>
                <div class="card-body">
                    <form id="email-form">
                        <div class="mb-3">
                            <label for="email-input">Enmail Address</label>
                            <input type="email" id="email-input" class="form-control" />
                            <span id="email-message"></span>
                        </div>
                        <button type="submit" class="btn btn-primary" id="submit-btn">Check Email</button>
                    </form>
                </div>
            </div>
        </div>
    </div>
</body>
</html>
<script>

const form = document.querySelector('#email-form');

const message = document.querySelector('#email-message');

form.addEventListener('submit', (event) => {

    event.preventDefault();

    const email = document.querySelector('#email-input').value;

    if(email != '')
    {
        const xhr = new XMLHttpRequest();

        xhr.open('POST', 'http://localhost:3000/check-email', true);

        xhr.setRequestHeader('Content-Type', 'application/json');
        
        xhr.onload = () => {

            if(xhr.status === 200)
            {
                const response = JSON.parse(xhr.responseText);

                if(response.emailExists)
                {
                    message.innerHTML = '<span class="badge bg-danger">Email is already in use</span>';
                }
                else
                {
                    message.innerHTML = '<span class="badge bg-success">Email is available</span>';
                }
            }
            else
            {
                message.innerHTML = '<span class="badge bg-info">Error checking email availability</span>';
            }
        };

        xhr.onerror = () => {
            message.innerHTML = '<span class="badge bg-info">Error checking email availability</span>';
        };

        xhr.send(JSON.stringify({ email }));
    }
    else
    {
        message.innerHTML = '<span class="badge bg-info">Please Enter Email</span>';
    }

});

</script>


Below you can find description of JavaScript Code part.


const form = document.querySelector('#email-form');

This line of code selects the HTML form element with an id of email-form and stores it in the form variable.


const message = document.querySelector('#email-message');

This line of code selects the HTML element with an id of email-message and stores it in the message variable.


form.addEventListener('submit', (event) => {

});

This line of code adds a listener to the submit event of the form element. When the form is submitted, the anonymous function inside the parentheses will be executed.


event.preventDefault();

This line of code prevents the default behavior of the form when it is submitted. By default, the form would submit the data to a server and reload the page. This code prevents that behavior so that we can use AJAX to check if the email is already in use without reloading the page.


const email = document.querySelector('#email-input').value;

This line of code selects the HTML input element with an id of email-input, gets its value (the email entered by the user), and stores it in the email variable.


if(email != '')

This line of code checks if the email variable is not an empty string.


const xhr = new XMLHttpRequest();

This line of code creates a new instance of the XMLHttpRequest object, which allows us to make HTTP requests from the browser.


xhr.open('POST', 'http://localhost:3000/check-email', true);

This line of code initializes the AJAX request. We are sending a POST request to the URL http://localhost:3000/check-email, which is the endpoint that will check if the email is already in use. The true parameter specifies that the request should be asynchronous.


xhr.setRequestHeader('Content-Type', 'application/json');

This line of code sets the Content-Type header of the request to application/json, which tells the server that we are sending JSON data in the request body.


xhr.onload = () => {

This line of code sets the onload event handler for the AJAX request. When the request is complete and a response has been received, the anonymous function inside the parentheses will be executed.


if (xhr.status === 200) {

This line of code checks if the response status code is 200, which means that the request was successful.


const response = JSON.parse(xhr.responseText);

This line of code parses the response text from JSON format into a JavaScript object and stores it in the response variable.


if (response.emailExists) {

This line of code checks if the emailExists property of the response object is true, which means that the email is already in use.


xhr.send(JSON.stringify({ email }));

This lines of code will send send data to http://localhost:3000/check-email this url.

After this, we have to create app.js file and under this file, we have to write Node JS Code for check Email Already exists or not in MySQL database.

app.js (Server-side (Node.js with Express and MySQL)))

const express = require('express');

const mysql = require('mysql');

const cors = require('cors');

const app = express();

const port = 3000;

const connection = mysql.createConnection({
	host : 'localhost',
	user : 'root',
	password : '',
	database : 'testing'
});

connection.connect((error) => {
	if(error)
	{
		console.log('Error connecting to MySQL database:', error);
		return;
	}
	console.log('Connected to MySQL database');
});

app.use(cors());

app.use(express.json());

app.post('/check-email', (request, response) => {

	const email = request.body.email;

	const sql = 'SELECT COUNT(*) AS count FROM users WHERE email = ?';

	connection.query(sql, [email], (error, results) => {

		const count = results[0].count;

		const emailExists = count === 1;

		response.json({ emailExists });

	});
});

app.listen(port, () => {
	console.log(`Server running on port ${port}`);
});


In this code, we create an Express app, set up a connection to a MySQL database, and define a route to check the email availability. The route expects a POST request with a JSON payload containing an email property. We use the mysql library to query the database and check if the email already exists in the users table. We then send a JSON response with a emailExists property that indicates whether the email is already in use or not.

Now for run above application, first we have to run app.js file. So we have goes to command prompt and run following command.


node app.js

This command will start Node.js server and for check output in the browser, we have to open index.html file in the browser.


file:///F:/node/email_exist_or_not/index.html

So now you can check email address has been exists or not in MySQL database by entering email address in textbox by using Node.js with MySQL database.

Conclusion


In this blog, we explored how to use Node.js and MySQL to check if an email address already exists in a database. We discussed the steps involved in setting up a MySQL database, installing the mysql module for Node.js, connecting to the MySQL database, and checking if an email address exists in the database. With these tools and techniques, you can implement a robust user authentication system that ensures each user has a unique email address.

Wednesday, 9 June 2021

Ajax Live Data Search using JavaScript with PHP


In this post you can find tutorial on How to Create Ajax Live Mysql Database search using JavaScript with PHP script. With the help of this tutorial you can learn how to implement Ajax Live data search functionality in your HTML web page using javaScript without using any extra library like jQuery. So from HTML web page you can search mysql database using PHP script with the help of Ajax.

If you want to improve your web application UI then at that time we have to reqire search database data without reloading of entire web page. So for get the solution of this problem, here you can see how can we have implement ajax live data search using javaScript with PHP script. From this post you can see how can we easy way to live search with Mysql using javaScript with Ajax.

Ajax Live Database Search using javaScript


If you are looking for Live Data search functionality using pure vanilla javaScript, then you can come on right place because in this tutorial, we have covered topic simple live database search functionality using javaScript with Ajax and PHP, in which search results will be start displaying, when user has start write in search textbox.

In this tutorial we have are going to make live search box which will search data in mysql table and display result on web page without refresh of web page, because here we have use Ajax in javaScript.


Ajax Live Data Search using javaScript with PHP


Step 1: Create Database Table


For create table in mysql database, we need to execute following SQL query which will create post table in your MySQL database.


--
-- Table structure for table `post`
--

CREATE TABLE `post` (
  `id` mediumint(8) UNSIGNED NOT NULL,
  `post_title` text,
  `post_description` text,
  `author` varchar(255) DEFAULT NULL,
  `datetime` datetime DEFAULT NULL,
  `post_image` varchar(150) DEFAULT NULL
) ENGINE=InnoDB DEFAULT CHARSET=latin1;

--
-- Indexes for dumped tables
--

--
-- Indexes for table `post`
--
ALTER TABLE `post`
  ADD PRIMARY KEY (`id`);

--
-- AUTO_INCREMENT for dumped tables
--

--
-- AUTO_INCREMENT for table `post`
--
ALTER TABLE `post`
  MODIFY `id` mediumint(8) UNSIGNED NOT NULL AUTO_INCREMENT;


Once table has been created then you have to insert some data using the SQL INSERT statement. After inserting data into MySQL table then able you can perform live database search operation using pure vanilla javaScript.

Step2: Create Search Form & Table for Load Data


After your MySQL database is ready, then we have to proceed to write HTML code and javaScript code. First we have to create web interface which will allows user to perform live search functionality.

Under this tutorial, we will write HTML and javaScript code under index.html file, which source code you can find below.


index.html

<!DOCTYPE HTML>
<html>
<head>
	<meta charset="utf-8" />
	<title>Live Mysql Data Search using javaScript with PHP</title>
	<meta name="viewport" content="width=device-width, initial-scale=1" />
    <link rel="stylesheet" href="https://maxcdn.bootstrapcdn.com/bootstrap/4.0.0/css/bootstrap.min.css" integrity="sha384-Gn5384xqQ1aoWXA+058RXPxPg6fy4IWvTNh0E263XmFcJlSAwiGgFAW/dAiS6JXm" crossorigin="anonymous">
</head>
<body>
    <div class="container">
    	<h2 class="text-center mt-4 mb-4">Live Mysql Data Search using javaScript with PHP</h2>
    	
    	<div class="card">
    		<div class="card-header">
    			<div class="row">
    				<div class="col-md-6">Sample Data</div>
    				<div class="col-md-3 text-right"><b>Total Data - <span id="total_data"></span></b></div>
    				<div class="col-md-3">
    					<input type="text" name="search" class="form-control" id="search" placeholder="Search Here" onkeyup="load_data(this.value);" />
    				</div>
    			</div>
    		</div>
    		<div class="card-body">
    			<table class="table table-bordered">
    				<thead>
    					<tr>
    						<th width="5%">#</th>
    						<th width="35%">Post Title</th>
    						<th width="60%">Description</th>
    					</tr>
    				</thead>
    				<tbody id="post_data"></tbody>
    			</table>
    		</div>
    	</div>
    	
    </div>
</body>
</html>

<script>

load_data();

function load_data(query = '')
{
	var form_data = new FormData();

	form_data.append('query', query);

	var ajax_request = new XMLHttpRequest();

	ajax_request.open('POST', 'process_data.php');

	ajax_request.send(form_data);

	ajax_request.onreadystatechange = function()
	{
		if(ajax_request.readyState == 4 && ajax_request.status == 200)
		{
			var response = JSON.parse(ajax_request.responseText);

			var html = '';

			var serial_no = 1;
			if(response.length > 0)
			{
				for(var count = 0; count < response.length; count++)
				{
					html += '<tr>';
					html += '<td>'+serial_no+'</td>';
					html += '<td>'+response[count].post_title+'</td>';
					html += '<td>'+response[count].post_description+'</td>';
					html += '</tr>';
					serial_no++;
				}
			}
			else
			{
				html += '<tr><td colspan="3" class="text-center">No Data Found</td></tr>';
			}
			document.getElementById('post_data').innerHTML = html;
			document.getElementById('total_data').innerHTML = response.length;
		}
	}
}
	

</script>


In above code, first we have create Search form in which you can type their search query and below this form we have create one table under this table we will load post table data when page has been load by using javaScript.

Below HTML code we have write javaScript code and under this we have create one load_data(query = '') function. This function will be called when page has been load then at that time then it will received all post table data in JSON format and convert that data into HTML format and display on this page. And when user has type something in search textbox, then also this function will be called and it will display only filter data on web page without refresh of web page. This is because, we have called this function under search textbox onkeyup="load_data(this.value);" attribute, so when user type something then this javascript function will called and it will display filter data on web page.

Step 3: Processing Search Query at PHP Script


Now we have come on backend PHP script code which we will write under process_data.php file. Under this file we will write PHP script which will search MySQL database data based on query string which user has send by the Ajax request and this PHP script send data back to ajax request in JSON string fromat which has been display in browser to user side.

process_data.php

<?php

//process_data.php

if(isset($_POST["query"]))
{
	$connect = new PDO("mysql:host=localhost; dbname=testing", "root", "");

	$data = array();

	if($_POST["query"] != '')
	{
		$condition = preg_replace('/[^A-Za-z0-9\- ]/', '', $_POST["query"]);
		$condition = trim($condition);
		$condition = str_replace(" ", "%", $condition);

		$sample_data = array(
			':post_title'		=>	'%' . $condition . '%',
			':post_description'	=>	'%' . $condition . '%'
		);

		$query = "
		SELECT post_title, post_description 
		FROM post 
		WHERE post_title LIKE :post_title 
		OR post_description LIKE :post_description 
		ORDER BY id DESC
		";

		$statement = $connect->prepare($query);

		$statement->execute($sample_data);

		$result = $statement->fetchAll();

		$replace_array_1 = explode("%", $condition);

		foreach($replace_array_1 as $row_data)
		{
			$replace_array_2[] = '<span style="background-color:#'.rand(100000, 999999).'; color:#fff">'.$row_data.'</span>';
		}

		foreach($result as $row)
		{
			$data[] = array(
				'post_title'			=>	str_ireplace($replace_array_1, $replace_array_2, $row["post_title"]),
				'post_description'		=>	str_ireplace($replace_array_1, $replace_array_2, $row["post_description"])
			);
		}
	}
	else
	{
		$query = "
		SELECT post_title, post_description 
		FROM post 
		ORDER BY id DESC
		";

		$result = $connect->query($query);

		foreach($result as $row)
		{
			$data[] = array(
				'post_title'			=>	$row["post_title"],
				'post_description'		=>	$row["post_description"]
			);
		}
	}

	echo json_encode($data);
}

?>


Under this PHP script first we have make database connection and after making database connection this script check ajax request has been received from fetch all data from post table or search query has been send for fetch filter data from database.

Suppose Ajax request has been received for fetch all data from Mysql database then here we have write SELECT query for fetch all data from post and send back data to Ajax request in JSON format.

But suppose Ajax request has been receive for get filter data from MySQL database. So in this script first it has clean search query by using preg_replace() function for prevent SQL Injection and then after write SELECT query with LIKE statement for search data from post MySQL table and return back data to Ajax request in JSON format.

Conclusion


In this post, you have learned how to create live search in PHP with MySQL database table using javaScript and Ajax.

If you want to get complete source with .sql file, so please write your email address in comment box. We will send you complete source code file at your define email address.


Friday, 22 May 2020

Check Username or Email Availability using Vue.js with PHP


In this Vue.js tutorial, we will make PHP script for implement username or email live check for registration feature using Vue.js with Axios package for send Ajax request. This functionality is very common and it is required feature for most of the websites which is available online. If in your website, you have give login rights to user by entering their username or email and password, and get access into websites. Then at that time their username or email address must be unique. For this things when user has come into your websites for new account registration, then at that time we have to check username or email is available for registration or not for prevent duplicate registration with same username or email address.

For this problem, In this tutorial, we will use Vue.js with PHP script for check username of email already exists in our Mysql database or not. If Username or email is already exists then at that time we have stop user registration process by displaying message like particular email or username is already registered in our system try with different username or email address, and it will notify to the user regarding email address or username is already used by some another person before submitting of registration form data. Now in your mind one question will arise, how to check email ID or username exist or not in database, for this we will use Ajax with Vue.js and PHP script. When user has type something in username or email textbox then Vue.js will send Ajax request to PHP script with query like for search particular username or email address already exists in Mysql database.

This we can done when User has create account in our website, so while user enters their username or email id then Vue.js will triggered Ajax call and it will send request to PHP script at server side to check the availability status of email address or username. At PHP script, it will matches user data which they have enter with data available in Mysql database and it will send back response to Ajax request with availability of Username or email address which will be display on web page by using Vue.js without refresh of web page. So checking of availability of Email Address or Username of the user at the time registration is the best way to prevent duplicate registration in our web application. So from this tutorial, you can learn how to check email id or username availability of user from database, this things here we will use Ajax with Vue.js and PHP script. Below you can find the complete source code of how to check availability of the username or email address using ajax and Vue.js in PHP.


Check Username or Email Availability using Vue.js with PHP


Source Code


Mysql Database


--
-- Database: `testing`
--

-- --------------------------------------------------------

--
-- Table structure for table `tbl_login`
--

CREATE TABLE `tbl_login` (
  `id` int(11) NOT NULL,
  `first_name` varchar(100) NOT NULL,
  `last_name` varchar(100) NOT NULL,
  `gender` varchar(30) NOT NULL,
  `email` varchar(200) NOT NULL,
  `password` varchar(200) NOT NULL,
  `address` text NOT NULL,
  `mobile_no` varchar(15) NOT NULL
) ENGINE=InnoDB DEFAULT CHARSET=latin1;

--
-- Dumping data for table `tbl_login`
--

INSERT INTO `tbl_login` (`id`, `first_name`, `last_name`, `gender`, `email`, `password`, `address`, `mobile_no`) VALUES
(1, 'John', 'Smith', 'male', 'johnsmith@gmail.com', '$2y$10$vgo3NI5w5cLB74E4B2sdVuKwdSpJL/EAeKSUdevkc/j3zl0sJAf5i', 'test address', '9632587410');

--
-- Indexes for dumped tables
--

--
-- Indexes for table `tbl_login`
--
ALTER TABLE `tbl_login`
  ADD PRIMARY KEY (`id`);

--
-- AUTO_INCREMENT for dumped tables
--

--
-- AUTO_INCREMENT for table `tbl_login`
--
ALTER TABLE `tbl_login`
  MODIFY `id` int(11) NOT NULL AUTO_INCREMENT, AUTO_INCREMENT=2;


index.php


<!DOCTYPE html>
<html>
 <head>
  <meta charset="UTF-8">
  <meta name="viewport" content="width=device-width, initial-scale=1">
  <title>Live Username Or Email Availability using Vue.js in PHP</title>
  <link href="https://maxcdn.bootstrapcdn.com/bootstrap/3.3.7/css/bootstrap.min.css" rel="stylesheet">
  <script src="https://cdn.jsdelivr.net/npm/vue/dist/vue.js"></script>
  <script src="https://unpkg.com/axios/dist/axios.min.js"></script>
 </head>
 <body>
  <div class="container" id="registerApp">
   <br />
   <h3 align="center">Live Username Or Email Availability using Vue.js in PHP</h3>
   <br />
   <div class="panel panel-default">
    <div class="panel-heading">
     <h3 class="panel-title">Register</h3>
    </div>
    <div class="panel-body">
     <div class="form-group">
      <label>Enter Your Email</label>
      <input type="text" v-model="email" class="form-control input-lg" :class="class_name" @keyup="check()" />
      <span :class="[dynamic_class ? 'success' : 'danger']">{{ message }}</span>
     </div>
     <div class="form-group">
      <label>Enter Your Password</label>
      <input type="password" v-model="password" class="form-control input-lg" />
     </div>
     <div class="form-group" align="center">
      <button type="button" :disabled="is_disable" class="btn btn-info btn-lg">Register</button>
     </div>
    </div>
   </div>
  </div>
 </body>
</html>

<style>
.success
{
 font-weight: bold;
 color:#009933;
 background-color: #ccffcc;
 border:1px solid #009933;
}

.danger
{
 font-weight: bold;
 color:#ff0000;
 background-color: #ffe6e6;
 border:1px solid #ff0000;
}
</style>

<script>

var application = new Vue({
 el:'#registerApp',
 data:{
  email:'',
  dynamic_class:true,
  message:'',
  password:'',
  is_disable:false,
  class_name:''
 },
 methods:{
  check:function(){
   var email = application.email.trim();
   if(email.length > 2)
   {
    axios.post('action.php', {
     email:email
    }).then(function(response){
     if(response.data.is_available == 'yes')
     {
      application.dynamic_class = true;
      application.message = 'This Email is Available for Registration';
      application.is_disable = false;
      application.class_name = 'success';
     }
     else
     {
      application.dynamic_class = false;
      application.message = 'This Email is already registred';
      application.is_disable = true;
      application.class_name = 'danger';
     }
    });
   }
   else
   {
    application.message = '';
    application.class_name = '';
    application.dynamic_class = true;
    application.is_disable = false;
   } 
  }
 }
});

</script>


action.php


<?php

//action.php

$connect = new PDO("mysql:host=localhost;dbname=testing", "root", "");

$received_data = json_decode(file_get_contents("php://input"));

$data = array();

if($received_data->email != '')
{
 $is_available = 'yes';

 $query = "
 SELECT * FROM tbl_login 
 WHERE email = '".$received_data->email."'
 ";

 $statement = $connect->prepare($query);

 $statement->execute();

 $total_row = $statement->rowCount();

 if($total_row > 0)
 { 
  $is_available = 'no';
 }

 $data = array(
  'is_available'  => $is_available
 );
}

echo json_encode($data);

?>


If you like this tutorial and you have found that this tutorial helpful then please don't forget to share this tutorial.

Sunday, 17 May 2020

Make Editable Datatable using jQuery Tabledit Plugin with PHP Ajax


Hey Guys Are you looking of tutorial on How can we use jQuery Datatable plugin and jQuery Tabledit plugin together in PHP application by using Ajax. If yes, then you have come on the right page, because in this tutorial, we have will describe you step by step how can we use jQuery Tabledit plugin with Datatable plugin and convert Datable grid into editable PHP grid using Ajax. In this post we will create Live Editable Datatable with jQuery Tabledit plugin using PHP script and Ajax, and in this Live Editable Datatable user can perform Mysql Edit or update data operation and delete or remove data operation by using jQuery Tabledit plugin without refresh of web page because tabledit plugin will send Ajax request to PHP script for Mysql edit or delete data operation.

In this tutorial, we have use jQuery Datatable plugin, which is very powerful jQuery plugin for creating dynamic table grid for display data on web page in tabular format. This plugin has provide functionality like searching, sorting and pagination without any configuratin. In this post we have use jQuery Datatable plugin for load mysql table data and display on web page in PHP table grid with different feature like live searching of data, table column sorting of data, pagination. This all feature will work with PHP server-side operation. This is because here we have use PHP script with jQuery Datatable plugin for fetch data from Mysql table and send back to jquery Datatable plugin in json format because here we will use Ajax for send and received data from PHP script.


Same way here we have also use one more jQuery plugin with Datatable plugin and here we have use jQuery Tabledit plugin with jQuery Datatable plugin for Inline Datatable editing and deleting with PHP script using Ajax. By using Tabledit plugin, it will convert simple html table into inline editable table with feature like live edit and delete of data. This is plugin is compatiable with Bootstrap library. If you want to create live editable table then you can use this jQuery Tabledit plugin which will send Ajax request to PHP script for edit or delete of data from database. In this tutorial, we have use tabledit plugin with jQuery Datatable for convert Datatable grid into inline editable Datatable with edit or delete Datatable data without refresh of web page. So, if you want to make Live Datatable Edit Delete mysql table data then you can use tabledit plugin with jQuery Datatable using PHP script with Ajax. This post will help you to make datatable editable by using jQuery tabledit plugin with PHP script and Ajax. Below you can find complete source code of this tutorial.


Database


--
-- Database: `testing`
--

-- --------------------------------------------------------

--
-- Table structure for table `tbl_sample`
--

CREATE TABLE `tbl_sample` (
  `id` int(11) NOT NULL,
  `first_name` varchar(250) NOT NULL,
  `last_name` varchar(250) NOT NULL,
  `gender` enum('Male','Female') NOT NULL
) ENGINE=MyISAM DEFAULT CHARSET=latin1;

--
-- Dumping data for table `tbl_sample`
--

INSERT INTO `tbl_sample` (`id`, `first_name`, `last_name`, `gender`) VALUES
(1, 'John', 'Smith', 'Male'),
(2, 'Peter', 'Parker', 'Male'),
(4, 'Donna', 'Huber', 'Male'),
(5, 'Anastasia', 'Peterson', 'Male'),
(6, 'Ollen', 'Donald', 'Male'),
(10, 'Joseph', 'Stein', 'Male'),
(11, 'Wilson', 'Fischer', 'Male'),
(12, 'Lillie', 'Kirst', 'Female'),
(13, 'James', 'Whitchurch', 'Male'),
(14, 'Timothy', 'Brewer', 'Male'),
(16, 'Sally', 'Martin', 'Male'),
(17, 'Allison', 'Pinkston', 'Male'),
(18, 'Karen', 'Davis', 'Male'),
(19, 'Jaclyn', 'Rocco', 'Male'),
(20, 'Pamela', 'Boyter', 'Male'),
(21, 'Anthony', 'Alaniz', 'Male'),
(22, 'Myrtle', 'Stiltner', 'Male'),
(23, 'Gary', 'Hernandez', 'Male'),
(24, 'Fred', 'Jeffery', 'Male'),
(25, 'Ronald', 'Stjohn', 'Male'),
(26, 'Stephen', 'Mohamed', 'Male'),
(28, 'Michael', 'Dyer', 'Male'),
(29, 'Betty', 'Beam', 'Male'),
(30, 'Anna', 'Peterson', 'Female'),
(31, 'Peter', 'Stodola', 'Male'),
(32, 'Ralph', 'Jones', 'Male');

--
-- Indexes for dumped tables
--

--
-- Indexes for table `tbl_sample`
--
ALTER TABLE `tbl_sample`
  ADD PRIMARY KEY (`id`);

--
-- AUTO_INCREMENT for dumped tables
--

--
-- AUTO_INCREMENT for table `tbl_sample`
--
ALTER TABLE `tbl_sample`
  MODIFY `id` int(11) NOT NULL AUTO_INCREMENT, AUTO_INCREMENT=36;


database_connection.php


<?php

//database_connection.php

$connect = new PDO("mysql:host=localhost; dbname=testing", "root", "");

?>


index.php


<html>
 <head>
  <title>How to use Tabledit plugin with jQuery Datatable in PHP Ajax</title>
  <script src="https://ajax.googleapis.com/ajax/libs/jquery/2.2.0/jquery.min.js"></script>
  <link rel="stylesheet" href="https://maxcdn.bootstrapcdn.com/bootstrap/3.3.6/css/bootstrap.min.css" />
  <script src="https://cdn.datatables.net/1.10.12/js/jquery.dataTables.min.js"></script>
  <script src="https://cdn.datatables.net/1.10.12/js/dataTables.bootstrap.min.js"></script>  
  <link rel="stylesheet" href="https://cdn.datatables.net/1.10.12/css/dataTables.bootstrap.min.css" />
  <script src="https://maxcdn.bootstrapcdn.com/bootstrap/3.3.6/js/bootstrap.min.js"></script>
  <script src="https://markcell.github.io/jquery-tabledit/assets/js/tabledit.min.js"></script>
 </head>
 <body>
  <div class="container">
   <h3 align="center">How to use Tabledit plugin with jQuery Datatable in PHP Ajax</h3>
   <br />
   <div class="panel panel-default">
    <div class="panel-heading">Sample Data</div>
    <div class="panel-body">
     <div class="table-responsive">
      <table id="sample_data" class="table table-bordered table-striped">
       <thead>
        <tr>
         <th>ID</th>
         <th>First Name</th>
         <th>Last Name</th>
         <th>Gender</th>
        </tr>
       </thead>
       <tbody></tbody>
      </table>
     </div>
    </div>
   </div>
  </div>
  <br />
  <br />
 </body>
</html>

<script type="text/javascript" language="javascript" >
$(document).ready(function(){

 var dataTable = $('#sample_data').DataTable({
  "processing" : true,
  "serverSide" : true,
  "order" : [],
  "ajax" : {
   url:"fetch.php",
   type:"POST"
  }
 });

 $('#sample_data').on('draw.dt', function(){
  $('#sample_data').Tabledit({
   url:'action.php',
   dataType:'json',
   columns:{
    identifier : [0, 'id'],
    editable:[[1, 'first_name'], [2, 'last_name'], [3, 'gender', '{"1":"Male","2":"Female"}']]
   },
   restoreButton:false,
   onSuccess:function(data, textStatus, jqXHR)
   {
    if(data.action == 'delete')
    {
     $('#' + data.id).remove();
     $('#sample_data').DataTable().ajax.reload();
    }
   }
  });
 });
  
}); 
</script>


fetch.php


<?php

//fetch.php

include('database_connection.php');

$column = array("id", "first_name", "last_name", "gender");

$query = "SELECT * FROM tbl_sample ";

if(isset($_POST["search"]["value"]))
{
 $query .= '
 WHERE first_name LIKE "%'.$_POST["search"]["value"].'%" 
 OR last_name LIKE "%'.$_POST["search"]["value"].'%" 
 OR gender LIKE "%'.$_POST["search"]["value"].'%" 
 ';
}

if(isset($_POST["order"]))
{
 $query .= 'ORDER BY '.$column[$_POST['order']['0']['column']].' '.$_POST['order']['0']['dir'].' ';
}
else
{
 $query .= 'ORDER BY id DESC ';
}
$query1 = '';

if($_POST["length"] != -1)
{
 $query1 = 'LIMIT ' . $_POST['start'] . ', ' . $_POST['length'];
}

$statement = $connect->prepare($query);

$statement->execute();

$number_filter_row = $statement->rowCount();

$statement = $connect->prepare($query . $query1);

$statement->execute();

$result = $statement->fetchAll();

$data = array();

foreach($result as $row)
{
 $sub_array = array();
 $sub_array[] = $row['id'];
 $sub_array[] = $row['first_name'];
 $sub_array[] = $row['last_name'];
 $sub_array[] = $row['gender'];
 $data[] = $sub_array;
}

function count_all_data($connect)
{
 $query = "SELECT * FROM tbl_sample";
 $statement = $connect->prepare($query);
 $statement->execute();
 return $statement->rowCount();
}

$output = array(
 'draw'   => intval($_POST['draw']),
 'recordsTotal' => count_all_data($connect),
 'recordsFiltered' => $number_filter_row,
 'data'   => $data
);

echo json_encode($output);

?>


action.php


<?php

//action.php

include('database_connection.php');

if($_POST['action'] == 'edit')
{
 $data = array(
  ':first_name'  => $_POST['first_name'],
  ':last_name'  => $_POST['last_name'],
  ':gender'   => $_POST['gender'],
  ':id'    => $_POST['id']
 );

 $query = "
 UPDATE tbl_sample 
 SET first_name = :first_name, 
 last_name = :last_name, 
 gender = :gender 
 WHERE id = :id
 ";
 $statement = $connect->prepare($query);
 $statement->execute($data);
 echo json_encode($_POST);
}

if($_POST['action'] == 'delete')
{
 $query = "
 DELETE FROM tbl_sample 
 WHERE id = '".$_POST["id"]."'
 ";
 $statement = $connect->prepare($query);
 $statement->execute();
 echo json_encode($_POST);
}


?>

Wednesday, 13 November 2019

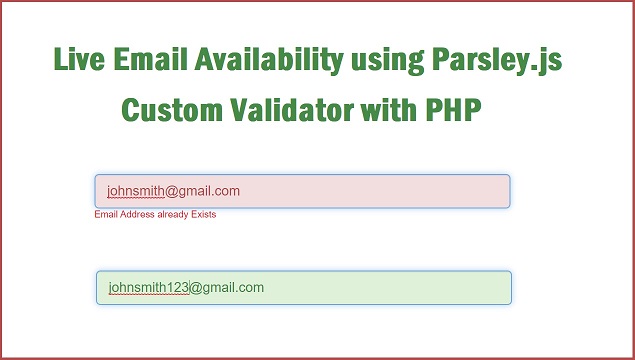
Parsley.js Custom Validator for Email Availability with PHP


This is one more post on Parsley.js JavaScript library, this library has been used for validate form data. In this post also, we will also validate form data by using this Parsley.js library. But here we will make Parsley.js custom validation for check particular email is available for register in our system or not. This custom validator will send ajax request to php script, for check particular email address or username is already register or not. In short, we will make unique email address or username validation with PHP by using this Parsley.js custom validator.

In any web application, Registration process is required for get access into web application. So, in registration, user can register only with unique email address or username. So, for restrict to user with same email address or username then at that time this live email availability or username availability feature is required. When user has enter his email address or username in form field , then at that time system has to check entered email address or username is already register in our system or not. If Email Address or username already register then system has to display error message on web page, otherwise system has give permission to user for proceed for registration.

So, Email Availability is required feature in any web application. And here we have make this feature by using Parsley.js form validation library and by using this library here we will make custom validator for check email is available for registration or not with PHP script.

For make this live email availability feature, here we have use Parsley.js library with PHP script, jquery library and Mysql database. First we have define on textbox and in this textbox we have to define Parsley.js library validation attribute which you can see below.

Attrbute Description
required Value of this input field is required for submit form data.
data-parsley-type Value of input element must be a valid email
data-parsley-trigger It will trigger validation error on focusout event
data-parsley-checkemail Here "checkemail" is the name of custom validator
data-parsley-checkemail-message It will display "checkemail" custom validator error

Above you have seen which Parsley.js javascript attribute for validate email textbox value. Below you can find complete source of HTML, jQuery and PHP script in which we have make Parsley.js custom validator for check live email availability which has send ajax request to PHP script. This all source code will you can find below.


Source Code


Database


--
-- Database: `testing`
--

-- --------------------------------------------------------

--
-- Table structure for table `register_user`
--

CREATE TABLE `register_user` (
  `register_user_id` int(11) NOT NULL,
  `user_name` varchar(250) NOT NULL,
  `user_email` varchar(250) NOT NULL,
  `user_password` varchar(250) NOT NULL,
  `user_activation_code` varchar(250) NOT NULL,
  `user_email_status` enum('not verified','verified') NOT NULL
) ENGINE=InnoDB DEFAULT CHARSET=latin1;

--
-- Dumping data for table `register_user`
--

INSERT INTO `register_user` (`register_user_id`, `user_name`, `user_email`, `user_password`, `user_activation_code`, `user_email_status`) VALUES
(1, 'John Smith', 'web-tutorial@programmer.net', '$2y$10$ZFXBzg3rzusgSFuAL.VeneDnJJpUVEMtEy2r2Xjshz/3O/wxSDQZa', 'c74c4bf0dad9cbae3d80faa054b7d8ca', 'verified'),
(2, 'John Smit', 'johnsmith@gmail.com', '$2y$10$n0ckpdEkvGVhX5GExG1ZD.Vg3Z1TEpMEoq12aEMCKVNFzXRSeOJ.q', '84b069ebd287d467cb7fd26e53c6a0c9', 'verified'),
(3, 'John Smith', 'peterparker@gmail.com', '$2y$10$CaXjutIQ2gYrvGwvuN3tJey36n.DNHVXtro11RFpnoRGHAaCf0FZ2', '2459e63c0cc08d3717f1e159de44586e', 'verified');

--
-- Indexes for dumped tables
--

--
-- Indexes for table `register_user`
--
ALTER TABLE `register_user`
  ADD PRIMARY KEY (`register_user_id`);

--
-- AUTO_INCREMENT for dumped tables
--

--
-- AUTO_INCREMENT for table `register_user`
--
ALTER TABLE `register_user`
  MODIFY `register_user_id` int(11) NOT NULL AUTO_INCREMENT, AUTO_INCREMENT=4;


index.php


<!DOCTYPE html>
<html>
  <head>
    <title>Live Email Availability using Parsley.js Custom Validator with PHP</title>
    <script src="https://cdnjs.cloudflare.com/ajax/libs/jquery/3.3.1/jquery.js"></script>
    <script src="https://cdnjs.cloudflare.com/ajax/libs/parsley.js/2.8.0/parsley.js"></script>
    <link rel="stylesheet" href="https://maxcdn.bootstrapcdn.com/bootstrap/3.3.6/css/bootstrap.min.css" />
    <script src="https://maxcdn.bootstrapcdn.com/bootstrap/3.3.7/js/bootstrap.min.js"></script>
    <style> 
      input.parsley-success,
       select.parsley-success,
       textarea.parsley-success {
         color: #468847;
         background-color: #DFF0D8;
         border: 1px solid #D6E9C6;
       }

       input.parsley-error,
       select.parsley-error,
       textarea.parsley-error {
         color: #B94A48;
         background-color: #F2DEDE;
         border: 1px solid #EED3D7;
       }

       .parsley-errors-list {
         margin: 2px 0 3px;
         padding: 0;
         list-style-type: none;
         font-size: 0.9em;
         line-height: 0.9em;
         opacity: 0;

         transition: all .3s ease-in;
         -o-transition: all .3s ease-in;
         -moz-transition: all .3s ease-in;
         -webkit-transition: all .3s ease-in;
       }

       .parsley-errors-list.filled {
         opacity: 1;
       }
       
       .parsley-type,
       .parsley-required,
       .parsley-equalto,
       .parsley-pattern,
       .parsley-urlstrict,
       .parsley-length,
       .parsley-checkemail{
        color:#ff0000;
       }
    </style>
  </head>
  <body>
    <br />
    <br />
    <div class="container">
      <h3 align="center">Live Email Availability using Parsley.js Custom Validator with PHP</h3>
      <br />
      <br />
      <br />
      <div class="row">
        <div class="col-md-3">

        </div>
        <div class="col-md-6">
          <input type="text" id="email_address" class="form-control input-lg" required placeholder="Enter Email ID" data-parsley-type="email" data-parsley-trigger="focusout" data-parsley-checkemail data-parsley-checkemail-message="Email Address already Exists" />
        </div>
        <div class="col-md-3">

        </div>
      </div>
    </div>
  </body>
</html>
<script>
  $(document).ready(function(){
      
    $('#email_address').parsley();

    window.ParsleyValidator.addValidator('checkemail', {
      validateString: function(value)
      {
        return $.ajax({
          url:'fetch.php',
          method:"POST",
          data:{email:value},
          dataType:"json",
          success:function(data)
          {
            return true;
          }
        });
      }
    });

  });
</script>


fetch.php


<?php

//fetch.php;

if(isset($_POST["email"]))
{
 $connect = new PDO("mysql:host=localhost; dbname=testing", "root", "");

 $query = "
 SELECT * FROM register_user 
 WHERE user_email = '".trim($_POST["email"])."'
 ";

 $statement = $connect->prepare($query);

 $statement->execute();

 $total_row = $statement->rowCount();

 if($total_row == 0)
 {
  $output = array(
   'success' => true
  );

  echo json_encode($output);
 }
}

?>