Sunday, 25 November 2018

Image Crop and Save into Database using PHP with Ajax


Do you know How to Store or Insert Crop image into Mysql database with PHP script. If you looking such type of tutorial, then you have come on best post. In this post you can learn How to crop an Image by using Croppie javascript plugin and then after that croped image has been inserted into mysql database by using PHP script with Ajax and Bootstrap modal. In one of our post like Image Crop and Upload into folder using javascript plugin with PHP and Ajax, in that post you can find before upload of image, it has been crop by using javascript Croppie plugin, and after crop of image it will store into folder using Ajax with PHP.

Why we have to store image into Mysql database in place of store image info folder, there is one benefit is that if we have store image into database then it has been load faster than image load from folder. There is one another benifit is that image which are store in database is not cache in browser, while image load from folder has been easily cache in browser. There are some more other benifit for storing image into database. So, Here we have do two operation like first we have crop image by using jQuery plugin, and after crop image has been inserted into mysql database.

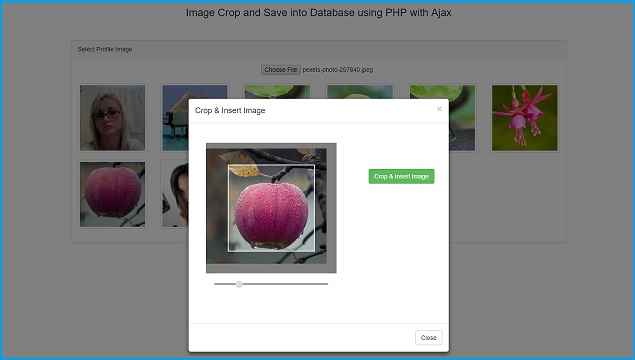
Now we have seen whole process of crop image and store into mysql database. When first we have select image, then Croppie plugin has been initialize, and by using this plugin we can zoom image, and as per our requirement we can crop image. Once image has been crop then this plugin has convert crop image into binary string format. By using base64_decode() function we decode binary string into image, and by using file_put_contents() we have create under local folder. Once Image has been created and under store under folder, we ahve convert into binary string format by using file_get_contents() and addslashes() function. Then after run insert query and store into database. Once crop image has been store into database by using unlink() function, it will be remove from local folder also. This is whole process of Image crop and Save into Mysql database by using javascript croppie plugin with PHP and Ajax. Below you can find complete source code of this tutorial.


Source Code


Database


--
-- Database: `testing`
--

-- --------------------------------------------------------

--
-- Table structure for table `tbl_images`
--

CREATE TABLE `tbl_images` (
  `image_id` int(11) NOT NULL,
  `images` longblob NOT NULL
) ENGINE=InnoDB DEFAULT CHARSET=latin1;

--
-- Indexes for dumped tables
--

--
-- Indexes for table `tbl_images`
--
ALTER TABLE `tbl_images`
  ADD PRIMARY KEY (`image_id`);

--
-- AUTO_INCREMENT for dumped tables
--

--
-- AUTO_INCREMENT for table `tbl_images`
--
ALTER TABLE `tbl_images`
  MODIFY `image_id` int(11) NOT NULL AUTO_INCREMENT;


index.php


<html>  
    <head>  
        <title>Image Crop and Save into Database using PHP with Ajax</title>  
  
  <script src="jquery.min.js"></script>  
  <script src="bootstrap.min.js"></script>
  <script src="croppie.js"></script>
  <link rel="stylesheet" href="bootstrap.min.css" />
  <link rel="stylesheet" href="croppie.css" />
    </head>  
    <body>  
        <div class="container">
          <br />
      <h3 align="center">Image Crop and Save into Database using PHP with Ajax</h3>
      <br />
      <br />
   <div class="panel panel-default">
      <div class="panel-heading">Select Profile Image</div>
      <div class="panel-body" align="center">
       <input type="file" name="insert_image" id="insert_image" accept="image/*" />
       <br />
       <div id="store_image"></div>
      </div>
     </div>
    </div>
    </body>  
</html>

<div id="insertimageModal" class="modal" role="dialog">
 <div class="modal-dialog">
  <div class="modal-content">
      <div class="modal-header">
        <button type="button" class="close" data-dismiss="modal">&times;</button>
        <h4 class="modal-title">Crop & Insert Image</h4>
      </div>
      <div class="modal-body">
        <div class="row">
          <div class="col-md-8 text-center">
            <div id="image_demo" style="width:350px; margin-top:30px"></div>
          </div>
          <div class="col-md-4" style="padding-top:30px;">
        <br />
        <br />
        <br/>
            <button class="btn btn-success crop_image">Crop & Insert Image</button>
          </div>
        </div>
      </div>
      <div class="modal-footer">
        <button type="button" class="btn btn-default" data-dismiss="modal">Close</button>
      </div>
    </div>
  </div>
</div>

<script>  
$(document).ready(function(){

 $image_crop = $('#image_demo').croppie({
    enableExif: true,
    viewport: {
      width:200,
      height:200,
      type:'square' //circle
    },
    boundary:{
      width:300,
      height:300
    }    
  });

  $('#insert_image').on('change', function(){
    var reader = new FileReader();
    reader.onload = function (event) {
      $image_crop.croppie('bind', {
        url: event.target.result
      }).then(function(){
        console.log('jQuery bind complete');
      });
    }
    reader.readAsDataURL(this.files[0]);
    $('#insertimageModal').modal('show');
  });

  $('.crop_image').click(function(event){
    $image_crop.croppie('result', {
      type: 'canvas',
      size: 'viewport'
    }).then(function(response){
      $.ajax({
        url:'insert.php',
        type:'POST',
        data:{"image":response},
        success:function(data){
          $('#insertimageModal').modal('hide');
          load_images();
          alert(data);
        }
      })
    });
  });

  load_images();

  function load_images()
  {
    $.ajax({
      url:"fetch_images.php",
      success:function(data)
      {
        $('#store_image').html(data);
      }
    })
  }

});  
</script>


database_connection.php


<?php

//database_connection.php

$connect = new PDO("mysql:host=localhost;dbname=testing", "root", "");

?>


insert.php


<?php

//insert.php

if(isset($_POST["image"]))
{
 include('database_connection.php');

 $data = $_POST["image"];

 $image_array_1 = explode(";", $data);

 $image_array_2 = explode(",", $image_array_1[1]);

 $data = base64_decode($image_array_2[1]);

 $imageName = time() . '.png';

 file_put_contents($imageName, $data);

 $image_file = addslashes(file_get_contents($imageName));

 $query = "INSERT INTO tbl_images(images) VALUES ('".$image_file."')";

 $statement = $connect->prepare($query);

 if($statement->execute())
 {
  echo 'Image save into database';
  unlink($imageName);
 }

}

?>


fetch_images.php


<?php

//fetch_images.php

include('database_connection.php');

$query = "SELECT * FROM tbl_images ORDER BY image_id DESC";

$statement = $connect->prepare($query);

$output = '<div class="row">';

if($statement->execute())
{
 $result = $statement->fetchAll();

 foreach($result as $row)
 {
  $output .= '
  <div class="col-md-2" style="margin-bottom:16px;">
   <img src="data:image/png;base64,'.base64_encode($row['images']).'" class="img-thumbnail" />
  </div>
  ';
 }
}

$output .= '</div>';

echo $output;

?>

Thursday, 22 November 2018

How to Delete Multiple Records using Checkbox in Codeigniter


This post covered topic on Codeigniter tutorial for beginner step by step, and in this post we have shared simple feature like How to Delete multiple data from Mysql table using Checkbox in Codeigniter framework with Ajax. For do this operation we will use jQuery Ajax and HTML Check boxes input fields for delete multiple rows of mysql data in Codeigniter. Mainly we have always put delete button at individual row for delete single data. But if we have large amount of data, from that data we want to remove many unwanted rows of data at the same time. Then at that time this functionality will helpful. This is because if we have remove single data one by one then it will take much more time, and by using this feature we can delete bulk data at the same time.

If we have use Codeigniter framework for our web development, then we will make any large application by using this framework. So, if application is large, then in that application data will be bulk of amount. So, If we have made this functionality in our application then it will reduce our work time, and it will increase efficiency of our web application. For make this feature we have use jQuery, Ajax and HTML check boxes. HTML check boxes used for select multiple row of data by selecting checkbox. Ajax used for send and received request to server. By using Ajax with Codeigniter we can delete multiple or bulk of mysql data without refresh of web page. jQuery is used for give animation effect at the time of delete of multiple data.

For discuss deleting of multiple data in Codeigniter using Checkbox with Ajax, here we have first fetch data from mysql database with delete button and checkbox selection. When used checked checkbox, then that row background color and font color will be change. For multiple delete operation we have define one button for delete action. Once we have click on delete button, by using jQuery code first we have store id of data in one local variable, and then after send ajax request to Codeigniter controller with array of id data store in local variable. At server side it will delete multiple records one by one, and on client side, user can see deleting of multiple data with animated effect. Below you can find complete source code of How to Delete Multiple Records using Checkbox in Codeigniter.


Source Code


Step 1 - Database


Run following sql script in your phpMyAdmin, this script will make tbl_employee in your database.


--
-- Database: `testing`
--

-- --------------------------------------------------------

--
-- Table structure for table `tbl_employee`
--

CREATE TABLE `tbl_employee` (
  `id` int(11) NOT NULL,
  `name` varchar(50) NOT NULL,
  `address` text NOT NULL,
  `gender` varchar(10) NOT NULL,
  `designation` varchar(100) NOT NULL,
  `age` int(11) NOT NULL
) ENGINE=MyISAM DEFAULT CHARSET=latin1;

--
-- Dumping data for table `tbl_employee`
--

INSERT INTO `tbl_employee` (`id`, `name`, `address`, `gender`, `designation`, `age`) VALUES
(5, 'Clara Gilliam', '63 Woodridge Lane\r\nMemphis, TN 38138', 'Female', 'Programmer', 24),
(6, 'Barbra K. Hurley', '1241 Canis Heights Drive\r\nLos Angeles, CA 90017', 'Female', 'Service technician', 26),
(7, 'Antonio J. Forbes', '403 Snyder Avenue\r\nCharlotte, NC 28208', 'Male', 'Faller', 32),
(8, 'Charles D. Horst', '1636 Walnut Hill Drive\r\nCincinnati, OH 45202', 'Male', 'Financial investigator', 29),
(174, 'Martha B. Tomlinson', '4005 Bird Spring Lane, Houston, TX 77002', 'Female', 'Systems programmer', 38),
(162, 'Jarrod D. Jones', '3827 Bingamon Road, Garfield Heights, OH 44125', 'Male', 'Manpower development advisor', 64),
(177, 'Patricia L. Scott', '1584 Dennison Street\r\nModesto, CA 95354', 'Female', 'Urban and regional planner', 54),
(181, 'Kimberly J. Ellis', '4905 Holt Street\r\nFort Lauderdale, FL 33301', 'Male', 'Dressing room attendant', 24),
(183, 'Steve John', '108, Vile Parle, CL', 'Male', 'Software Engineer', 29),
(186, 'Louis C. Charmis', '1462 Juniper Drive\r\nBreckenridge, MI 48612', 'Male', 'Mental health counselor', 40),
(190, 'Michael Cobb', '2409 Patterson Fork Road, Westchester, IL 60154', 'Female', 'Personal secretary', 36);

--
-- Indexes for dumped tables
--

--
-- Indexes for table `tbl_employee`
--
ALTER TABLE `tbl_employee`
  ADD PRIMARY KEY (`id`);

--
-- AUTO_INCREMENT for dumped tables
--

--
-- AUTO_INCREMENT for table `tbl_employee`
--
ALTER TABLE `tbl_employee`
  MODIFY `id` int(11) NOT NULL AUTO_INCREMENT, AUTO_INCREMENT=197;


Step 2 - Multiple_delete.php(Controllers)


Once database is ready, next step we have to create controller in our Codeigniter application. So, here we have create Multiple_delete.php controller in application/controllers folder.

In this controller class we have two method like index() and delete_all() method. index() method is used for fetch data from mysql database and display on web page, while delete_all() method is used for received ajax request for delte multiple data.


<?php if ( ! defined('BASEPATH')) exit('No direct script access allowed');

class Multiple_delete extends CI_Controller {
 
 public function __construct()
 {
  parent::__construct();
  $this->load->model('multiple_delete_model');
 }

 function index()
 {
  $data['employee_data'] = $this->multiple_delete_model->fetch_data();
  $this->load->view('multiple_delete', $data);
 }

 function delete_all()
 {
  if($this->input->post('checkbox_value'))
  {
   $id = $this->input->post('checkbox_value');
   for($count = 0; $count < count($id); $count++)
   {
    $this->multiple_delete_model->delete($id[$count]);
   }
  }
 }
  
}
?>


Step 3 - Multiple_delete_model.php (Models)


Generally, In Codeigniter models file is used for do any database operation. So, here also we have make Multiple_delete_model.php model file under application/models folder for database operation. In this file also there are two method like fetch_data() for fetch data from employee table and delete() method for delete data from mysql database operation.


<?php

class Multiple_delete_model extends CI_Model
{
 function fetch_data()
 {
  $this->db->select("*");
  $this->db->from("tbl_employee");
  $this->db->order_by('id', 'desc');
  return $this->db->get();
 }

 function delete($id)
 {
  $this->db->where('id', $id);
  $this->db->delete('tbl_employee');
 }
}

?>


Step 4 - multiple_delete.php (Views)


In Codeigniter Views file is used for display output on webpage and received any request for client. Here we have make multiple_delete.php view file under application/views folder. This view file first display employee table data in html table formate. And from this view file user can give request to delete multiple records using Ajax.


<html>
<head>
    <title>Delete Multiple Data using Checkboxs in Codeigniter 3 with Ajax</title>
    <link rel="stylesheet" href="https://maxcdn.bootstrapcdn.com/bootstrap/3.3.7/css/bootstrap.min.css" />
    <script src="https://ajax.googleapis.com/ajax/libs/jquery/3.1.0/jquery.min.js"></script>
</head>
<body>
<div class="container">
 <br /><br /><br />
 <h3 align="center">Delete Multiple Data using Checkboxs in Codeigniter 3 with Ajax</h3><br />
 
 <div class="table-responsive">
  <table class="table table-bordered">
   <thead>
    <tr>
     <th width="5%"><button type="button" name="delete_all" id="delete_all" class="btn btn-danger btn-xs">Delete</button></th>
     <th width="20%">Name</th>
     <th width="38%">Address</th>
     <th width="7%">Gender</th>
     <th width="25%">Designation</th>
     <th width="5%">Age</th>
    </tr>
   </thead>
   <tbody>
   <?php
   foreach($employee_data->result() as $row)
   {
    echo '
    <tr>
     <td><input type="checkbox" class="delete_checkbox" value="'.$row->id.'" /></td>
     <td>'.$row->name.'</td>
     <td>'.$row->address.'</td>
     <td>'.$row->gender.'</td>
     <td>'.$row->designation.'</td>
     <td>'.$row->age.'</td>
    </tr>
    ';
   }
   ?>
   </tbody>
  </table>
    </div>
</body>
</html>
<style>
.removeRow
{
 background-color: #FF0000;
    color:#FFFFFF;
}
</style>
<script>
$(document).ready(function(){
 
 $('.delete_checkbox').click(function(){
  if($(this).is(':checked'))
  {
   $(this).closest('tr').addClass('removeRow');
  }
  else
  {
   $(this).closest('tr').removeClass('removeRow');
  }
 });

 $('#delete_all').click(function(){
  var checkbox = $('.delete_checkbox:checked');
  if(checkbox.length > 0)
  {
   var checkbox_value = [];
   $(checkbox).each(function(){
    checkbox_value.push($(this).val());
   });
   $.ajax({
    url:"<?php echo base_url(); ?>multiple_delete/delete_all",
    method:"POST",
    data:{checkbox_value:checkbox_value},
    success:function()
    {
     $('.removeRow').fadeOut(1500);
    }
   })
  }
  else
  {
   alert('Select atleast one records');
  }
 });

});
</script>


Once you have follow video tutorial and above source code, then you can make Codeigniter application in which you can delete multiple records using checkbox selection with Ajax jQuery and Mysql.

Saturday, 17 November 2018

Laravel Searching Column Sorting with Pagination using Ajax

Laravel Sorting with Pagination using Ajax


Laravel Searching with Sorting with Pagination using Ajax


If you are beginner level in Laravel, and if you want to learn How to use Ajax with Laravel, then you have come on right place because in this post you can find How to Live data search with Sort table column data in ascending or descending order and Pagination in Laravel framework by using Ajax.  We have always try to publish something new post which will help you to learn something new. So, here we have publish new article on Laravel with Ajax and make simple mysql table data live searching, table column sorting data in Ascending or descending order with pagination link. This is amazing tutorial of Laravel tutorial series with Ajax and here we have make search filter with sortable table and pagination link. Which is one part of any crud application. So, by using this tutorial you can make simple application in which can live search mysql data, sort tabular data and pagination link in Laravel framework using Ajax. In short we will do column sorting with Live data search in Laravel using Ajax.

We all know by using Data sorting and searching is important for find quick and perfect data in a very short time. Here we will take a live example of data sorting in ascending or descending order with pagination. Here we will not only implement tabular data sorting but also we will also make pagination link with column sorting in Laravel using Ajax. We will discuss step by step this ascending or descending column sorting of data with pagination using Ajax and Laravel. This tutorial will show you how to create data sorting with pagination operation without refresh of web page with Laravel jQuery and Ajax.


Step 1 : Instal Laravel Application


Here we have start from scratch. So, If you have not install Laravel application, then you have to open command prompt, and run composert command, and then after you can run below command this command will download Laravel application, and install at define destination.


composer create-project --prefer-dist laravel/laravel student_crud


Step 2 - Database Connection


Once Laravel application has been installed successfully, then first you have to make database connection. For make database connection you have to .env file and define following database configuration.


DB_CONNECTION=mysql
DB_HOST=localhost
DB_PORT=3306
DB_DATABASE=test
DB_USERNAME=root
DB_PASSWORD=


Step 3 - Create PaginationController (Controller)


After making database connection, we have to make one PaginationController file under app/Http/Controllers/PaginationController.php. This controller will handle http request for display data on web page with data sorting and pagination request.


<?php

namespace App\Http\Controllers;

use Illuminate\Http\Request;
use DB;

class PaginationController extends Controller
{
    function index()
    {
     $data = DB::table('post')->orderBy('id', 'asc')->paginate(5);
     return view('pagination', compact('data'));
    }

    function fetch_data(Request $request)
    {
     if($request->ajax())
     {
      $sort_by = $request->get('sortby');
      $sort_type = $request->get('sorttype');
            $query = $request->get('query');
            $query = str_replace(" ", "%", $query);
      $data = DB::table('post')
                    ->where('id', 'like', '%'.$query.'%')
                    ->orWhere('post_title', 'like', '%'.$query.'%')
                    ->orWhere('post_description', 'like', '%'.$query.'%')
                    ->orderBy($sort_by, $sort_type)
                    ->paginate(5);
      return view('pagination_data', compact('data'))->render();
     }
    }
}
?>


Step 4 - Create View file


For display data on web page, in Laravel we have to create view file in resources/views folder. In this folder we have to create two view files like pagination.blade.php and pagination_data.blade.php.

In pagination.blade.php you can find complete html jQuery and ajax code for data sorting and pagination. In this file we have include pagination_data.blade.php file data by using @include statement. Below you can find source code of both view files.


resources/views/pagination.blade.php

<!DOCTYPE html>
<html>
 <head>
  <title>Laravel Live Data Search with Sorting & Pagination using Ajax</title>
  <script src="https://ajax.googleapis.com/ajax/libs/jquery/3.1.0/jquery.min.js"></script>
  <link rel="stylesheet" href="https://maxcdn.bootstrapcdn.com/bootstrap/3.3.6/css/bootstrap.min.css" />
  <script src="https://maxcdn.bootstrapcdn.com/bootstrap/3.3.7/js/bootstrap.min.js"></script>
 </head>
 <body>
  <br />
  <div class="container">
   <h3 align="center">Laravel Live Data Search with Sorting & Pagination using Ajax</h3><br />
   <div class="row">
    <div class="col-md-9">

    </div>
    <div class="col-md-3">
     <div class="form-group">
      <input type="text" name="serach" id="serach" class="form-control" />
     </div>
    </div>
   </div>
   <div class="table-responsive">
    <table class="table table-striped table-bordered">
     <thead>
      <tr>
       <th width="5%" class="sorting" data-sorting_type="asc" data-column_name="id" style="cursor: pointer">ID <span id="id_icon"></span></th>
       <th width="38%" class="sorting" data-sorting_type="asc" data-column_name="post_title" style="cursor: pointer">Title <span id="post_title_icon"></span></th>
       <th width="57%">Description</th>
      </tr>
     </thead>
     <tbody>
      @include('pagination_data')
     </tbody>
    </table>
    <input type="hidden" name="hidden_page" id="hidden_page" value="1" />
    <input type="hidden" name="hidden_column_name" id="hidden_column_name" value="id" />
    <input type="hidden" name="hidden_sort_type" id="hidden_sort_type" value="asc" />
   </div>
  </div>
 </body>
</html>

<script>
$(document).ready(function(){

 function clear_icon()
 {
  $('#id_icon').html('');
  $('#post_title_icon').html('');
 }

 function fetch_data(page, sort_type, sort_by, query)
 {
  $.ajax({
   url:"/pagination/fetch_data?page="+page+"&sortby="+sort_by+"&sorttype="+sort_type+"&query="+query,
   success:function(data)
   {
    $('tbody').html('');
    $('tbody').html(data);
   }
  })
 }

 $(document).on('keyup', '#serach', function(){
  var query = $('#serach').val();
  var column_name = $('#hidden_column_name').val();
  var sort_type = $('#hidden_sort_type').val();
  var page = $('#hidden_page').val();
  fetch_data(page, sort_type, column_name, query);
 });

 $(document).on('click', '.sorting', function(){
  var column_name = $(this).data('column_name');
  var order_type = $(this).data('sorting_type');
  var reverse_order = '';
  if(order_type == 'asc')
  {
   $(this).data('sorting_type', 'desc');
   reverse_order = 'desc';
   clear_icon();
   $('#'+column_name+'_icon').html('<span class="glyphicon glyphicon-triangle-bottom"></span>');
  }
  if(order_type == 'desc')
  {
   $(this).data('sorting_type', 'asc');
   reverse_order = 'asc';
   clear_icon
   $('#'+column_name+'_icon').html('<span class="glyphicon glyphicon-triangle-top"></span>');
  }
  $('#hidden_column_name').val(column_name);
  $('#hidden_sort_type').val(reverse_order);
  var page = $('#hidden_page').val();
  var query = $('#serach').val();
  fetch_data(page, reverse_order, column_name, query);
 });

 $(document).on('click', '.pagination a', function(event){
  event.preventDefault();
  var page = $(this).attr('href').split('page=')[1];
  $('#hidden_page').val(page);
  var column_name = $('#hidden_column_name').val();
  var sort_type = $('#hidden_sort_type').val();

  var query = $('#serach').val();

  $('li').removeClass('active');
        $(this).parent().addClass('active');
  fetch_data(page, sort_type, column_name, query);
 });

});
</script>


resources/views/pagination_data.blade.php

                                               @foreach($data as $row)
      <tr>
       <td>{{ $row->id}}</td>
       <td>{{ $row->post_title }}</td>
       <td>{{ $row->post_description }}</td>
      </tr>
      @endforeach
      <tr>
       <td colspan="3" align="center">
        {!! $data->links() !!}
       </td>
      </tr>


Step 5 - Set Route


Lastly we have to set route for controller and method which we have make under controller. For this we have to go to routes/web.php file and write following code for set route.


<?php

Route::get('/pagination', 'PaginationController@index');

Route::get('/pagination/fetch_data', 'PaginationController@fetch_data');

?>


Once you have completely follow this step then you can make data sorting and pagination in Laravel with Ajax. For run laravel application, you have to run following command.


php artisan serve


After run this command, then you will receive message like Laravel server has been start with this link - http://localhost:8000/. For run this application you have to type following link in your browser.


http://localhost:8000/pagination


Wednesday, 14 November 2018

How to Store Multiple Images in Database using PHP Ajax


In Web development file or image upload is a very required feature. There are many ways we can store images. One we can upload image on server and store image name in Mysql database using PHP. In another way we can directly store images in Mysql database table using PHP also. There are many post we have publish on upload single image or multiple images on server and store image details in database using PHP. But in this post we have convered one advance topic like how to insert multiple image in mysql database using PHP with Ajax.

In one of our previous post we have step by step describe how to insert and fetch images from Mysql database using PHP. But in that post we have use only PHP script for insert image into mysql database and then after fetch images from Mysql database and display on web page using PHP. But here we have make one form with option like select multiple images at the same time and by using jQuery Ajax send that images data to PHP. In PHP script it will convert image into binary string format and insert into Mysql database one by one. After inserting multiple images into Mysql database, now we want to retrieve images from mysql database and display on web page. For this also we have use jQuery and Ajax function which send request to PHP, at PHP script that fetch data from mysql table and convert that data into html format and send back to ajax request. Now we have discuss source of How to Upload Multiple Images in Database using PHP Ajax.


Mysql Database


Run following SQL script into your phpMyadmin, this script will make tbl_images table into your database.


--
-- Database: `testing`
--

-- --------------------------------------------------------

--
-- Table structure for table `tbl_images`
--

CREATE TABLE `tbl_images` (
  `image_id` int(11) NOT NULL,
  `images` longblob NOT NULL
) ENGINE=InnoDB DEFAULT CHARSET=latin1;

--
-- Indexes for dumped tables
--

--
-- Indexes for table `tbl_images`
--
ALTER TABLE `tbl_images`
  ADD PRIMARY KEY (`image_id`);

--
-- AUTO_INCREMENT for dumped tables
--

--
-- AUTO_INCREMENT for table `tbl_images`
--
ALTER TABLE `tbl_images`
  MODIFY `image_id` int(11) NOT NULL AUTO_INCREMENT;


database_connection.php


This PHP script will make Mysql database connection.


<?php

//database_connection.php

$connect = new PDO("mysql:host=localhost;dbname=testing", "root", "");

?>


index.php


This index file of this source code in this file you can find following things.

  • HTML form for select multiple images from local computer space with image selection validation.
  • jQuery script for submit form data to PHP script using Ajax.
  • Selected image has been send to PHP script using new FormData() object.
  • Ajax script send request for images and display on web page.


<!DOCTYPE html>  
<html>  
    <head>  
        <title>Webslesson Tutorial | Insert Multiple Images into Mysql Database using PHP</title>  
        <script src="https://ajax.googleapis.com/ajax/libs/jquery/2.2.0/jquery.min.js"></script>  
        <link rel="stylesheet" href="https://maxcdn.bootstrapcdn.com/bootstrap/3.3.6/css/bootstrap.min.css" />  
        <script src="https://maxcdn.bootstrapcdn.com/bootstrap/3.3.6/js/bootstrap.min.js"></script>  
    </head>  
    <body>  
        <br /><br />  
        <div class="container">  
   <h3 align="center">Insert Multiple Images into Mysql Database using PHP</h3>  
            <br />  
            <form method="post" id="upload_multiple_images" enctype="multipart/form-data">
                <input type="file" name="image[]" id="image" multiple accept=".jpg, .png, .gif" />
                <br />
                <input type="submit" name="insert" id="insert" value="Insert" class="btn btn-info" />
            </form>
            <br />  
            <br />
   
            <div id="images_list"></div>
            
        </div>  
    </body>  
</html>  
<script>  
$(document).ready(function(){

    load_images();

    function load_images()
    {
        $.ajax({
            url:"fetch_images.php",
            success:function(data)
            {
                $('#images_list').html(data);
            }
        });
    }
 
    $('#upload_multiple_images').on('submit', function(event){
        event.preventDefault();
        var image_name = $('#image').val();
        if(image_name == '')
        {
            alert("Please Select Image");
            return false;
        }
        else
        {
            $.ajax({
                url:"insert.php",
                method:"POST",
                data: new FormData(this),
                contentType:false,
                cache:false,
                processData:false,
                success:function(data)
                {
                    $('#image').val('');
                    load_images();
                }
            });
        }
    });
 
});  
</script>


insert.php


This insert.php file, in this file you can find PHP script for Insert Multiple images into Mysql database. This file has received ajax request for insert multiple file into Mysql database. First, this script check there is any image file has been received or not, if received then it will check how many image insert has been received. After this this PHP script insert images into Mysql database. Before insert imag into mysql database, first it has convert into binary string format using file_get_contents() function and then at it has make insert query and run insert query and store multiple images into mysql database.


<?php

//insert.php

include('database_connection.php');

if(count($_FILES["image"]["tmp_name"]) > 0)
{
 for($count = 0; $count < count($_FILES["image"]["tmp_name"]); $count++)
 {
  $image_file = addslashes(file_get_contents($_FILES["image"]["tmp_name"][$count]));
  $query = "INSERT INTO tbl_images(images) VALUES ('$image_file')";
  $statement = $connect->prepare($query);
  $statement->execute();
 }
}


?>


fetch_images.php


This PHP script received Ajax request for retrieve images from Mysql database. This PHP script retrieve images from Mysql database and after this convert into HTML format and send to Ajax request. For convert binary string to images, here we have use base64_encode() function.


<?php

//fetch_images.php

include('database_connection.php');

$query = "SELECT * FROM tbl_images ORDER BY image_id DESC";

$statement = $connect->prepare($query);

$output = '<div class="row">';

if($statement->execute())
{
 $result = $statement->fetchAll();

 foreach($result as $row)
 {
  $output .= '
  <div class="col-md-2" style="margin-bottom:16px;">
   <img src="data:image/jpeg;base64,'.base64_encode($row['images'] ).'" class="img-thumbnail" />
  </div>
  ';
 }
}

$output .= '</div>';

echo $output;

?>

Monday, 5 November 2018

Shopping Cart with Add Bulk Item into Cart using PHP Ajax


If you have seen eCommerce Website or Online stores sites, If it is user friendly, then it will increase conversion and websites usability. One small feature of your website will stand you top and it will convert into profitability. This is because all revenue of your website comes from buyer or users of websites, If your online shopping cart has some feature that are very useful to user and user friendly, user can easily understand and it's decrease user efforts for place an order on your website, then your website revenue will jump to high. For this we have to give some features to our shopping cart and decrease the flow of process, so buyer can easily use our website. For this here we have discuss one features for shopping cart, which will decrease Buyers efforts for place an order, an that feature is add multiple or bulk item into Shopping cart.

Now question arise how can buyer can add bulk or multiple product into his Shopping cart by single click. Here we will make simple script using PHP with Ajax in which we have step by step describe how user can add bulk product into Shopping cart by single click. For this we have use use Checkbox selection, by checkboxes user can select multiple item which he want to add into cart, once all item has been selected, then he can click on Add to cart button. Once he has click on add to cart button, all selected item will be added into his cart. This feature will improve our shopping cart output, before we have to click on single item add to cart button, then that product will be added into cart. For multiple product add into cart we have to click multiple time Add to cart button for add multiple product into Shopping cart. But this type of functionality will decrease the click on Add to cart button, and in single click all item has been added into Shopping Cart.

Add multiple or Bulk product into Shopping Cart using PHP with Ajax we are make here. In this post first we will load all product details from Mysql database and display on web page using Ajax request with PHP script. On product load, you can find checkbox selection for select multiple item. After this we have use PHP with Ajax for display shopping cart details. Here we have use PHP SESSION variable for store shopping cart details. So, this shopping cart detail we can fetch all pages of website and this details will not be remove on accidental page refresh. By Ajax with PHP script, it will fetch shopping cart details for SESSION variable and display on web page with single item remove button and clear shopping cart button. Buyer can select multiple or Bulk item for add into his cart. Once all item has been selected then all he can click on Add to cart button, and all item added into cart. If same item has been again add into cart, then that item quantity will be automatically increase. Here user can remove single item or all item from shopping cart. So, this is simple tutorial on Shopping cart with Add multiple product into Cart using PHP with Ajax. Below you can find complete source code of this tutorial.


Source Code


Database


--
-- Database: `test`
--

-- --------------------------------------------------------

--
-- Table structure for table `tbl_product`
--

CREATE TABLE IF NOT EXISTS `tbl_product` (
  `id` int(11) NOT NULL AUTO_INCREMENT,
  `name` varchar(255) NOT NULL,
  `image` varchar(255) NOT NULL,
  `price` double(10,2) NOT NULL,
  PRIMARY KEY (`id`)
) ENGINE=MyISAM  DEFAULT CHARSET=latin1 AUTO_INCREMENT=10 ;

--
-- Dumping data for table `tbl_product`
--

INSERT INTO `tbl_product` (`id`, `name`, `image`, `price`) VALUES
(1, 'Samsung J2 Pro', '1.jpg', 100.00),
(2, 'HP Notebook', '2.jpg', 299.00),
(3, 'Panasonic T44 Lite', '3.jpg', 125.00);


index.php


<?php
//index.php
?>
<!DOCTYPE html>
<html>
 <head>
  <title>PHP Ajax Shopping Cart by using Bootstrap Popover</title>
  <script src="https://ajax.googleapis.com/ajax/libs/jquery/2.2.0/jquery.min.js"></script>
  <link rel="stylesheet" href="https://maxcdn.bootstrapcdn.com/bootstrap/3.3.6/css/bootstrap.min.css" />
  <script src="https://maxcdn.bootstrapcdn.com/bootstrap/3.3.6/js/bootstrap.min.js"></script>
  <style>
  .popover
  {
      width: 100%;
      max-width: 800px;
  }
  </style>
 </head>
 <body>
  <div class="container">
   <br />
   <h3 align="center"><a href="#">PHP Ajax Shopping Cart with Add Multiple Item into Cart</a></h3>
   <br />
   
   <div class="panel panel-default">
    <div class="panel-heading">
     <div class="row">
      <div class="col-md-6">Cart Details</div>
      <div class="col-md-6" align="right">
       <button type="button" name="clear_cart" id="clear_cart" class="btn btn-warning btn-xs">Clear</button>
      </div>
     </div>
    </div>
    <div class="panel-body" id="shopping_cart">

    </div>
   </div>

   <div class="panel panel-default">
    <div class="panel-heading">
     <div class="row">
      <div class="col-md-6">Product List</div>
      <div class="col-md-6" align="right">
       <button type="button" name="add_to_cart" id="add_to_cart" class="btn btn-success btn-xs">Add to Cart</button>
      </div>
     </div>
    </div>
    <div class="panel-body" id="display_item">

    </div>
   </div>
  </div>
 </body>
</html>

<script>  
$(document).ready(function(){

 load_product();

 load_cart_data();
    
 function load_product()
 {
  $.ajax({
   url:"fetch_item.php",
   method:"POST",
   success:function(data)
   {
    $('#display_item').html(data);
   }
  });
 }

 function load_cart_data()
 {
  $.ajax({
   url:"fetch_cart.php",
   method:"POST",
   success:function(data)
   {
    $('#shopping_cart').html(data);
   }
  });
 }

 $(document).on('click', '.select_product', function(){
  var product_id = $(this).data('product_id');
  if($(this).prop('checked') == true)
  {
   $('#product_'+product_id).css('background-color', '#f1f1f1');
   $('#product_'+product_id).css('border-color', '#333');
  }
  else
  {
   $('#product_'+product_id).css('background-color', 'transparent');
   $('#product_'+product_id).css('border-color', '#ccc');
  }
 });

 $('#add_to_cart').click(function(){
  var product_id = [];
  var product_name = [];
  var product_price = [];
  var action = "add";
  $('.select_product').each(function(){
   if($(this).prop('checked') == true)
   {
    product_id.push($(this).data('product_id'));
    product_name.push($(this).data('product_name'));
    product_price.push($(this).data('product_price'));
   }
  });

  if(product_id.length > 0)
  {
   $.ajax({
    url:"action.php",
    method:"POST",
    data:{product_id:product_id, product_name:product_name, product_price:product_price, action:action},
    success:function(data)
    {
     $('.select_product').each(function(){
      if($(this).prop('checked') == true)
      {
       $(this).attr('checked', false);
       var temp_product_id = $(this).data('product_id');
       $('#product_'+temp_product_id).css('background-color', 'transparent');
       $('#product_'+temp_product_id).css('border-color', '#ccc');
      }
     });

     load_cart_data();
     alert("Item has been Added into Cart");
    }
   });
  }
  else
  {
   alert('Select atleast one item');
  }

 });

 $(document).on('click', '.delete', function(){
  var product_id = $(this).attr("id");
  var action = 'remove';
  if(confirm("Are you sure you want to remove this product?"))
  {
   $.ajax({
    url:"action.php",
    method:"POST",
    data:{product_id:product_id, action:action},
    success:function()
    {
     load_cart_data();
     alert("Item has been removed from Cart");
    }
   })
  }
  else
  {
   return false;
  }
 });

 $(document).on('click', '#clear_cart', function(){
  var action = 'empty';
  $.ajax({
   url:"action.php",
   method:"POST",
   data:{action:action},
   success:function()
   {
    load_cart_data();
    alert("Your Cart has been clear");
   }
  });
 });
    
});

</script>


database_connection.php


<?php

//database_connection.php

$connect = new PDO("mysql:host=localhost;dbname=test", "root", "");

?>


fetch_item.php


<?php

//fetch_item.php

include('database_connection.php');

$query = "SELECT * FROM tbl_product ORDER BY id DESC";

$statement = $connect->prepare($query);

if($statement->execute())
{
 $result = $statement->fetchAll();
 $output = '';
 foreach($result as $row)
 {
  $output .= '
  <div class="col-md-3" style="margin-top:12px;margin-bottom:12px;">  
            <div style="border:1px solid #ccc; border-radius:5px; padding:16px; height:300px;" align="center" id="product_'.$row["id"].'">
             <img src="images/'.$row["image"].'" class="img-responsive" /><br />
             <h4 class="text-info">
                        <div class="checkbox">
                              <label><input type="checkbox" class="select_product" data-product_id="'.$row["id"].'" data-product_name="'.$row["name"].'" data-product_price="'.$row["price"] .'" value="">'.$row["name"].'</label>
                        </div>
                  </h4>
             <h4 class="text-danger">$ '.$row["price"] .'</h4>
            </div>
        </div>
  ';
 }
 echo $output;
}

/*$output = '
<div class="col-md-3" style="margin-top:12px;">  
      <div style="border:1px solid #333; background-color:#f1f1f1; border-radius:5px; padding:16px; height:350px;" align="center">
            <img src="https://image.ibb.co/jSR5Mn/1.jpg" class="img-responsive"><br>
            <h4 class="text-info">Samsung J2 Pro</h4>
            <h4 class="text-danger">$ 100.00</h4>
            <input type="text" name="quantity" id="quantity1" class="form-control" value="1">
            <input type="hidden" name="hidden_name" id="name1" value="Samsung J2 Pro">
            <input type="hidden" name="hidden_price" id="price1" value="100.00">
            <input type="button" name="add_to_cart" id="1" style="margin-top:5px;" class="btn btn-success form-control add_to_cart" value="Add to Cart">
      </div>
</div>
            
            
            <div class="col-md-3" style="margin-top:12px;">  
            <div style="border:1px solid #333; background-color:#f1f1f1; border-radius:5px; padding:16px; height:350px;" align="center">
                  <img src="https://image.ibb.co/mt5zgn/3.jpg" class="img-responsive"><br>
                  <h4 class="text-info">Panasonic T44 Lite</h4>
                  <h4 class="text-danger">$ 125.00</h4>
                  <input type="text" name="quantity" id="quantity3" class="form-control" value="1">
                  <input type="hidden" name="hidden_name" id="name3" value="Panasonic T44 Lite">
                  <input type="hidden" name="hidden_price" id="price3" value="125.00">
                  <input type="button" name="add_to_cart" id="3" style="margin-top:5px;" class="btn btn-success form-control add_to_cart" value="Add to Cart">
            </div>
        </div>
            
            
            <div class="col-md-3" style="margin-top:12px;">  
            <div style="border:1px solid #333; background-color:#f1f1f1; border-radius:5px; padding:16px; height:350px;" align="center">
                  <img src="https://image.ibb.co/b57C1n/2.jpg" class="img-responsive"><br>
                  <h4 class="text-info">HP Notebook</h4>
                  <h4 class="text-danger">$ 299.00</h4>
                  <input type="text" name="quantity" id="quantity2" class="form-control" value="1">
                  <input type="hidden" name="hidden_name" id="name2" value="HP Notebook">
                  <input type="hidden" name="hidden_price" id="price2" value="299.00">
                  <input type="button" name="add_to_cart" id="2" style="margin-top:5px;" class="btn btn-success form-control add_to_cart" value="Add to Cart">
            </div>
        </div><div class="col-md-3" style="margin-top:12px;">  
            <div style="border:1px solid #333; background-color:#f1f1f1; border-radius:5px; padding:16px; height:350px;" align="center">
                  <img src="https://image.ibb.co/eDhqnS/4.jpg" class="img-responsive"><br>
                  <h4 class="text-info">Wrist Watch</h4>
                  <h4 class="text-danger">$ 85.00</h4>
                  <input type="text" name="quantity" id="quantity4" class="form-control" value="1">
                  <input type="hidden" name="hidden_name" id="name4" value="Wrist Watch">
                  <input type="hidden" name="hidden_price" id="price4" value="85.00">
                  <input type="button" name="add_to_cart" id="4" style="margin-top:5px;" class="btn btn-success form-control add_to_cart" value="Add to Cart">
            </div>
        </div>
';

echo $output;*/

?>


fetch_cart.php


<?php

//fetch_cart.php

session_start();

$total_price = 0;
$total_item = 0;

$output = '
<div class="table-responsive" id="order_table">
 <table class="table table-bordered table-striped">
  <tr>  
            <th width="40%">Product Name</th>  
            <th width="10%">Quantity</th>  
            <th width="20%">Price</th>  
            <th width="15%">Total</th>  
            <th width="5%">Action</th>  
        </tr>
';
if(!empty($_SESSION["shopping_cart"]))
{
 foreach($_SESSION["shopping_cart"] as $keys => $values)
 {
  $output .= '
  <tr>
   <td>'.$values["product_name"].'</td>
   <td>'.$values["product_quantity"].'</td>
   <td align="right">$ '.$values["product_price"].'</td>
   <td align="right">$ '.number_format($values["product_quantity"] * $values["product_price"], 2).'</td>
   <td><button name="delete" class="btn btn-danger btn-xs delete" id="'. $values["product_id"].'">Remove</button></td>
  </tr>
  ';
  $total_price = $total_price + ($values["product_quantity"] * $values["product_price"]);
  //$total_item = $total_item + 1;
 }
 $output .= '
 <tr>  
        <td colspan="3" align="right">Total</td>  
        <td align="right">$ '.number_format($total_price, 2).'</td>  
        <td></td>  
    </tr>
 ';
}
else
{
 $output .= '
    <tr>
     <td colspan="5" align="center">
      Your Cart is Empty!
     </td>
    </tr>
    ';
}
$output .= '</table></div>';

echo $output;
//echo '<pre>';
//print_r($_SESSION["shopping_cart"]);
//echo '</pre>';


?>


action.php


<?php

//action.php

session_start();

if(isset($_POST["action"]))
{
 if($_POST["action"] == "add")
 {
  $product_id = $_POST["product_id"];
  $product_name = $_POST["product_name"];
  $product_price = $_POST["product_price"];
  for($count = 0; $count < count($product_id); $count++)
  {
   $cart_product_id = array_keys($_SESSION["shopping_cart"]);
   if(in_array($product_id[$count], $cart_product_id))
   {
    $_SESSION["shopping_cart"][$product_id[$count]]['product_quantity']++;
   }
   else
   {
    $item_array = array(
     'product_id'               =>     $product_id[$count],  
     'product_name'             =>     $product_name[$count],
     'product_price'            =>     $product_price[$count],
     'product_quantity'         =>     1
    );

    $_SESSION["shopping_cart"][$product_id[$count]] = $item_array;

    
   }
  }
 }

 if($_POST["action"] == 'remove')
 {
  foreach($_SESSION["shopping_cart"] as $keys => $values)
  {
   if($values["product_id"] == $_POST["product_id"])
   {
    unset($_SESSION["shopping_cart"][$keys]);
   }
  }
 }
 if($_POST["action"] == 'empty')
 {
  unset($_SESSION["shopping_cart"]);
 }
}

?>